12V/LV Power (Disconnect and Connect)
- 2026-07-16: Added LV measurement at ancillary bay for Model Y Structural Pack
- 2026-01-26: Deleted steps for Model Y with Lead Acid battery to disconnect the electrical harness to the high voltage controller.
- 2025-10-30: Added a caution to make sure windows are not moved for at least 1 minute before disconnecting the 12V/LV power.
- 2025-10-16: Added additional info for disconnecting and connecting 16V Li-ion battery.
- 2024-01-19: Added info for different Li-Ion battery types.
- 2023-10-4: Added step to disconnect charge cable in Li-Ion disconnect section.
- Model Y with Lead Acid Battery: Correction code17010200, 0.12
- Model Y with Li-Ion Battery: Correction code17010410, 0.12
NOTE: Unless otherwise explicitly stated in the procedure, the above correction code and FRT reflect all of the work required to perform this procedure, including the linked procedures. Do not stack correction codes unless explicitly told to do so. NOTE: See Flat Rate Times to learn more about FRTs and how they are created. NOTE: See Personal Protection to make sure wearing proper PPE when performing the below procedure. NOTE: See Ergonomic Precautions for safe and healthy working practices.
Torque Specifications
| Description | Torque Value | Recommended Tools | Reuse/Replace | Notes |
|---|---|---|---|---|
| (Lead acid) positive/negative cable to the battery terminal |
 6 Nm (4.4 lbs-ft) |
|
Reuse |
Disconnect (Model Y with Lead Acid Battery)
-
Warning
Prepare for these conditions before disconnecting 12V power:
-
Closed windows might shatter if the door is opened.
-
Closed doors might cause a lockout condition.
-
Airbags do not deploy.
-
Systems, displays, and other controls are off.
-
- Disconnect any charging cable.
- On the touchscreen, power off the climate control system, and wait at least 30 seconds for the climate control system to completely shut down.
- Make sure the vehicle is in Park.
- Open all doors and lower the windows.
- Open the LH and RH rear doors, and then pass a shop towel halfway through each door striker to prevent the latch from securing.
- Remove the 2nd row lower seat cushion. See Seat Cushion - Lower - 2nd Row (Remove and Replace).
- Remove the rear underhood apron. See Underhood Apron - Rear (Remove and Replace).
- If the vehicle is equipped with HEPA filters, remove the HEPA filter assembly. See Assembly - Filter - HEPA (Remove and Install).
-
On the touchscreen, touch
.
CAUTIONDo not proceed until the climate control system has been powered off for at least 30 seconds. Do not disconnect 12V power while the climate control system is operational.
-
Loosen the nut that attaches the 12V battery negative cable to the battery, and then disconnect the cable from the battery.
CAUTIONDisconnect 12V battery negative cable before disconnecting the first responder loop.
-
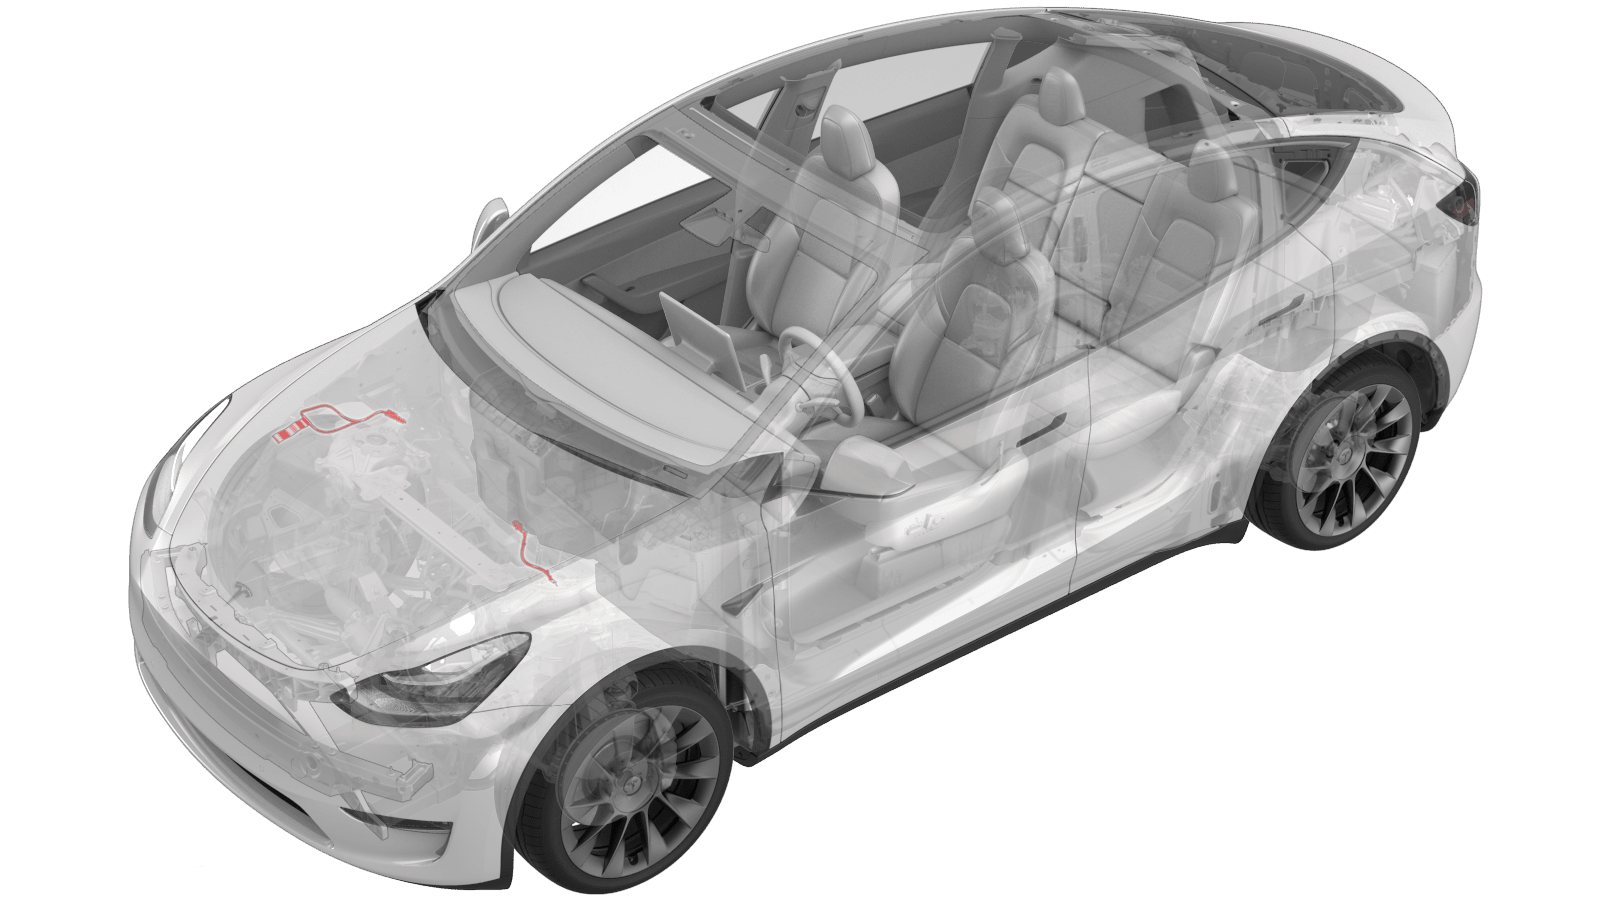
Locate the first responder loop near the top of the RH shock tower.
- Slide the red locking tab back, press the black tab, and then disconnect the first responder loop.
-
Set the multimeter to
measure DC voltage, and then measure the voltage across the 12V auxiliary
battery terminals.
CAUTIONIf the voltage measured is less than 10 volts or greater than 14 Volts, the multimeter is not measuring reliably and must not be used.
-
Measure the voltage at the LV busbar
at the ancillary bay.
NoteMeasure voltage at the DC passthrough. If the measured voltage is <1V, continue. If the measured voltage is >10V, wait 2 minutes for the 12V/LV system to drain, and then remeasure. If the voltage is still >10V, the LV system is still up;. Escalate for assistance as the PCS is still supporting the Low Voltage system.
- If 12V power was disconnected to service a high voltage component, verify that high voltage power is no longer available to that component. See Vehicle HV Disablement Procedure.
Disconnect (Li-Ion)
- Disconnect any charging cable.
- Open all doors and lower the windows.
- Open the LH and RH rear doors, and then pass a shop towel halfway through each door striker to prevent the latch from securing.
- Power off the vehicle from the center display.
- Remove the rear apron. See Underhood Apron - Rear (Remove and Replace).
- Remove the HEPA filter. See Assembly - Filter - HEPA (Remove and Replace).
-
Disconnect the LV battery
connector from the LV battery.
- Release the green locking tab, pull the black connector lock
outwards to release the connector, and then pull up to disconnect the
connector.
-
- Release the green
locking tab by pulling it outwards (1).
- Press the black locking tab numbered as "1" (2A), and then pull
the black connector lock outwards (2B).
- Press the black locking tab numbered as "2" (3A), and then pull
the black connector lock even further outwards (3B) to fully
release the connector.
- Pull the connector upwards to release it from the LV battery.
- Release the green
locking tab by pulling it outwards (1).
- Release the green locking tab, pull the black connector lock
outwards to release the connector, and then pull up to disconnect the
connector.
-
Disconnect the first
responder loop.
NoteBefore proceeding to service the vehicle, allow 2 minutes for all electrical circuits to discharge.
-
Set the multimeter to
measure voltage, and then measure the across the 12V/LV auxiliary battery
terminals.
NoteIf the voltage across the battery terminals is 0, the battery may have switched off internally. Use a 12V Lead Acid battery for testing. For mobile technicians: use the 12V Lead Acid battery in the Mobile Service vehicle.CAUTIONIf the voltage across the battery terminals is less than 13 volts or greater than 16 volts, the multimeter is not measuring reliably and must not be used.
-
If installed, remove the
foam cover from the RH side of the ancillary bay.
-
Disconnect the electrical
harness from the high voltage controller connector.
NoteThe HV battery positive contactor and negative contactor open with a clunk sound.
-
Install the logic connector
cap onto the high voltage controller connector to prevent mistaken
reconnection and protect the connector.
- For Model Y Structural pack, skip to step 16.
-
Measure the voltage at the LV busbar
at the ancillary bay.
NoteMeasure voltage at the DC passthrough. If the measured voltage is <1V, continue. If the measured voltage is >10V, wait 2 minutes for the 12V/LV system to drain, and then remeasure. If the voltage is still >10V, the LV system is still up;. Escalate for assistance as the PCS is still supporting the Low Voltage system.
- Continue at step 18
-
Model Y Structural Pack:
disconnect the LV power connector to the HV battery.
-
Measure the voltage at the
DC passthrough. Measure the voltage at both the HV battery connector and the
DCDC inline connector.
NoteIf the measured voltage is <1V, continue. If the measured voltage is >10V, wait 2 minutes for the 12V/LV system to drain, and then remeasure. If the voltage is still >10V, the LV system is still up. Escalate for assistance as the PCS is still supporting the Low Voltage system.
- If LV power was disconnected to service a high voltage component, verify that high voltage power is no longer available to that component. See Vehicle HV Disablement Procedure.
Connect (Model Y with Lead Acid Battery)
- Install the 2nd row lower seat cushion. See Seat Cushion - Lower - 2nd Row (Remove and Replace).
-
Connect the first responder loop, and then slide the red locking tab forward to lock the connector.
CAUTIONDo not reconnect the 12V negative terminal until the first responder loop is connected.
- Connect the 12V battery negative cable to the battery, press down to firmly seat the terminal clamp onto the battery post.
-
Install the nut that
attaches the clamp to the post.6 Nm (4.4 lbs-ft)
- Install the rear underhood apron. See Underhood Apron - Rear (Remove and Replace).
- Press the brake pedal to turn on vehicle power.
- Remove the shop towels from the rear door strikers.
- Return the windows, seats, climate control, audio, and charging to the state before service.
- Close all doors.
Connect (Li-Ion)
-
Remove the logic connector
cap from the high voltage controller connector.
-
Connect the electrical
harness to the high voltage controller connector.
-
Install the foam cover to
the RH side of the ancillary bay.
-
Model Y Structural Pack: Connect the LV power connector to the HV
battery.
- Install the 2nd row lower seat cushion. See Seat Cushion - Lower - 2nd Row (Remove and Replace).
-
Connect the first responder
loop.
CAUTIONConnect the first responder loop BEFORE connecting the LV battery connector.
-
Connect the LV battery
connector to the LV battery.
- Insert the connector, then push the black connector lock inwards to
engage the connector, and then seat the green locking tab to secure the
connector.
-
- Connect the connector to the LV battery (1).
- Push the black connector lock fully inwards (2).
- Push the green locking tab inwards (3) to lock the connector.
- Connect the connector to the LV battery (1).
- Insert the connector, then push the black connector lock inwards to
engage the connector, and then seat the green locking tab to secure the
connector.
- Install the HEPA filter. See Assembly - Filter - HEPA (Remove and Replace).
- Install the rear apron. See Underhood Apron - Rear (Remove and Replace).
- Remove the shop towels from the rear door strikers.
- Return the windows, seats, climate control, audio, and charging to the state before service.
- Close all doors.