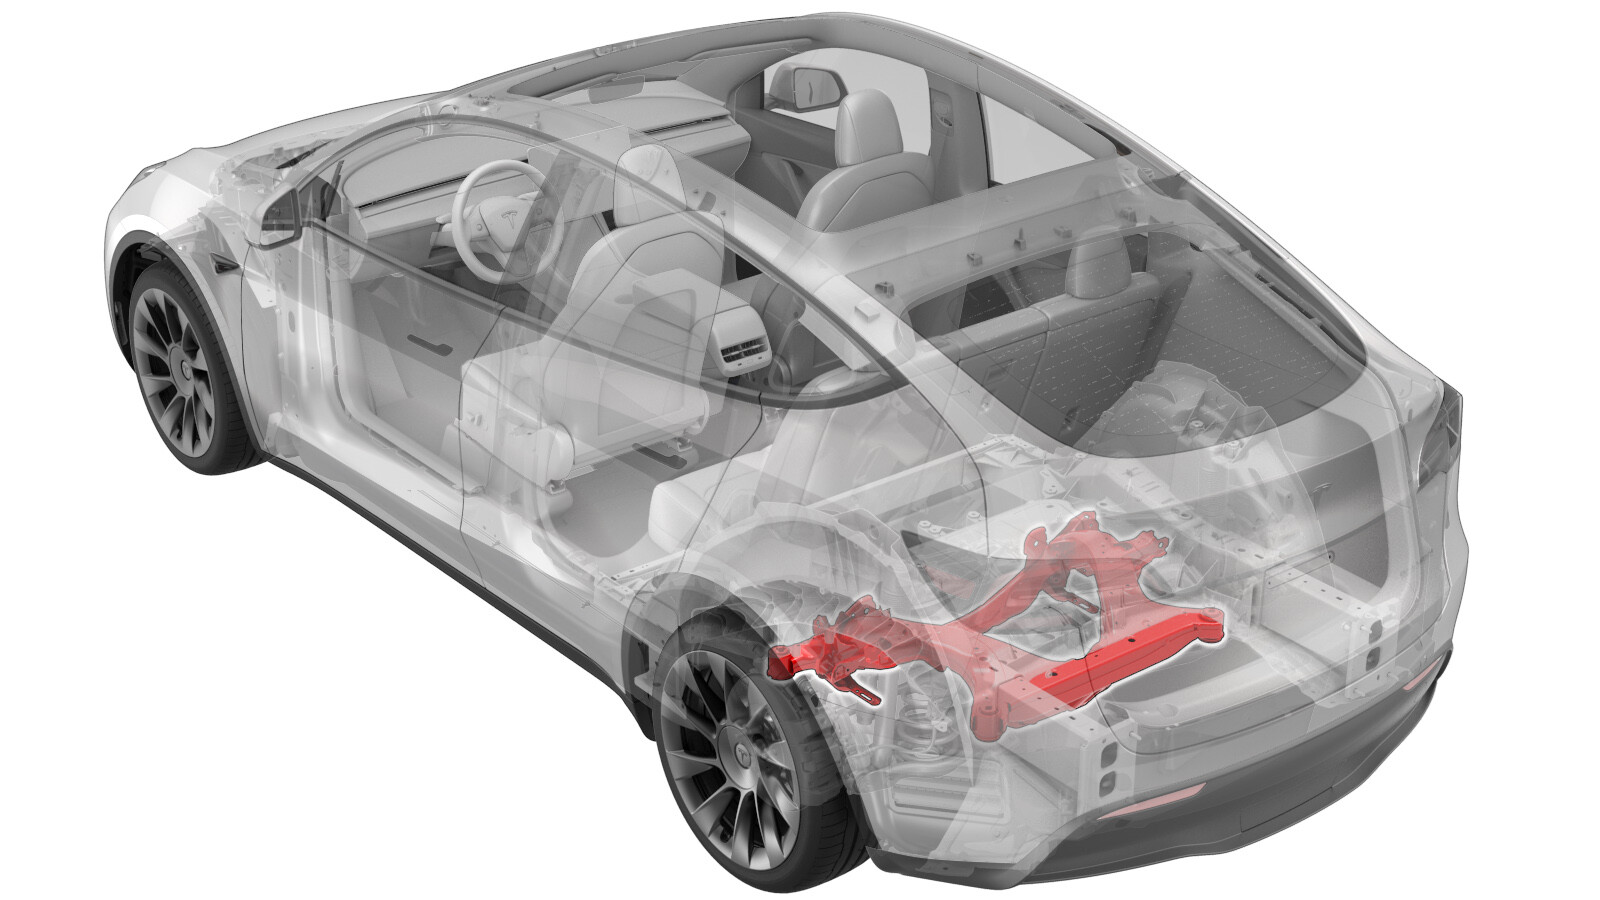
Subframe Assembly - Rear (Remove and Replace)
 Correction code
30010202
4.08
NOTE: Unless otherwise explicitly
stated in the procedure, the above correction code and FRT reflect all of the work
required to perform this procedure, including the linked procedures. Do not stack correction codes unless
explicitly told to do so.
NOTE: See Flat Rate
Times to learn more about FRTs and how they are created.
NOTE: See Personal Protection to make sure wearing proper PPE when
performing the below procedure. NOTE: See Ergonomic Precautions for safe and healthy working
practices.
Correction code
30010202
4.08
NOTE: Unless otherwise explicitly
stated in the procedure, the above correction code and FRT reflect all of the work
required to perform this procedure, including the linked procedures. Do not stack correction codes unless
explicitly told to do so.
NOTE: See Flat Rate
Times to learn more about FRTs and how they are created.
NOTE: See Personal Protection to make sure wearing proper PPE when
performing the below procedure. NOTE: See Ergonomic Precautions for safe and healthy working
practices.
- 2026-04-21: Updated the LH/RH suspension assembly removal method.
- 2026-02-13: Switched sequence of EPB Service Mode and Thermal Fill/Drain routines.
- 2023-10-25: Updated torque figure for rear upper fore link to knuckle and subframe from 76 Nm to 84 Nm.
- 2023-08-25: Updated EPB Service Mode reference.
- 2023-06-15: Added shear plate small bolts torque figure for Structural Pack vehicles.
Equipment:
- 1099645-00-B Fixture, Subframe, Model 3
- 1130279-00-A Lifting Sling, Drive Unit, Model 3 (NA, APAC)
- 1130481-00-A Adapter, Subframe, Body Shop, Model 3
- 1096075-00-A Tool, Hub Puller, Hydraulic
- 1498673-00-A KIT, CABLE AXLE REMOVER, MS/MX/M3
- 1140311-00-A Lever Lock, HV Connector, Model 3
Torque Specifications
| Description | Torque Value | Recommended Tools | Reuse/Replace | Notes |
|---|---|---|---|---|
| Bolts that attach the LH/RH rear damper at the top mount |
 41 Nm (30.2 lbs-ft) |
|
Reuse | |
|
Bolt and nut that attach the LH rear damper assembly to the LH rear lower aft link Bolt and nut that attaches the LH rear lower aft link to the knuckle Bolt and nut that attach the LH rear lower aft link to the subframe |
115 Nm (84.8 lbs-ft) |
|
Reuse | |
| Bolts that attach the LH/RH rear rotor to the LH/RH rear hub |
5 Nm (3.7 lbs-ft) |
|
Reuse | |
| Nut that attaches the end link to the stabilizer bar |
55 Nm (40.6 lbs-ft) |
|
Replace | 1111542-00-A |
|
Bolt and nut that attach the LH rear lower fore link to the knuckle Bolt and nut that attach the LH/RH rear lower fore link to the subframe |
76 Nm (56.0 lbs-ft) |
|
Reuse | |
|
Bolt and nut that attaches the LH/RH rear upper aft link to the subframe |
134 Nm (98.8 lbs-ft) |
|
Reuse |
Note The bolt and nut
will be tightened to specification during the Four Wheel Alignment
(Check and Adjust) at the end of the Front Subframe Assembly (Remove
and Install) procedure. |
|
Bolt and nut that attaches the LH rear upper fore link to the subframe |
84 Nm (61.9 lbs-ft) |
|
Reuse | |
| Nut that attaches the rear drive unit ground strap to the body |
10 Nm (7.4 lbs-ft) |
|
Reuse | |
| Nut that attaches the HV battery to rear drive unit harness bracket to the HV battery |
10 Nm (7.4 lbs-ft) |
|
Reuse | |
| Smaller bolts that attach the LH and RH shear plates to the vehicle (non-Structural Pack vehicles) |
35 Nm (25.8 lbs-ft) |
|
Reuse | |
| Smaller bolts that attach the LH shear plate to the HV battery (Structural Pack vehicles) |
62 Nm (45.7 lbs-ft) |
|
Reuse | |
| Larger bolts that attach the LH and RH shear plates to the vehicle |
130 Nm (95.9 lbs-ft) |
|
Replace | 1461657-00-A |
| Bolts that attach the LH and RH of the rear subframe to the body |
165 Nm (121.7 lbs-ft) |
|
Replace | 1461657-00-A |
| Bolt that attaches the rear drive unit HV harness bracket to the rear drive unit |
6 Nm (4.4 lbs-ft) |
|
Reuse | |
|
Bolt that attaches the LH/RH mount of the rear drive unit to the rear subframe Bolt that attaches the rear of the rear drive unit to the rear subframe |
80 Nm (59.0 lbs-ft) |
|
Reuse | |
| Bolt and nut that attaches the LH/RH rear toe link to the subframe |
85 Nm (62.7 lbs-ft) |
|
Reuse |
Remove
- Raise and support the vehicle. See Raise Vehicle - 2 Post Lift.
- Open all doors and fully lower all windows.
- Unlock the vehicle gateway. See .
- Perform the following routine using Service Mode or Toolbox (see 0005 - Service Modes): PROC_VCFRONT_X_START-THERMAL-FILL-DRAIN-COOLANTvia Toolbox:(link)
- Enable EPB Service Mode. See Parking Brake - Caliper - Rear - LH (Release)
- Perform the vehicle electrical isolation procedure. See Vehicle HV Disablement Procedure.
- If equipped, remove the LH and RH rear wheel center caps. See Cap - Wheel (Remove and Replace).
-
Loosen the LH and RH rear wheel lug
nuts.
CAUTIONUse only hand tools to remove or install the fasteners. Do not use impact or power tools.CAUTIONUse a 6 point socket. Do not use a 12 point socket or a specialty socket.
- Close all doors.
- Remove the rear fascia diffuser. See Diffuser - Rear Fascia (Remove and Replace).
- Remove the LH and RH rear suspension covers. See Cover - Rear Suspension - LH (Remove and Replace).
- Lower and lock the vehicle at a comfortable working height.
- Remove the LH and RH rear wheels. See Wheel Assembly (Remove and Install).
-
Remove and discard the bolts (x2) that
attach the LH rear brake caliper bracket to the knuckle, and then hang the caliper
bracket on the body with an S-hook. Repeat this step on the RH rear brake caliper.
TIpUse of the following tool(s) is recommended:
- External Torx E18
-
Install a spring compressor onto the
LH rear coil spring.
TIpUse of the following tool(s) is recommended:
- Gedore Spring Compressor
-
Remove the bolts that attach the LH
rear damper at the top mount.
TIpUse of the following tool(s) is recommended:
- 15 mm socket
-
Remove and discard the nut that
attaches the LH rear stabilizer bar end link to the stabilizer bar, and then remove the
bar from the end link.
TIpUse of the following tool(s) is recommended:
- 15 mm socket
- 5 mm hex socket
- 15 mm flex head combination ratcheting wrench
NoteMove the stabilizer up and down as needed to achieve the correct angle for removal. If necessary, use a pry bar for assistance. - Repeat step 14 through step 17 for the RH side of the vehicle.
- Fully raise and lock the vehicle.
- Remove the LH and RH rear wheel arch liners. See Wheel Arch Liner - Rear - LH (Non-Structural Pack) (Remove and Replace).
-
Release the connector lock, and then
disconnect the RH 12V subframe harness connector.
-
Release the clip that attaches the
subframe electrical harness to the body.
-
Release the connector lock, and then
disconnect the LH 12V subframe harness connectors.
-
Release the clip that attaches the LH
subframe electrical harness to the body.
-
Remove the nut that attaches the rear
drive unit ground strap to the body.
TIpUse of the following tool(s) is recommended:
- 10 mm 12-point deep socket
- Remove the rear stabilizer bar. See Stabilizer Bar - Rear (Remove and Replace).
- Remove the rear HV battery skid plate. See Skid Plate - HV Battery - Rear (Remove and Replace).
- Position the coolant drain beneath the LH rear of the HV battery.
-
Disconnect the rear drive unit
inverter inlet hose from the rear of the HV battery, and then plug the male and female
fittings.
- Position the coolant drain container beneath the LH rear drive unit area.
-
Disconnect the coolant inlet hose from
the rear drive unit, and then plug the hose.
- Position the coolant drain container beneath the RH rear of the HV battery.
-
Release the clip and disconnect the
coolant outlet hose to rear powertrain return coupling, and immediately plug the male
and female fittings.
- Remove the coolant drain container from underneath the vehicle.
-
Remove the nut that attaches the HV
battery to rear drive unit harness bracket to the HV battery.
TIpUse of the following tool(s) is recommended:
- 10 mm socket
-
Put on HV insulating gloves, leather outer gloves, and safety glasses.
WarningContinue to wear the gloves until instructed to remove them.
-
Slide the release to unlock the HV
battery rear drive unit connector handle of the rear drive unit to HV battery harness
from the secured position.
-
Fully raise the handle on the HV
battery rear drive unit connector.
- Remove the HV battery rear drive unit connector from the HV battery header.
- Remove the HV insulating gloves and leather outer gloves.
- Position the rear subframe lifting tool beneath the rear subframe.
- Attach an air hose to the rear subframe lifting tool.
- With an assistant, raise the rear subframe lifting tool to support the rear subframe.
-
Loop the straps over the rear
subframe, hook the ends of the straps to the metal rings, and then pull the straps tight
to restrain the subframe to the rear subframe lifting tool.
NoteLower the vehicle to give more slack to connect the straps to the rings, if necessary.
-
Release the fir tree clips that attach
the coolant hoses to the LH shear plate.
-
Remove the smaller bolts that attach
the LH shear plate to the HV battery.
TIpUse of the following tool(s) is recommended:
- 13 mm socket
- 3 in extension
-
Remove and discard the larger bolt
that attaches the LH shear plate and rear subframe to the body, and then remove the LH
shear plate.
TIpUse of the following tool(s) is recommended:
- 21 mm socket
- Repeat step 45 through step 47 for the RH shear plate.
-
Remove and discard the bolts (x2) that
attach the rear subframe to the body.
TIpUse of the following tool(s) is recommended:
- 21 mm socket
-
With an assistant, slowly lower the
rear subframe lifting tool to remove the rear subframe assembly from the vehicle.
CAUTIONAssist with the routing of HV harnesses and coolant hoses through components so that they do not "catch".
- Disconnect the air supply from the rear subframe lifting tool.
- Move the rear subframe assembly and rear subframe lifting tool away from the vehicle.
-
Release the clip that attaches the
rear drive unit inlet hose to the HV harness bracket, and then remove the hose from the
rear subframe assembly.
-
Remove the bolt that attaches the rear
drive unit HV harness bracket to the rear drive unit.
TIpUse of the following tool(s) is recommended:
- 10 mm socket
-
Slide the release to unlock the rear
drive unit HV connector handle of the rear drive unit to HV battery harness from the
secured position.
-
Fully raise the handle on the rear
drive unit HV connector.
- Remove the rear drive unit HV cable from the subframe assembly.
-
Disconnect the electrical harness from
the inverter low voltage connector.
-
Release the clip that attaches the low
voltage electrical harness to the inverter.
-
Release the clips that attach the
resolver electrical harness to the rear drive unit, and then disconnect the electrical
connector.
-
Disconnect the oil pump connector from
the rear drive unit assembly.
- Position the drive unit stand underneath the gantry.
- Attach the drive unit sling tool to the rear drive unit.
- Attach the drive unit sling tool to the gantry.
- Raise the sling tool so that there is a slight tension on the cables.
-
Remove the bolts (x2) that attach the
LH and RH mounts of the rear drive unit to the rear subframe.
TIpUse of the following tool(s) is recommended:
- 18 mm socket
-
Remove the bolt that attaches rear of
the rear drive unit to the rear subframe.
TIpUse of the following tool(s) is recommended:
- 18 mm socket
-
Position the axle remover cable around
the inner joint of the LH rear drive unit halfshaft, and then use a cable tie to hold
the axle remover cable in position.
Figure 1. Axle removed from drive unit for demonstration purposes - Hook the axle remover slide hammer on the 2 axle remover cable loops, and then use the slide hammer to release the halfshaft from the drive unit.
- With assistance, remove the LH rear drive unit halfshaft from the rear drive unit, and then install a halfshaft plug into the opening of the gearbox.
- Repeat step 68 through step 70 on the RH side of the vehicle.
- With assistance, raise the drive unit sling tool to lift the rear drive unit out of the rear subframe.
- Move the subframe and lifting tool from underneath the drive unit.
- Lower the rear drive unit onto a protected surface.
-
With assistance, place a ½ Ton economy
transmission jack under the LH suspension assembly.
NoteAvoid the suspension assembly falling.
-
Remove the bolt and nut that attach
the LH rear upper aft link to the subframe.
TIpUse of the following tool(s) is recommended:
- 21 mm socket
-
Remove the bolt and nut that attach
the LH rear upper fore link to the subframe.
TIpUse of the following tool(s) is recommended:
- 18 mm socket
-
Remove the bolt and nut that attach
the LH rear toe link to the subframe.
TIpUse of the following tool(s) is recommended:
- 18 mm 12-point deep socket
NoteRotate the eccentric bolt to find the correct position for removal. -
Remove the bolt and nut that attach
the LH rear lower fore link to the subframe.
TIpUse of the following tool(s) is recommended:
- 18 mm socket
-
Remove the bolt and nut that attach
the LH rear lower aft link to the subframe.
TIpUse of the following tool(s) is recommended:
- 21 mm socket
-
Release the clip that attaches the LH
rear wheel speed connector to the rear subframe.
-
Disconnect the LH rear wheel speed
connector.
NoteUse mechanical hands to hold the connector end on subframe harness side.
-
Release the clip that attaches the LH
rear wheel speed harness to the rear subframe.
-
With assistance, remove the LH rear
suspension assembly from the vehicle.
- Repeat step 75 through step 84 for the RH side of the subframe assembly.
-
Release the clips that attach the
subframe harness to the bottom of the rear subframe.
-
Release the clips (x9) that attach the
subframe harness to the top of the rear subframe, and then remove the harness from the
subframe.
-
With assistance, release the straps
that secures the subframe to lifting tool, and then remove the subframe from the lifting
tool.
Install
- With assistance, install a new subframe into the lifting tool, and then secure the straps.
-
Install the clips (x9) that attach the
subframe harness to the top of the rear subframe.
-
Install the clips that attach the
subframe harness to the bottom of the rear subframe.
- Move the subframe and lifting tool beneath the drive unit.
-
With assistance, position the LH
suspension assembly onto the rear subframe assembly.
NoteAlign the compliance link to its installation position.
-
Install the clip that attaches the LH
rear wheel speed harness to the rear subframe.
-
Connect the LH rear wheel speed
connector.
NoteUse mechanical hands to hold the connector end on subframe harness side.
-
Install the clip that attaches the LH
rear wheel speed connector to the rear subframe.
-
Install and hand-tighten the bolt and
nut that attach the RH rear upper aft link to the subframe.
TIpUse of the following tool(s) is recommended:
- 21 mm socket
-
Install and hand-tighten the bolt and
nut that attach the RH rear upper fore link to the subframe.
TIpUse of the following tool(s) is recommended:
- 18 mm socket
-
Install and hand-tighten the bolt and
nut that attach the RH rear toe link to the subframe.
TIpUse of the following tool(s) is recommended:
- 18 mm 12-point deep socket
NoteRotate the eccentric bolt to find the correct position for removal. -
Install and hand-tighten the bolt and
nut that attach the RH rear lower fore link to the subframe.
TIpUse of the following tool(s) is recommended:
- 18 mm socket
-
Install and hand-tighten the bolt and
nut that attach the RH rear lower aft link assembly to the subframe.
TIpUse of the following tool(s) is recommended:
- 21 mm socket
- Remove the ½ Ton economy transmission jack from under the LH suspension assembly.
- Repeat step 5 through step 14 for the LH side of the subframe assembly.
- With assistance, lower the sling to install the rear drive unit into the subframe.
-
Remove the halfshaft plugs from the gearbox, and then with assistance, install the LH
and RH front drive unit halfshafts into the rear drive unit.
CAUTIONTake care not to damage or displace the oil seal.CAUTIONMake sure that the opening of the snap ring is facing towards the bottom of the drive unit.NoteMove the front knuckle assembly aside to provide enough clearance to safely install the front drive unit halfshaft.NoteNew front drive units come pre-filled with gearbox fluid. Clean up any leaks during installation and top off the gearbox fluid as necessary. For more information, search for 1446276-00-B in the Service Tooling Catalog.
-
Verify that the halfshafts are fully seated:
- Carefully push the halfshaft into the drive unit until there is an audible "click" from the halfshaft stub contacting the pinion shaft.
- There will be a slight pulling sensation on the halfshaft as the halfshaft circlip locks into place.
- Pull on the inner halfshaft cup to confirm that the circlip is locked into place. If the halfshaft detaches from the drive unit then reinstall the halfshaft and then test that it is fully seated.
-
Apply approximately 1 gram of Molykote M-77 Lubricant Paste
only to the hub mating face on the outboard side of the LH rear drive unit
halfshaft.
CAUTIONDo not apply any lubricant to the halfshaft splines. If lubricant is mistakenly applied, wipe the splines clean with a shop towel.
Figure 2. Lubricate the area highlighted red -
Install and hand-tighten the bolt that
attaches rear of the rear drive unit to the rear subframe.
TIpUse of the following tool(s) is recommended:
- 18 mm socket
-
Install and hand-tighten the bolts
(x2) that attach the LH and RH mounts of the rear drive unit to the rear subframe.
TIpUse of the following tool(s) is recommended:
- 18 mm socket
- Lower the drive unit sling to release tension in the cable.
- Remove the drive unit sling from the gantry.
- Remove the hooks (x3) that attaches the drive unit sling tool to the rear drive unit.
-
Torque the LH, RH and rear motor mount
bolts.80 Nm (59.0 lbs-ft)TIpUse of the following tool(s) is recommended:
- 18 mm socket
-
Install the clips that attach the
resolver electrical harness to the rear drive unit, and then connect the electrical
connector.
-
Connect the oil pump connector from
the rear drive unit assembly.
-
Install the clip that attaches the low
voltage electrical harness to the inverter.
-
Connect the electrical harness from
the inverter low voltage connector.
- Position the rear drive unit HV cable on the rear subframe.
-
Fully raise the handle on the rear
drive unit HV connector.
-
Install the HV connector special tool
onto the rear drive unit HV connector.
-
Use both hands to firmly connect the
rear drive unit HV connector to the rear drive unit.
CAUTIONMake sure that the connector fits the header squarely and tightly, and that both retention pins enter the handle.
- Remove the HV connector special tool from the rear drive unit HV connector.
-
While pressing the rear drive unit HV
connector onto the rear drive unit HV header, fully lower the handle.
CAUTIONMake sure that the handle does not bind as it is lowered.
-
Slide the release to lock the rear
drive unit HV connector handle in the secured position.
-
Verify that the rear drive unit HV
connector is fully seated, and compare both sides of the connector that it is properly
secured in place.
NoteAn improperly seated connector might lead to connector damage and rear drive unit problems later on.
-
Install the bolt that attaches the HV
harness bracket to the inverter.6 Nm (4.4 lbs-ft)TIpUse of the following tool(s) is recommended:
- 10 mm socket
-
Connect the rear drive unit inlet hose
to the inverter coolant coupling, and then fasten the spring clip.
CAUTIONPerform a push-pull test to verify that the hose is fully seated.
-
Install the clip that attaches the
rear drive unit inlet hose to the HV harness bracket.
- Position the subframe lifting tool and rear subframe underneath the vehicle.
- Connect the air line to the subframe lifting tool.
-
With an assistant, slowly raise the
rear drive unit and subframe into position.
CAUTIONAssist with the routing of HV harnesses and coolant hoses through components so that they are not pinched or broken.
-
Hand-tighten the new bolts (x2) that
attach the rear subframe to the body.
NoteThe tightening of the bolts will be performed later in this procedure.
-
Install the LH and RH shear plates to
the rear subframe and HV battery, and then hand-tighten new larger bolts to attach the
shear plates to the subframe.
NoteThe tightening of the bolt will be performed later in this procedure.
-
Hand-tighten the smaller bolts that
attach the LH and RH shear plates to the HV battery.
NoteThe tightening of the bolts will be performed later in this procedure.
-
Torque the smaller bolts that attach
the LH and RH shear plates to the vehicle.
For non-Structural Pack vehicles:35 Nm (25.8 lbs-ft)For Structural Pack vehicles:62 Nm (45.7 lbs-ft)TIpUse of the following tool(s) is recommended:
- 13 mm socket
- 3 in extension
-
Torque the large bolts that attach the
LH and RH shear plates to the vehicle, and then mark them with a paint pen after
torquing.130 Nm (95.9 lbs-ft)TIpUse of the following tool(s) is recommended:
- 21 mm socket
-
Torque the bolts that attach the LH
and RH rear subframe to the body, and then mark them with a paint pen after
torquing.165 Nm (121.7 lbs-ft)TIpUse of the following tool(s) is recommended:
- 21 mm socket
-
Fasten the fir tree clips that attach
the coolant hoses to the LH and RH shear plates.
Figure 3. LH shear plate shown, RH shear plate similar - Release the straps and lower the subframe lifting tool from the vehicle.
- Disconnect the air line from the subframe lifting tool, and then remove the tool from underneath the vehicle.
-
Put on HV insulating gloves, leather outer gloves, and safety glasses.
WarningContinue to wear the gloves until instructed to remove them.
-
Fully raise the handle on the HV
battery rear drive unit harness connector.
-
Install the HV connector special tool
onto the HV battery rear drive unit connector.
-
Use both hands to firmly connect the
HV battery rear drive unit connector of the rear drive unit to HV battery harness to the
HV battery header.
CAUTIONMake sure that the connector fits the header squarely and tightly, and that both retention pins enter the handle.
- Remove the HV connector special tool from the HV battery rear drive unit connector.
-
While pressing the HV battery rear
drive unit connector onto the HV battery header, fully lower the handle.
CAUTIONMake sure that the handle does not bind as it is lowered.
-
Slide the release to lock the HV
battery rear drive unit connector handle in the secured position.
-
Verify that the HV battery rear drive
unit connector is fully seated, and compare both sides of the connector that it is
properly secured in place.
NoteAn improperly seated connector might lead to connector damage and rear drive unit problems later on.
- Remove the HV insulating gloves and leather outer gloves.
-
Install the nut that attaches the rear
drive unit HV electrical harness bracket to the HV battery.10 Nm (7.4 lbs-ft)TIpUse of the following tool(s) is recommended:
- 10 mm socket
- Position the coolant drain beneath the RH rear of the HV battery.
-
Remove the hose plugs, and then
connect coolant outlet hose to rear power train return hose.
CAUTIONPerform a push-pull test to verify that the hose is fully seated.
- Position the coolant drain underneath the LH rear of the HV battery.
-
Remove the hose plugs, and then
connect rear drive unit inverter inlet hose to the rear of HV battery.
CAUTIONPerform a push-pull test to verify that the hose is fully seated.
- Remove the coolant drain from underneath the vehicle.
- Install the rear HV battery skid plate. See Skid Plate - HV Battery - Rear (Remove and Replace).
- Install the rear stabilizer bar. See Stabilizer Bar - Rear (Remove and Replace).
-
Install the bolt that attaches the
rear drive unit ground strap to the body.10 Nm (7.4 lbs-ft)NoteReinstall the washer if the vehicle had this washer during removal.TIpUse of the following tool(s) is recommended:
- 10 mm 12-point deep socket
-
Fasten the LH subframe electrical
harness barrel clip to the body.
-
Connect the electrical connector for
the LH side 12V subframe harness.
Figure 4. LH side shown, RH similar - Repeat steps 71 and 72 for the RH side of the vehicle.
- Partially lower and lock the vehicle to a comfortable working height.
-
Install the bolts that attach the RH
rear damper at the top mount.41 Nm (30.2 lbs-ft)TIpUse of the following tool(s) is recommended:
- 15 mm socket
Figure 5. LH shown; RH similar -
Position the RH rear end link into the
stabilizer bar, and then install a new nut that attaches the end link to the stabilizer
bar.55 Nm (40.6 lbs-ft)NoteMove the stabilizer up and down as needed to achieve the correct angle for installation.TIpUse of the following tool(s) is recommended:
- 15 mm socket
-
Position the RH rear brake caliper
onto the RH rear knuckle, and then install new bolts that attach the caliper to the
knuckle.83 Nm (61.2 lbs-ft)TIpUse of the following tool(s) is recommended:
- External Torx E18
- Repeat steps 75 and 77 for the RH side of the vehicle.
-
Remove the bolt that attaches the RH
rear brake rotor to the hub, but do not remove the rotor from the assembly.
TIpUse of the following tool(s) is recommended:
- 10 mm socket
- Hand-tighten the nuts that attach the rear hub jack adapter to the RH rear hub.
-
Position a support stand underneath
the RH lower rear control arm, and then raise the support stand to simulate vehicle at
ride height.
-
Use the rear ride height torque gauge
to verify that the suspension is set within ride height specification.
NoteMight need to adjust the support stand or spring compressor tool slightly.
-
Measure the distance between the
bottom of the quarter panel to the center of the rear axle to make sure that the rear
suspension is set to ride height: The distance should measure 427 mm.
-
Tighten the bolt and nut that attach
the RH rear upper aft link to the subframe.134 Nm (98.8 lbs-ft)TIpUse of the following tool(s) is recommended:
- 21 mm socket
Figure 6. LH shown, RH similar -
Torque the bolt and nut that attach
the RH rear upper fore link to the subframe.84 Nm (61.9 lbs-ft)TIpUse of the following tool(s) is recommended:
- 18 mm socket
Figure 7. LH shown, RH similar -
Torque the bolt and nut that attach
the RH rear toe link to the subframe.85 Nm (62.7 lbs-ft)TIpUse of the following tool(s) is recommended:
- 18 mm 12-point deep socket
Figure 8. LH shown, RH similar -
Tighten the bolt and nut that attach
the RH rear lower fore link to the subframe.76 Nm (56.0 lbs-ft)TIpUse of the following tool(s) is recommended:
- 18 mm socket
Figure 9. LH shown, RH similar -
Tighten the bolt and nut that attach
the RH rear lower aft link to the subframe.115 Nm (84.8 lbs-ft)TIpUse of the following tool(s) is recommended:
- 21 mm socket
Figure 10. LH shown, RH similar - Remove the support stand from beneath the RH rear suspension.
- Remove the hub jack adapter from the RH rear hub.
-
Install the bolt that attaches the RH
rear brake rotor to the RH rear hub.5 Nm (3.7 lbs-ft)TIpUse of the following tool(s) is recommended:
- 10 mm socket
Figure 11. LH shown, RH similar - Remove the spring compressor from the RH rear coil spring.
- Repeat step 79 through step 92 for the LH side of the vehicle.
- Install the LH and RH rear suspension covers. See Cover - Rear Suspension - LH (Remove and Replace).
- Install the rear fascia diffuser. See Diffuser - Rear Fascia (Remove and Replace).
- Install the rear wheels. See Wheel Assembly (Remove and Install).
- If equipped, install the LH and RH front wheel center caps. See Cap - Wheel (Remove and Replace).
- Perform a vacuum refill of the cooling system. See Cooling System (Vacuum Refill).
-
Press and hold the park button to
release the EPB service mode.
NoteRemove the wheel chocks if necessary.
- Install the 2nd row lower seat cushion. See Seat Cushion - Lower - 2nd Row (Remove and Replace).
- Install the HEPA assembly. See Assembly - Filter - HEPA (Remove and Replace).
- Refer to the Alignment Requirement tables to determine whether an EPAS alignment check (EC) or four wheel alignment check (AC) is necessary. If performed, add the alignment check/adjust correction code as a separate activity to the SV. See Alignment Requirement - Suspension.
- Restore the driver and front passenger seats back to their original positions.