Sensor - Subcool - Pressure and Temperature (PT) - High Pressure (Remove and Replace)
 Correction code
18400502
0.36
NOTE: Unless otherwise explicitly
stated in the procedure, the above correction code and FRT reflect all of the work
required to perform this procedure, including the linked procedures. Do not stack correction codes unless
explicitly told to do so.
NOTE: See Flat Rate
Times to learn more about FRTs and how they are created.
NOTE: See Personal Protection to make sure wearing proper PPE when
performing the below procedure. NOTE: See Ergonomic Precautions for safe and healthy working
practices.
Correction code
18400502
0.36
NOTE: Unless otherwise explicitly
stated in the procedure, the above correction code and FRT reflect all of the work
required to perform this procedure, including the linked procedures. Do not stack correction codes unless
explicitly told to do so.
NOTE: See Flat Rate
Times to learn more about FRTs and how they are created.
NOTE: See Personal Protection to make sure wearing proper PPE when
performing the below procedure. NOTE: See Ergonomic Precautions for safe and healthy working
practices.
- 2023-04-04: Updated A/C oil type to be used with reference to Fluids and Capacities for A/C oil specifications.
- 2024-02-01: Updated the way of performing the routines from using Toolbox to using the touchscreen.
Torque Specifications
| Description | Torque Value | Recommended Tools | Reuse/Replace | Notes |
|---|---|---|---|---|
| High Pressure and Temperature Subcool Sensor |
 9 Nm (6.6 lbs-ft) |
|
N/A |
|
| Bolt that attaches the supermanifold-to-compressor A/C line to the supermanifold. |
22 Nm (16.2 lbs-ft) |
|
Reuse |
Remove
- Open the LH front door and lower the LH front window.
- Place the vehicle in Service Mode by using the touchscreen. See Service Mode.
- Remove the underhood storage unit. See Underhood Storage Unit (Remove and Replace).
- Remove the HEPA filter assembly. See Assembly - Filter - HEPA (Remove and Install).
- Unlock the vehicle gateway. See Gateway (Unlock).
- On the touchscreen, tap the Service Mode "wrench" (at the bottom of the touchscreen UI), and then tap , and allow the routine to complete.
- Recover the A/C refrigerant (refrigerant only). See Recovery.
-
Remove the bolt that
attaches the supermanifold-to-compressor A/C line to the
supermanifold.
TIpUse of the following tool(s) is recommended:
- 13 mm socket
-
Remove the supermanifold-to-compressor AC line from the supermanifold, and then hang it on the underhood storage unit support beam using an s-hook.
NoteCarefully position the line so that oil does not drip out.
-
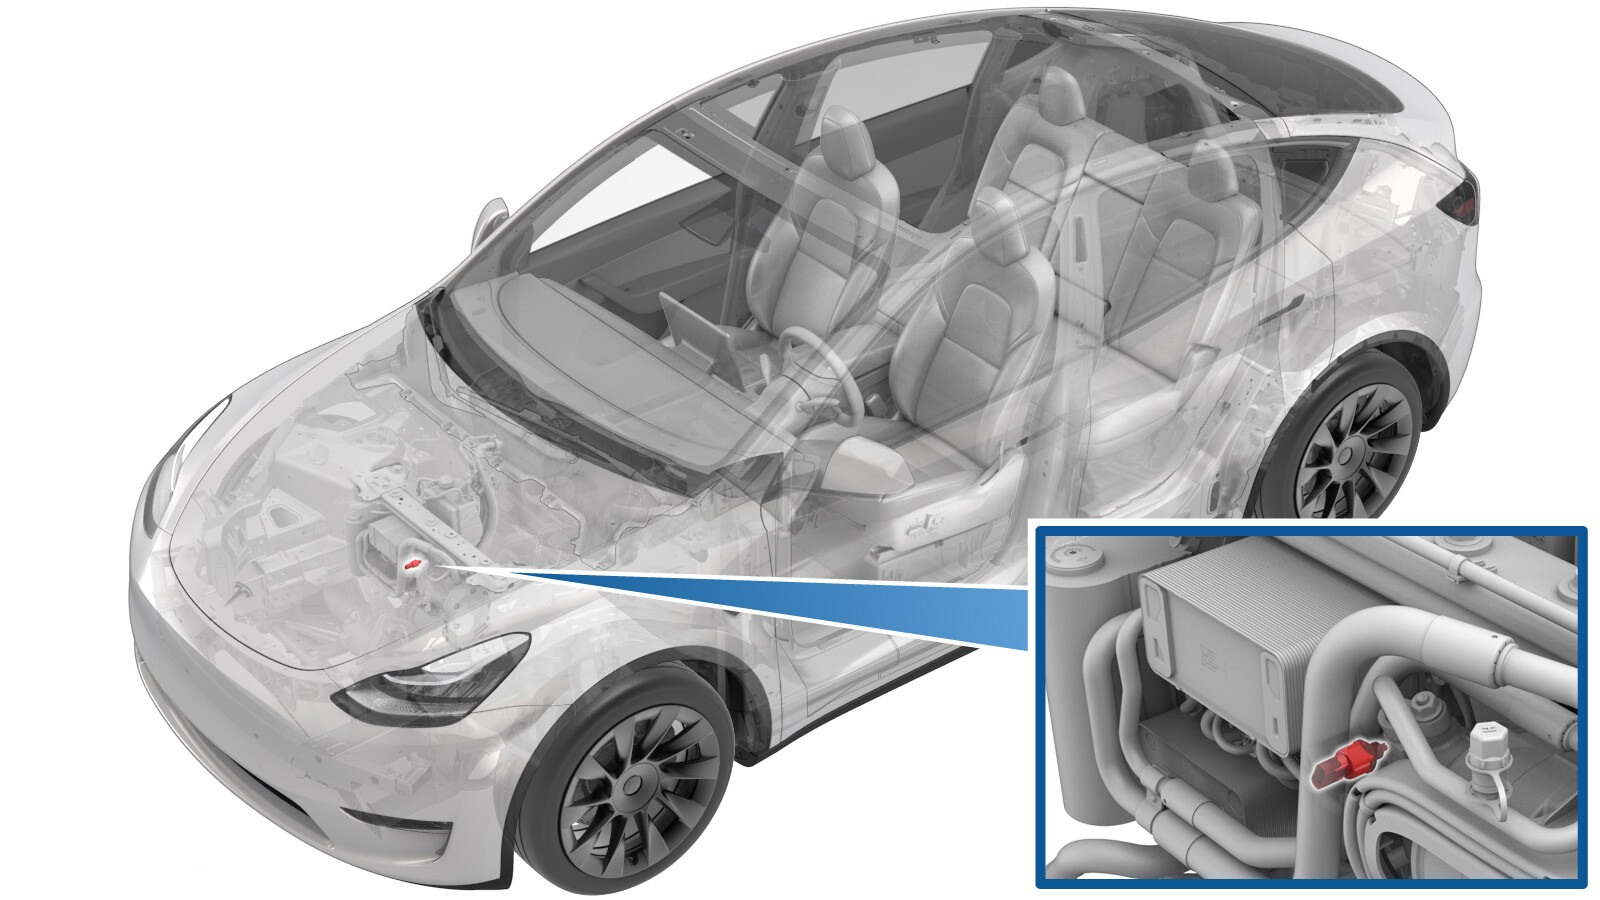
Release the locking tab, and
then disconnect the electrical connector from the high pressure temperature
subcool sensor.
CAUTIONDO NOT push down on the red locking tab. Pull the tab away from the connector until the connector is unlocked, and then continue pulling the main body of the connector to fully disconnect it.
-
Use the P/T sensor socket to
remove the high pressure temperature subcool sensor from the
supermanifold.
CAUTIONUse only hand tools to remove the PT sensor. Impact or power tools will break the threads.CAUTIONUse only the P/T sensor socket to remove the sensor. Using other tools can damage the connector housing.NoteFor Sensata sensors, use the 24mm thin wall P/T sensor socket (1600833-00-A). For Bridgeport sensors, use the 21mm P/T sensor socket (1565836-00-A).NoteUse of the following tool(s) is recommended:
- 1565836-00-A - GEN 1 P/T SENSOR SOCKET, 21MM
- 1600833-00-A - GEN 2 P/T SENSOR SOCKET, 24MM
- Record the part numbers and serial numbers of the old and new sensors in the repair order.
Install
- Lubricate the new high pressure temperature subcool sensor threads and O-ring with the appropriate A/C oil. See Fluids and Capacities for A/C oil specifications.
-
Install and hand-tighten the high pressure temperature subcool sensor until
the sensor O-ring just makes contact with the Supermanifold.
NoteUse an inspection mirror to visualize this and subsequent steps.
- Manually back off and tighten the high pressure temperature subcool sensor in an incremental manner so that the sensor O-ring properly slides into the chamfer in the Supermanifold.
- If the high pressure temperature subcool sensor O-ring appears to pinch, or no longer slides into the chamfer, stop and reverse thread the sensor until the O-ring no longer appears to be pinched.
-
Continue to back off and tighten the high pressure temperature subcool
sensor until the O-ring slides completely into the chamfer and is no longer
visible.
NoteThere should be no gap, and the sensor body should be bottomed out against the Supermanifold.
-
Use the P/T sensor socket to tighten
the high pressure temperature subcool sensor to the specified torque value.9 Nm (6.6 lbs-ft)CAUTIONUse only hand tools to install the PT sensor. Impact or power tools will break the threads.CAUTIONUse only the P/T sensor socket to install the sensor. Using other tools can damage the sensor.NoteFor Sensata sensors, use the 24mm thin wall P/T sensor socket (1600833-00-A). For Bridgeport sensors, use the 21mm P/T sensor socket (1565836-00-A).TIpUse of the following tool(s) is recommended:
- 1565836-00-A - GEN 1 P/T SENSOR SOCKET, 21MM
- 1600833-00-A - GEN 2 P/T SENSOR SOCKET, 24MM
-
Connect the electrical
harness to the high pressure temperature subcool sensor, and then engage the
locking tab.
CAUTIONPush the red locking tab towards the connector to engage the locking mechanism. DO NOT push down or pull up on the red locking tab.
-
Install new seal washers on
the supermanifold side of the supermanifold-to-compressor A/C line, and then
lubricate the washers with a small amount of the appropriate A/C oil. See
Fluids and Capacities for A/C oil
specifications.
-
Position the
supermanifold-to-compressor A/C line on the supermanifold, and then hand
tighten the bolt that attaches the A/C line to the supermanifold.
-
Tighten the bolt that
attaches the A/C line to the supermanifold.22 Nm (16.2 lbs-ft)TIpUse of the following tool(s) is recommended:
- 13 mm socket
- Perform the vacuum leak test and oil injection. See Vacuum Leak Test and Oil Injection.
-
Recharge the A/C refrigerant. See Recharge.
NoteDo not disconnect the laptop from the vehicle yet.
- On the touchscreen, tap the Service Mode "wrench" (at the bottom of the touchscreen UI), and then tap , and close once the routine is passed.
- Tap , and close once the routine is passed.
- Tap , and close once the routine is passed.
- Exit Service Mode. See Service Mode.
- Install the HEPA filter assembly. See Assembly - Filter - HEPA (Remove and Install).
- Install the underhood storage unit. See Underhood Storage Unit (Remove and Replace).