2025-12-09
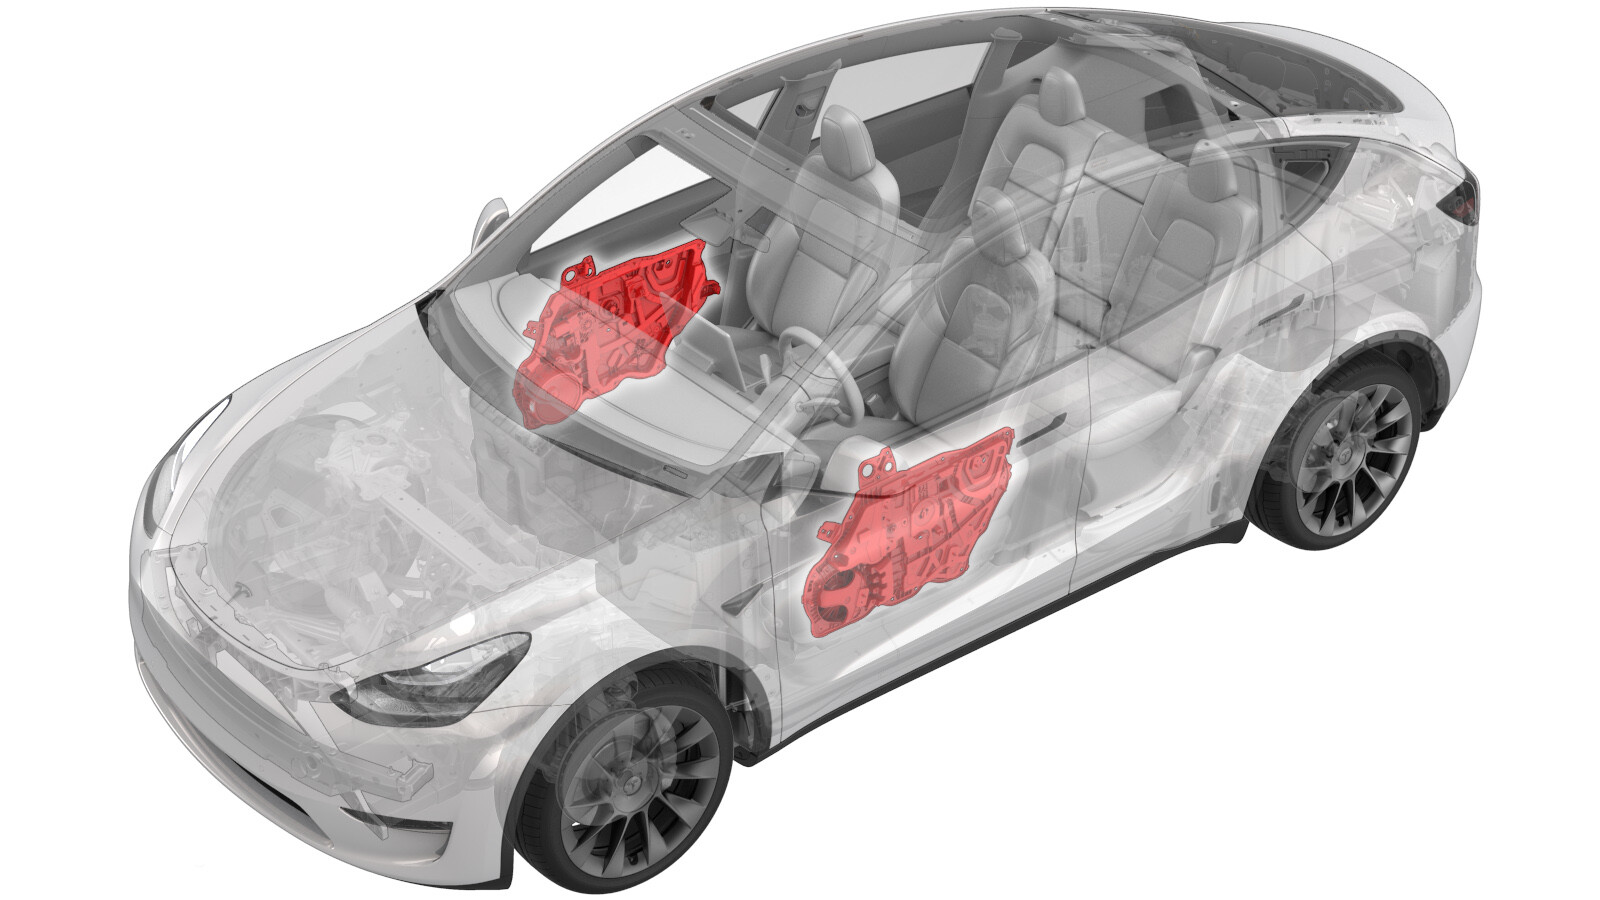
Closeout Panel - Door - Front - LH (Remove and Replace)
 Correction code
11701002
0.66
NOTE: Unless otherwise explicitly
stated in the procedure, the above correction code and FRT reflect all of the work
required to perform this procedure, including the linked procedures. Do not stack correction codes unless
explicitly told to do so.
NOTE: See Flat Rate
Times to learn more about FRTs and how they are created.
NOTE: See Personal Protection to make sure wearing proper PPE when
performing the below procedure. NOTE: See Ergonomic Precautions for safe and healthy working
practices.
Correction code
11701002
0.66
NOTE: Unless otherwise explicitly
stated in the procedure, the above correction code and FRT reflect all of the work
required to perform this procedure, including the linked procedures. Do not stack correction codes unless
explicitly told to do so.
NOTE: See Flat Rate
Times to learn more about FRTs and how they are created.
NOTE: See Personal Protection to make sure wearing proper PPE when
performing the below procedure. NOTE: See Ergonomic Precautions for safe and healthy working
practices.
- 2025-12-09: Added disconnecting/connecting LV battery power steps and window adjustment and calibration steps.
Equipment:
- 1054712-00-A Rivnut Install Kit, for NA (Optional special tool if the thread for the closeout panel becomes stripped)
- 1054712-01-A Rivnut Install Kit, for EMEA (Optional special tool if the thread for the closeout panel becomes stripped)
- 1004296-00-A Service Rivnut (Optional special tool if the thread for the closeout panel becomes stripped)
- 1015888-00-C Service bolt (Optional special tool if the thread for the closeout panel becomes stripped)
Warning
Make sure 12V/LV power has
been disconnected for at least 1 minute before disconnecting the electrical harness from
Supplementary Restraint System (SRS) components, such as Restraint Control Module, sensors,
airbags, etc. Disconnect the 12V/LV battery and the First Responder Loop. Failure to do so
can result in unintended safety system behaviors. For more information on SRS precautions,
see Airbag and Supplementary Restraint System (SRS) Precautions.
Torque Specifications
| Description | Torque Value | Recommended Tools | Reuse/Replace | Notes |
|---|---|---|---|---|
| Bolts that attach the closeout panel to the door |
 4.5 Nm (3.3 lbs-ft) |
|
Reuse | |
| Bolts that attach the regulator rail fasteners to the vehicle |
8 Nm (5.9 lbs-ft) |
|
Reuse | |
| Screws (x4) that attach the LH front door window regulator to the close out panel |
3.5 Nm (2.6 lbs-ft) |
|
Reuse |
Remove
- Remove the LH front door trim panel. See Panel - Door Trim - Front - LH (Remove and Install).
- Remove the LH front door inner belt seal. See Seal - Inner Belt - Front Door - LH (Remove and Replace).
- Remove the LH front door glass. See Glass - Door - LH - Front (Remove and Replace).
- Disconnect the LV battery power. See 12V/LV Power (Disconnect and Connect).
-
Disconnect the electrical wiring harness from the LH door mirror
connector.
- Remove the LH front door speaker. See Speaker - Front Door - LH (Remove and Replace).
- Remove the door pressure sensor. See Sensor - Pressure - Door - Front - LH (Remove and Replace).
-
Release the clips that attach the electrical wiring harness to the closeout
panel.
NoteThe number of clips may vary on different vehicles.
- Remove the LH front window motor. See Window Regulator Motor - Front - LH (Remove and Replace).
-
Remove the bolts that attach the closeout panel to the door.
TIpUse of the following tool(s) is recommended:
- 8 mm socket
-
Remove the plugs that cover the regulator rail fasteners.
-
Remove the bolts (x2) that attach the regulator rail fasteners to the
vehicle, and the remove the closeout panel from the vehicle.
NoteSlide the closeout panel down and out.NoteThe window regulator and closeout panel are removed attached.TIpUse of the following tool(s) is recommended:
- 10 mm socket
-
Remove the screws (x4) that attach the LH front door window regulator to
the close out panel.
NoteRelease the window regulator cable from the close out panel hook.TIpUse of the following tool(s) is recommended:
- Torx T25 socket
Install
-
Install the screws (x4) that attach the LH front door window regulator to
the close out panel.3.5 Nm (2.6 lbs-ft)NoteEnsure the window regulator cable is secured to the closeout panel hook.TIpUse of the following tool(s) is recommended:
- Torx T25 socket
-
Install the bolts (x2) that attach the regulator rail fasteners to the
vehicle, and the remove the closeout panel from the vehicle.8 Nm (5.9 lbs-ft)NoteSlide the window regulator rail up against inside of the door and seat the closeout panel outside.TIpUse of the following tool(s) is recommended:
- 10 mm socket
-
Install the plugs that cover the regulator rail fasteners.
-
Install the bolts that attach the closeout panel to the door.4.5 Nm (3.3 lbs-ft)NoteHand start the bolts to prevent stripping the threads.TIpUse of the following tool(s) is recommended:
- 8 mm socket
- Install the LH front window motor. See Window Regulator Motor - Front - LH (Remove and Replace).
-
Secure the clips that attach the electrical wiring harness to the closeout
panel.
NoteThe number of clips may vary on different vehicles.
- Install the door pressure sensor. See Sensor - Pressure - Door - Front - LH (Remove and Replace).
- Install the LH front door speaker. See Speaker - Front Door - LH (Remove and Replace).
-
Connect the electrical wiring harness to the LH door mirror
connector.
- Connect the LV battery power. See 12V/LV Power (Disconnect and Connect).
- Install the LH front door glass. See Glass - Door - LH - Front (Remove and Replace).
- Install the LH front door inner belt seal. See Seal - Inner Belt - Front Door - LH (Remove and Replace).
- Release the LH front door latch by pulling the emergency release cable.
- Close the LH front door.
- Open the LH rear door and lower its window.
- Raise the LH front window fully by accessing window switch tool through the LH rear door.
-
Check the LH front window gap and flush.
NoteGap 8.00mm +/- 1.8mm. Flush 0.00mm +/- 2mm.
- Open the LH front door.
-
Close the LH front door latch to allow the window height adjustment.
CAUTIONDo not close the door with window fully raised, as the upper bright trim will be damaged.
- Adjust the LH front glass for access to regulator guide blocks.
-
Loosen the bolts (x2) that attach the window glass to the regulator guide
blocks about half a turn to maintain position but still allow
adjustment.
- Adjust the moving glass to achieve gap target and hand tighten the bolts.
- Adjust the moving glass to achieve flush target to B-Pillar applique.
-
Use a 5mm hex socket to adjust the friction pad to tilt the glass inboard
or outboard. Turn clockwise to achieve outboard adjustments and turn counter
clockwise to achieve inboard adjustments.
- Release the LH front door latch by pulling the emergency release cable.
- Close the LH Front door.
- Raise the LH front window fully by accessing window switch tool through the LH rear door.
-
Check the LH front window gap and flush.
NoteGap 8.00mm +/- 1.8mm. Flush 0.00mm +/- 2mm.
- Open the LH front door.
-
Close the LH front door latch to allow the window height adjustment.
CAUTIONDo not close the door with window fully raised, as the upper bright trim will be damaged.
- Adjust the LH front glass for access to regulator guide blocks.
-
Torque the bolts (x2) that attach the window glass to the regulator guide
blocks.12 Nm (8.8 lbs-ft)
- Release the LH front door latch by pulling the emergency release cable.
- Lower the LH front window.
- Disconnect the window switch special tool.
- Install the circle button plugs covering openings in door for regulator guide blocks.
- Install the LH front door trim panel. See Panel - Door Trim - Front - LH (Remove and Install).
- Place the vehicle in Service Mode by using the touchscreen. See Service Mode.
- Unlock the vehicle gateway. See Gateway (Unlock).
- On the touchscreen, tap the Service Mode "wrench" (at the bottom of the touchscreen UI), and then tap , click Run, and allow the routine to complete.
- Exit Service Mode. See Service Mode.