2026-07-09
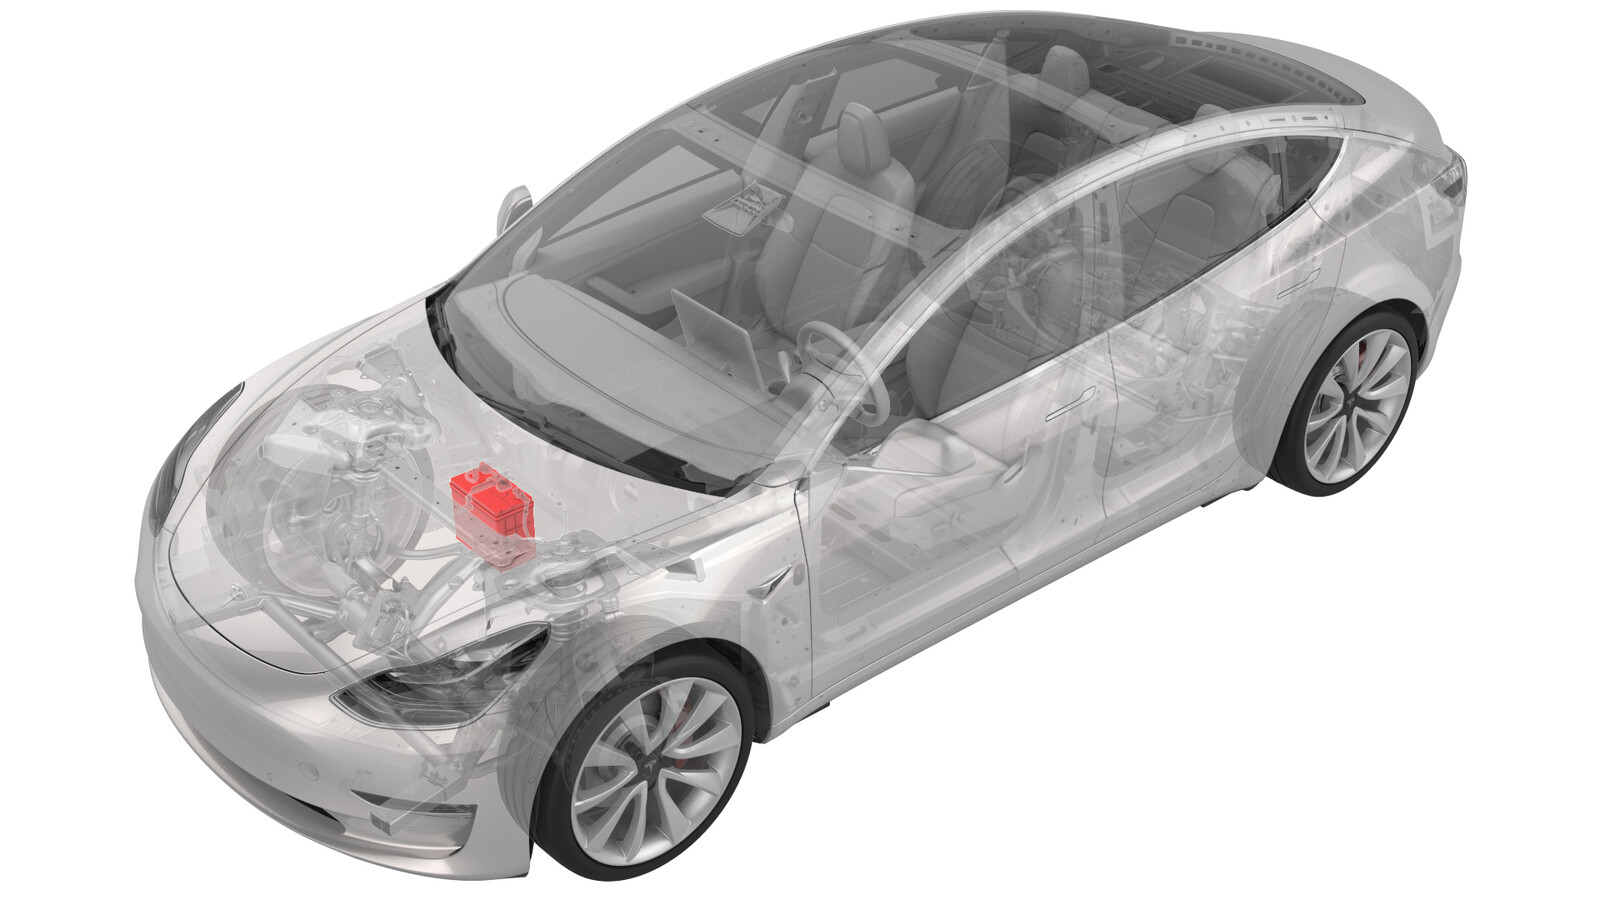
12V/LV Battery (Remove and Replace)
 NOTE: Unless otherwise explicitly
stated in the procedure, the above correction code and FRT reflect all of the work
required to perform this procedure, including the linked procedures. Do not stack correction codes unless
explicitly told to do so.
NOTE: See Flat Rate
Times to learn more about FRTs and how they are created.
NOTE: See Personal Protection to make sure wearing proper PPE when
performing the below procedure. NOTE: See Ergonomic Precautions for safe and healthy working
practices.
NOTE: Unless otherwise explicitly
stated in the procedure, the above correction code and FRT reflect all of the work
required to perform this procedure, including the linked procedures. Do not stack correction codes unless
explicitly told to do so.
NOTE: See Flat Rate
Times to learn more about FRTs and how they are created.
NOTE: See Personal Protection to make sure wearing proper PPE when
performing the below procedure. NOTE: See Ergonomic Precautions for safe and healthy working
practices.
- Model 3 with Lead Acid Battery: Correction code17011202, 0.18
- Model 3 with Li-Ion Battery: Correction code17011232, 0.18
- 2025-11-14: Add a note about how to figure out battery type.
- 2025-11-11: Removed redundant step to remove seat cushion.
- 2025-10-16: Replaced individual steps to disconnect LV battery and FRL with cross reference to 12V/LV power (Disconnect and Connect) topic.
- 2024-11-20: Added a note to remind of checking the 12V/LV battery temperature before performing the procedure.
- 2024-04-10: Added a Note to perform the recovery of the LV battery per Toolbox article prior to its replacement.
- 2023-12-20: Updated configuration steps for Li-Ion battery.
- 2023-10-04: Updated configuration steps for lead acid battery to become a separate activity (correction code 91022407) to be added to the service visit.
- 2023-09-08: Updated Li-Ion Battery procedures according to the latest procedure input.
- 2023-09-07: Updated lead-acid procedure with guidance for changing lead-acid battery types.
- 2023-07-06: Added a video in step 9 of Remove part for Li-Ion Battery.
Warning
Before performing
the following procedure, make sure the 12V/LV battery temperature is not
overheated.
Note
To determine which battery your vehicle uses, touch .
Torque Specifications
| Description | Torque Value | Recommended Tools | Reuse/Replace | Notes |
|---|---|---|---|---|
| (Lead acid) positive/negative cable to the battery terminal |
 6 Nm (4.4 lbs-ft) |
|
Reuse | |
| (Li-Ion) bolts that attach the LV battery to the bracket |
6 Nm (4.4 lbs-ft) |
|
Reuse | Early production vehicles have M6 bolts with 10 mm bolt head. Torque those to 10 Nm |
Remove Lead Acid Battery
Note
If replacing a Clarios (Varta) 12V battery with an AtlasBX 12V battery, or
vice-versa, make sure the vehicle is running software version 2023.32 or newer.
Update the vehicle software if necessary; see Software Update.
- Remove the rear underhood apron. See Underhood Apron - Rear (Remove and Replace).
- Remove the cabin intake duct. See Duct - Upper - Cabin Intake (Remove and Replace).
- Disconnect 12V power. See 12V/LV Power (Disconnect and Connect).
- Remove the cover for the 12V positive terminal.
-
Loosen the nut that attaches
the positive lead to the battery, and then remove the lead from the
battery.6 Nm (4.4 lbs-ft)TIpUse of the following tool(s) is recommended:
- 10 mm deep socket
- Remove the 12V battery strap. See Strap - 12V Battery (Remove and Replace).
-
Disconnect the hose from the LH side of the battery, and then remove the battery from the vehicle.
- Write the last 6 digits of the vehicle VIN clearly onto the removed battery so that it can be identified if later needed.
Remove Li-Ion Battery
Note
The Li-Ion LV battery may not need to be replaced. Attempt to recover the LV
battery first before determining that the LV battery
needs replacement. Refer to Toolbox article 6249900 for more information.
- Open the LH front door and fully lower the LH front window.
- Remove the rear underhood apron. See Underhood Apron - Rear (Remove and Replace).
- Disconnect LV power. See 12V/LV Power (Disconnect and Connect).
- Wait 2 minutes for the electrical system to fully discharge.
-
Release positive jump
post.
-
Remove LV battery cable
stand off.
-
Remove the bolts (x3) that
attach the LV battery to the vehicle.
-
Remove the LV battery from
the vehicle.
Install Lead Acid Battery
Installation procedure is the reverse of removal, except for the following:
CAUTION
Before
installing the new 12V battery, make sure that the new battery's Open Circuit
Voltage (OCV) is above 12.6V. If the OCV is between 12.4V and 12.6V, recharge
the new battery. Any battery below 12.4V must be discarded.
- If replacing a Clarios
(Varta) 12V battery with an AtlasBX 12V battery, or vice-versa, update the
vehicle configuration.NoteThe configuration update can only be performed on vehicles with vehicle software version 2023.32 and newer.NoteIf a configuration update is required, separately add Correction Code 91022407 (Vehicle Configuration Update) to the Service Visit.
- Unlock the vehicle gateway. See Gateway (Unlock).
- In the Service Mode menu, go to .
- Select the type of battery that was installed, and then touch Change Battery Type to Selected.
- Read the prompt, touch Run, and allow the routine to complete.
Install Li-Ion Battery
-
Install the bolts (x3) that
attach the LV battery to the vehicle.
 6 Nm (4.4 lbs-ft)
 -
Install positive jump
post.5 Nm (3.7 lbs-ft)
-
Install LV battery cable
stand off.
-
Connect LV power. See 12V/LV Power (Disconnect and Connect).
NoteIf the vehicle does not power up after the LV battery is connected, power up the vehicle with an approved external power supply.
- Enter Service Mode. See Service Mode.
- Unlock vehicle gateway. See Gateway (Unlock).
-
On the vehicle touchscreen,
touch , and click Run to start
the routine.
CAUTIONVehicle software must be FW 2023.44 or later version.NoteOnce the routine is completed, the Mosfet and ECPA will be Closed.
- Reinstall the vehicle firmware. See Software Reinstall - Touchscreen.
- Exit Service Mode.
- Install the rear underhood apron. See Underhood Apron - Rear (Remove and Replace).
- Raise the LH front window and close the LH front door.