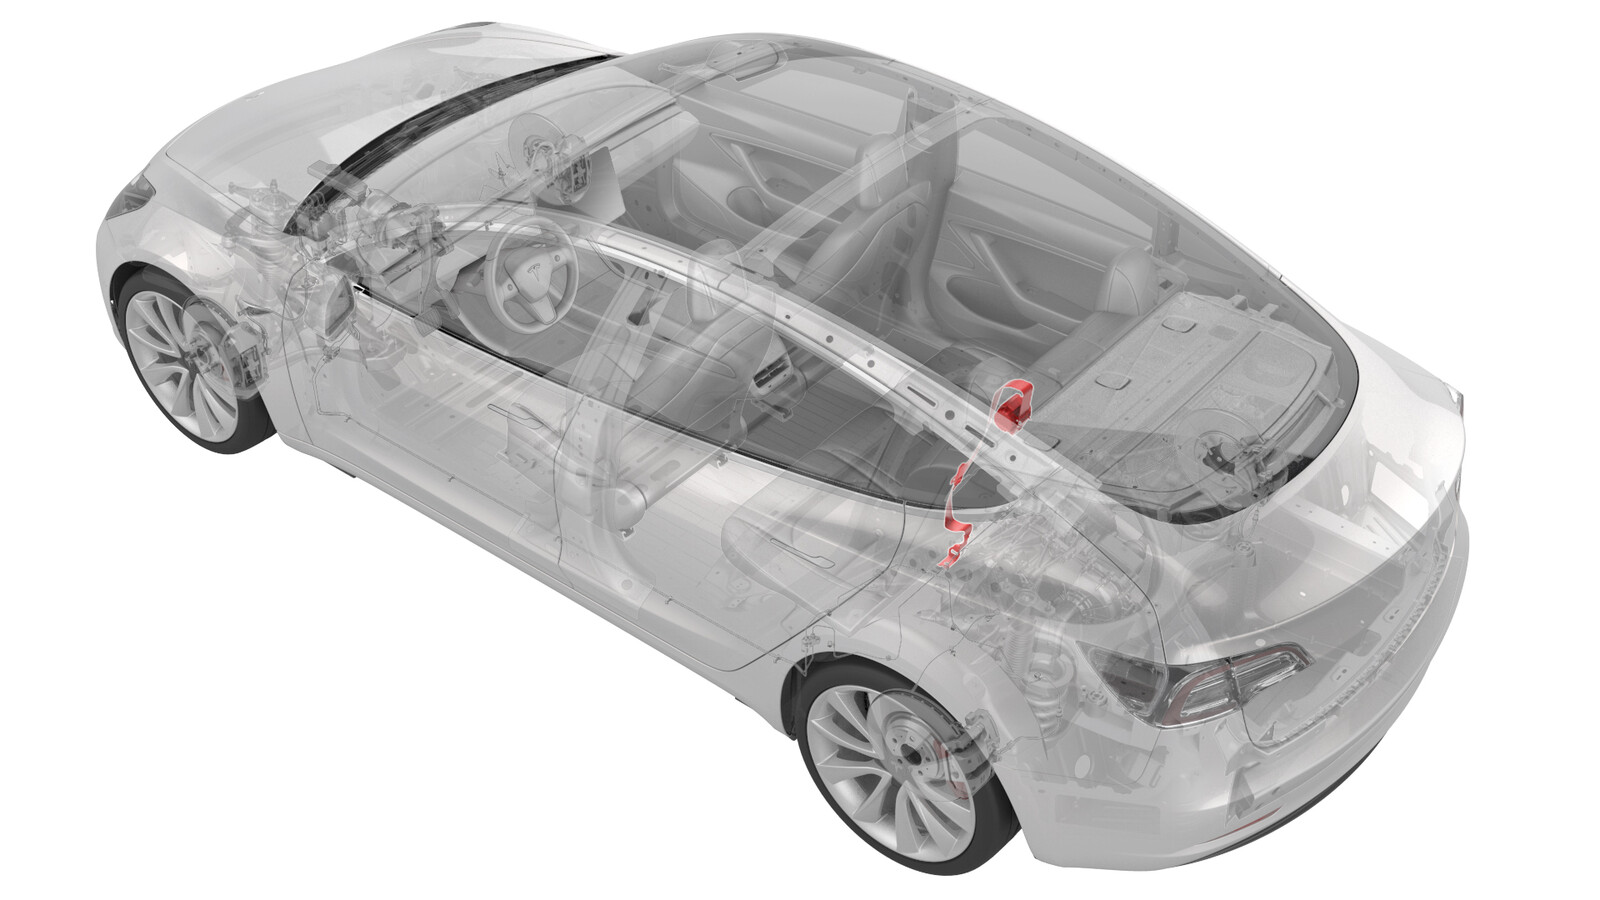
Seatbelt - 2nd Row - Center (Remove and Replace)
 Correction code
20056302
0.60
NOTE: Unless otherwise explicitly
stated in the procedure, the above correction code and FRT reflect all of the work
required to perform this procedure, including the linked procedures. Do not stack correction codes unless
explicitly told to do so.
NOTE: See Flat Rate
Times to learn more about FRTs and how they are created. To provide feedback on
FRT values, email ServiceManualFeedback@tesla.com.
NOTE: See Personal Protection to make sure wearing proper PPE when
performing the below procedure. See Ergonomic Precautions for safe and healthy working practices.
Correction code
20056302
0.60
NOTE: Unless otherwise explicitly
stated in the procedure, the above correction code and FRT reflect all of the work
required to perform this procedure, including the linked procedures. Do not stack correction codes unless
explicitly told to do so.
NOTE: See Flat Rate
Times to learn more about FRTs and how they are created. To provide feedback on
FRT values, email ServiceManualFeedback@tesla.com.
NOTE: See Personal Protection to make sure wearing proper PPE when
performing the below procedure. See Ergonomic Precautions for safe and healthy working practices.
Torque Specifications
| Description | Torque Value | Recommended Tools | Reuse/Replace | Notes |
|---|---|---|---|---|
| Bolt that attaches the armrest assembly to the seat back |
 15 Nm (11.1 lbs-ft) |
|
Reuse | |
| Bolt that attaches the center 2nd row seat belt to the seat back frame |
45 Nm (33.2 lbs-ft) |
|
Replace |
Remove
- Remove the 2nd row lower seat cushion. See Seat Cushion - Lower - 2nd Row (Remove and Replace).
- Remove the rear underhood apron. See Underhood Apron - Rear (Remove and Replace).
- Disconnect 12V power. See 12V/LV Power (Disconnect and Connect).
- Remove the LH 2nd row buckle. See Buckle - 2nd Row - LH (Remove and Replace).
- Remove the LH 2nd row seat side bolster. See Bolster - Side - Seat - 2nd Row - LH (Remove and Replace).
- Remove the 2nd row LH seat back hinge bracket. See Bracket - Hinge - Seat Back - 2nd Row - LH (Remove and Replace).
-
Remove the bolt that
attaches the armrest assembly to the seat back.15 Nm (11.1 lbs-ft)TIpUse of the following tool(s) is recommended:
- Torx T45 socket
- Pull the RH side of the armrest assembly forward, slide the armrest assembly towards the RH side of the seat, and then remove the armrest assembly from the seat back.
-
Release the RH and LH center headrest clips
simultaneously, and then pull the headrest upwards to remove it.
NoteUse a pocket screwdriver to release the LH headrest clip.
-
Remove the headrest clips from the seat.
NoteUse a wedge tool to lift up the guide locks from the seat.
-
Release the clips (x2), and
then remove the trim from the base where the cup holders are located.
NotePress the clips to release them from the seat frame
- Remove the 2nd row armrest closeout. See Closeout - Armrest - 2nd Row (Remove and Replace).
-
Release the clips (x2) that
attach the 2nd row seat back bezel to the seat back, and then remove the bezel from the seat
back.
-
Release the clips (x2) that
attach the escutcheon to the seat back, and then remove the escutcheon from
the seat back.
-
Remove the 2nd row seat soft back trim and foam from the seat back frame.
NoteRelease the soft back trim from the bottom sides, and then release the foam from the seat back frame.
-
Release the clips (x2) and
push clip that attach the 2nd row center seat back escutcheon support to the
seat back, and then remove the escutcheon support from the seat back.
-
Release the clips (2) that
attach the trim bolt cover to the seat back frame, and then remove the cover
from the seat back.
-
Remove and discard the bolt
that attaches the center 2nd row seat belt to the seat back frame, and then
remove the seat belt from the seat back frame.45 Nm (33.2 lbs-ft)TIpUse of the following tool(s) is recommended:
- 13 mm deep socket
- 13 mm socket
Install
-
Install the center 2nd row
seat belt to the seat back frame, and then install a new bolt to attach the
seat belt to the seat back frame.45 Nm (33.2 lbs-ft)TIpUse of the following tool(s) is recommended:
- 13 mm deep socket
- 13 mm socket
-
Install the trim bolt cover
to the seat back frame, and then fasten the clips (2) that attach the cover
to the seat back.
-
Install the 2nd row center
seat back escutcheon support to the seat back, and then fasten the clips
(x2) and push clip that attach the escutcheon support to the seat
back.
-
Install the 2nd row seat
soft back trim and foam to the seat back frame.
NoteInstall the foam to the seat back frame, and then install the soft back trim to the bottom sides.
-
Install the escutcheon to
the seat back, and then fasten the clips (x2) that attach the escutcheon to
the seat back.
-
Install the 2nd row seat
back bezel to the seat back, and
then fasten the clips (x2) that attach the bezel to the seat back.
- Install the 2nd row armrest closeout. See Closeout - Armrest - 2nd Row (Remove and Replace).
-
Install the trim to the base
where the cup holders are located, and then fasten the clips (x2) that
attach the trim to the base.
-
Install the headrest clips to the seat.
-
Install the RH and LH center headrests, and then fasten
the clips that attach the RH and LH center headrests to the 2nd row
seat back.
- Install the armrest assembly to the 2nd row seatback, slide the armrest assembly towards the LH side of the seat, and push the RH side of the armrest assembly rearward.
-
Install the bolt that
attaches the armrest assembly to the seat back.15 Nm (11.1 lbs-ft)TIpUse of the following tool(s) is recommended:
- Torx T45 socket
- Install the 2nd row LH seat back hinge bracket. See Bracket - Hinge - Seat Back - 2nd Row - LH (Remove and Replace).
- Install the LH 2nd row seat side bolster. See Bolster - Side - Seat - 2nd Row - LH (Remove and Replace).
-
This video shows how to properly stack the 2nd row LH seat buckle onto the
2nd row center seat belt anchor:
-
Set the 2nd row center seat
belt anchor onto the 2nd row LH inner ancillary bay rail, with the belt to the
RH side.
-
Make sure that the belt is
not twisted, and lays flat against the 2nd row seatback.
-
Set the guide pin of the 2nd
row LH seat buckle bracket into the hole of the 2nd row LH inner ancillary bay
rail, and pivot the bracket down onto the anchor, aligning the guide pin to
the slot in the anchor.
-
Install a new bolt to attach
the seat buckle bracket, the seat belt anchor, and the inner ancillary bay rail
to the body.
 40 Nm (29.5 lbs-ft)
 -
Verify the stacking.
Callout Description 1 LH 2nd Row Buckle on Top 2 Center 2nd Row Seatbelt Anchor in the Middle 3 LH Inner Ancillary Bay Rail at the Bottom -
Install the plastic bracket
that attaches the female side of the electrical connector to the body
studs.
-
Connect the electrical
harness to the LH rear seat belt buckle connector.
- Connect 12V power. See 12V/LV Power (Disconnect and Connect).
- Install the rear underhood apron. See Underhood Apron - Rear (Remove and Replace).
- Install the 2nd row lower seat cushion. See Seat Cushion - Lower - 2nd Row (Remove and Replace).