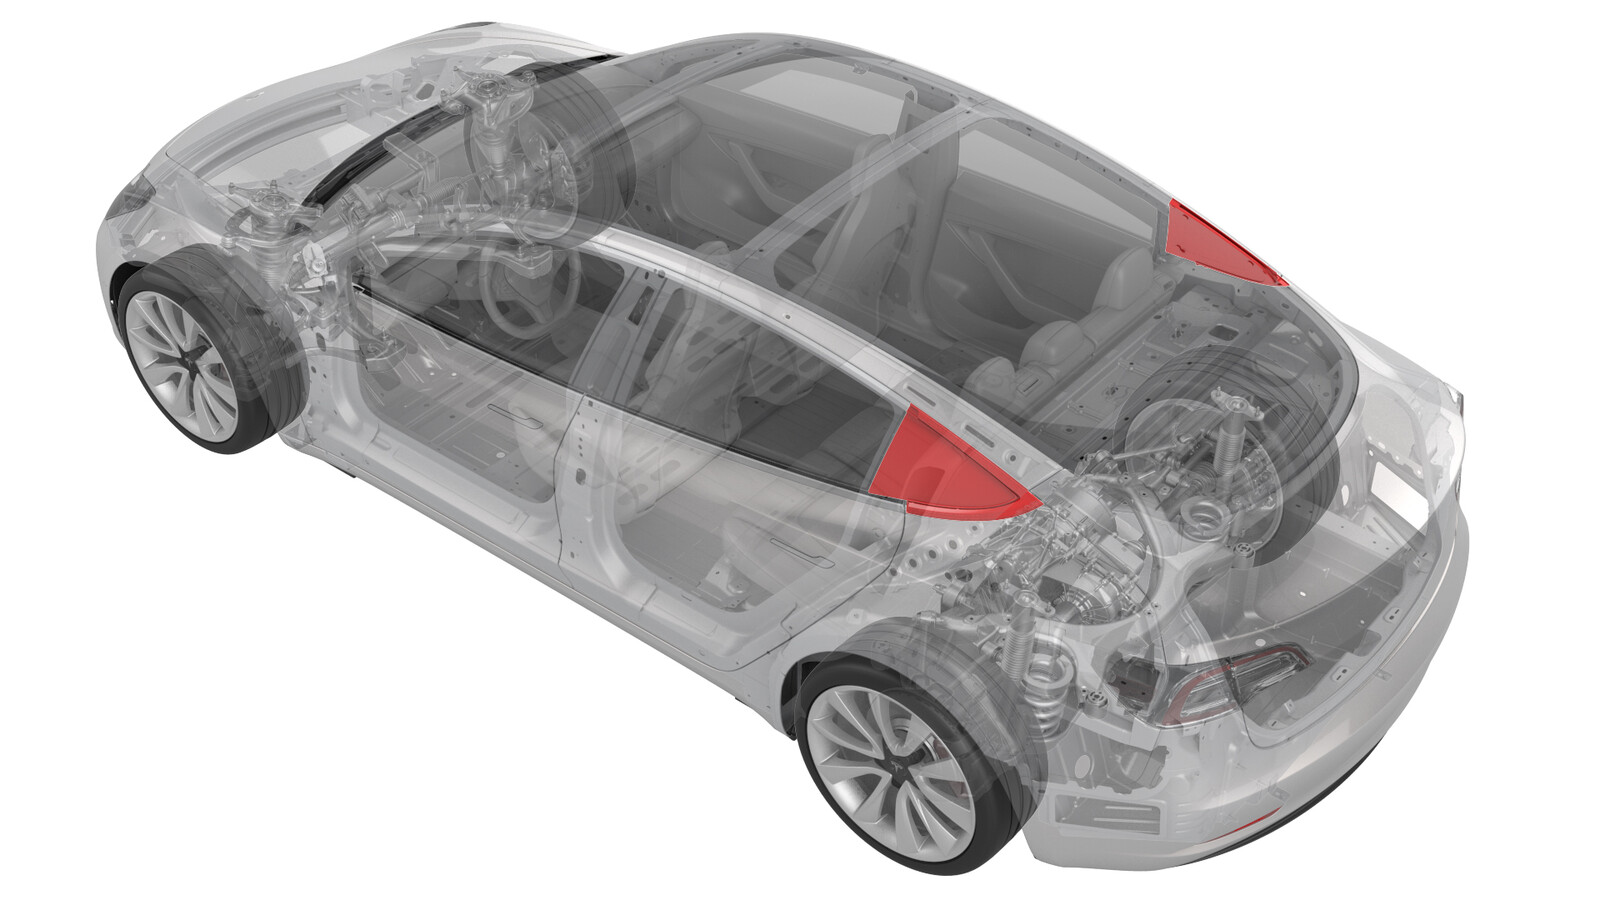
Glass - Body - Rear Quarter - LH (Remove and Replace)
 Correction code
10203002
1.08
NOTE: Unless otherwise explicitly
stated in the procedure, the above correction code and FRT reflect all of the work
required to perform this procedure, including the linked procedures. Do not stack correction codes unless
explicitly told to do so.
NOTE: See Flat Rate
Times to learn more about FRTs and how they are created.
NOTE: See Personal Protection to make sure wearing proper PPE when
performing the below procedure. NOTE: See Ergonomic Precautions for safe and healthy working
practices.
Correction code
10203002
1.08
NOTE: Unless otherwise explicitly
stated in the procedure, the above correction code and FRT reflect all of the work
required to perform this procedure, including the linked procedures. Do not stack correction codes unless
explicitly told to do so.
NOTE: See Flat Rate
Times to learn more about FRTs and how they are created.
NOTE: See Personal Protection to make sure wearing proper PPE when
performing the below procedure. NOTE: See Ergonomic Precautions for safe and healthy working
practices.
- 2026-05-22: Removed mobile service capability due to urethane adhesive curing time and environmental concerns.
- 2024-12-10: Added new caution about Pre-Installation Glass Inspection service requirements.
- 2024-07-26: Add step to remove upper bright trim.
- 2023-07-11: Adding retractable blade to brightwork removal step.
Remove
- Open the LH rear door.
- Fully lower the LH rear window.
- Open the trunk.
- Remove the LH upper brightwork. See Brightwork - Upper - LH (Remove and Replace).
-
Release the clip that attaches the rear primary seal to the C-pillar using a clip prytool.
- Pull the LH rear primary seal from the rear quarter glass area by pulling towards the front of the vehicle.
- Remove the LH 2nd row seat side bolster. See Bolster - Side - Seat - 2nd Row - LH (Remove and Replace).
- Remove the LH side rail trim. See Trim - Side Rail - LH (Remove and Install).
- Remove the LH upper C-pillar trim. See Trim - C-Pillar - Upper - LH (Remove and Replace).
-
Break the locating posts on the interior side of the LH rear quarter body glass using diagonal cutters and a flat head screwdriver to assist with the removal of the glass.
- Clean the exterior area of the LH rear quarter body glass.
-
Apply masking tape to the rear around the LH rear quarter body glass to protect the body and paint.
-
Using a plastic trim tool, pry out the rear edge of the LH quarter brightwork from the LH rear quarter body glass, and then use a retractable blade to cut the urethane that attaches brightwork to the vehicle to remove the trim from the vehicle.
WarningAlways wear cut-resistant gloves when using cutting tools.CAUTIONUse caution with the clip that attaches the rear quarter brightwork to the LH upper body side brightwork.
- Remove any remaining clip parts from the upper portion of the LH quarter brightwork.
-
Using a retractable blade knife, cut down the rubber seal around the LH rear quarter body glass to allow greater access when removing the glass.
WarningAlways wear cut-resistant gloves when using cutting tools.NoteThis action will avoid causing damage to the body and keep the wire from getting stuck in the seal when cutting the LH rear quarter body glass.
- Set up a pair of T-handles with square wire 6 feet long.
-
Wrap the square wire around the rear edge of the LH rear quarter body glass between the body the seal.
-
Cut the LH rear quarter body glass from the body, and then remove glass from the vehicle.
TIpUse a sawing motion to cut through the urethane.
- Clean the remaining urethane from the body using a winged scraper set.
- Remove the masking tape from the rear quarter glass area.
-
Clean the body around the urethane path with an isopropyl alcohol (IPA) wipe. Allow the area to dry for at least 1 minute.
Install
- Apply primer to the urethane path and any areas where the paint was damaged during the removal of the LH rear quarter body glass. Allow primer to dry for at least 1 minute before continuing.
-
Prepare the caulking gun and urethane.
NoteThe urethane opening must be 7 mm wide and 12 mm tall.
- Apply urethane to the body following the original path.
-
Position the LH rear quarter body glass over the vehicle and slide the rear quarter brightwork clip into the upper brightwork.
NoteMake sure the locating posts are aligned with the holes on the body, and then install the rear quarter body glass onto the body by applying pressure from the rear locating post, and then work forward.NoteStart from the rear locating post will help with the fitment of the rear quarter brightwork to the body.
- Secure the LH rear quarter body glass with tape while the urethane is curing.
- Fully seat the LH rear primary seal.
-
Secure the clip at the C-pillar.
- Close the trunk.
- Install the LH upper C-pillar trim. See Trim - C-Pillar - Upper - LH (Remove and Replace).
- Install the LH side rail trim. See Trim - Side Rail - LH (Remove and Install).
- Install the LH 2nd row seat side bolster. See Bolster - Side - Seat - 2nd Row - LH (Remove and Replace).
- Install the LH upper brightwork. See Brightwork - Upper - LH (Remove and Replace).
- Close the LH rear door.
-
Remove the masking tape after the urethane has cured.
CAUTIONDo not drive the vehicle until the adhesive manufacturer’s recommended minimum drive-away time has passed. Dow Betaseal Express has a drive-away time of 1 hour minimum in temperatures of 0˚F (-18˚C) or warmer. If necessary, leave the tape applying pressure to the glass on the vehicle and advise the customer that they can remove it after 24 hours. Additionally, advise the customer that they should avoid high driving speeds and speed bumps for the next 24 hours.