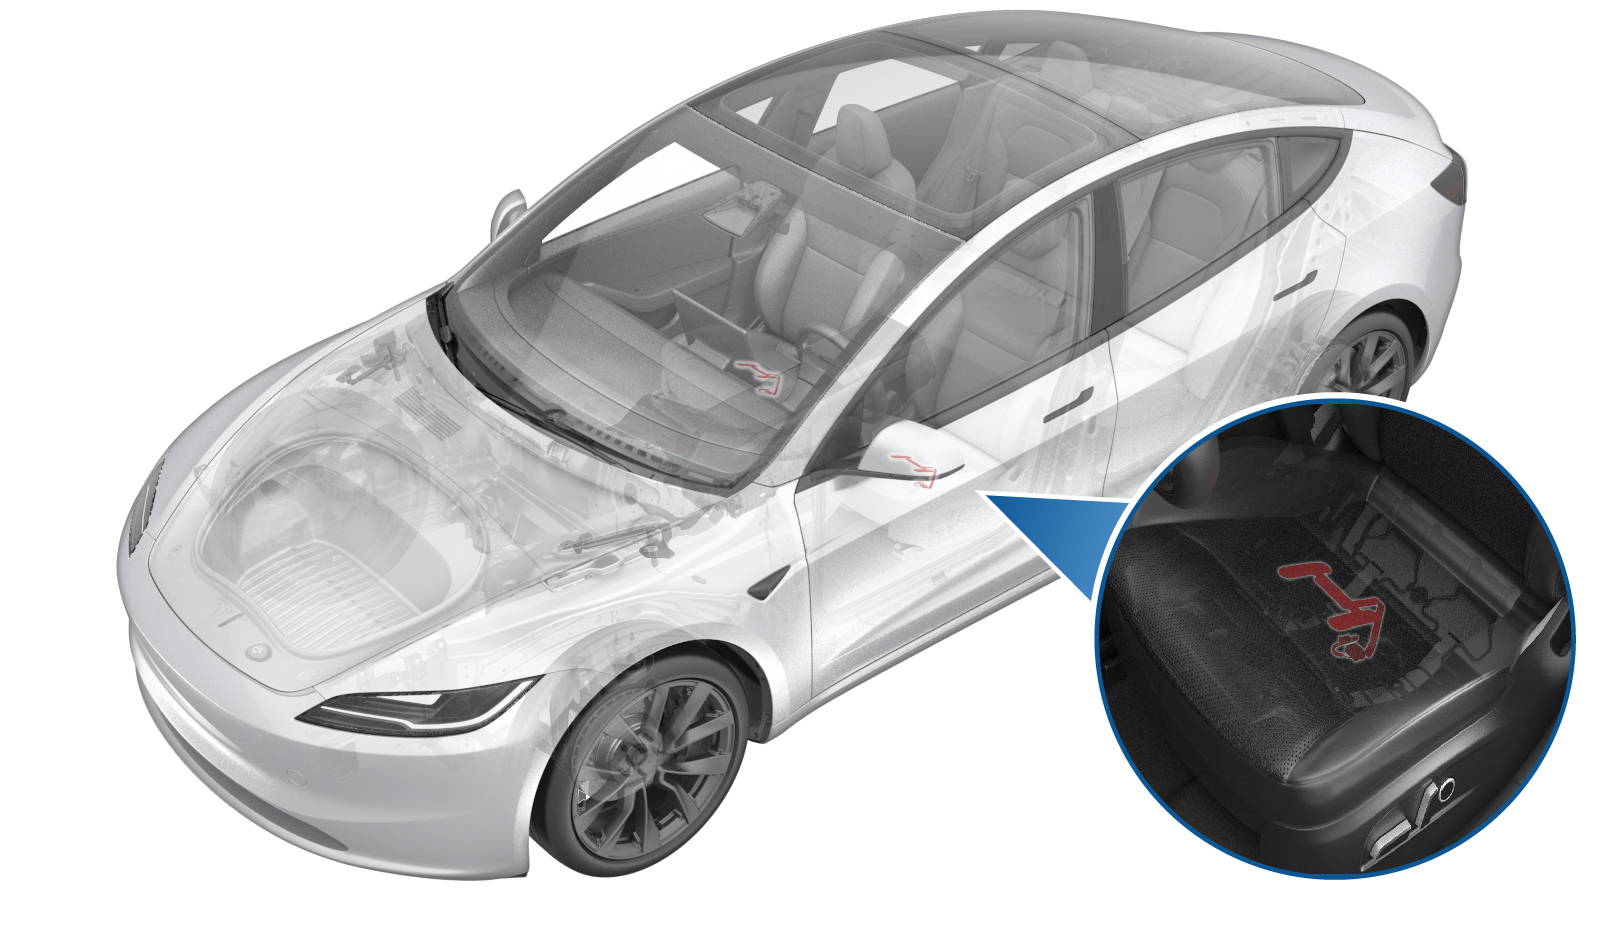
21/03/2024 12:23:48

1st Row Seat Belts -Occupancy Sensor (Remove and Replace)

Correction code 2005010032 FRT 0.84 NOTE: Unless otherwise explicitly stated in the procedure, the above correction code and FRT reflect all of the work required to perform this procedure, including the linked procedures. Do not stack correction codes unless explicitly told to do so. NOTE: See Flat Rate Times to learn more about FRTs and how they are created. To provide feedback on FRT values, email LaborTimeFeedback@tesla.com. NOTE: See Personal Protection to make sure wearing proper PPE when performing the below procedure.

  • 2024-02-27: Added steps of removing and installing the seatback heater.
  • 1133787-00-A Key, Seat Belt Release, Model 3
  • 1450424-00-A Mini Ratchet Bit Set
  • 1137568-00-C M3 Ethernet Cable
  • 1773092-00-A Diagnostic Harness Adapter - All Models
  • 1773595-00-A RJ45 Ethernet Cable

Remove

  1. Open the LH doors and lower the LH windows.
  2. Remove the LH front seat. See Front Seat Assemblies -1st Row Seat Assembly, LH (Remove and Replace).
  3. Remove the LH outboard sideshield. See Front Seat Covers And Pads -1st Row Outboard Sideshield, LH (Remove and Replace).
  4. Remove the LH outer sideshield carrier. See Front Seat Covers And Pads -1st Row Sideshield Carrier, LH (Remove and Replace).
  5. Remove the LH inboard sideshield. See Front Seat Covers And Pads -1st Row Inboard Sideshield, LH (Remove and Replace).
  6. Remove the LH inner sideshield carrier. See Front Seat Covers And Pads -1st Row Sideshield Carrier, LH (Remove and Replace).
  7. Rotate the seat to gain access to the underside of the seat, and unhook the straps for the lower section of the seat back, and then move the seat back flap away from the underside of the seat.
  8. Disconnect the seatback heater connector, and then separate the connector from the seat underside.
    Informational PurposesAn informational icon, calling your attention
    Note
    Slide the connector forward to release it from the seat assembly.
  9. Disconnect the seat cushion heater connector, and then separate the connector from the seat underside.
    Informational PurposesAn informational icon, calling your attention
    Note
    Slide the connector forward to release it from the seat assembly.
  10. Disconnect the LH front seat occupancy sensor, and set the sensor harness pigtail aside.
  11. Depress the retaining clip and remove the seat occupancy sensor from the seat underside.
  12. With assistance, remove the seat cushion retaining clips (x2) from the LH front seat suspension.
  13. Pull the front retaining clip that attaches the front of seat to the frame away from the seat cushion frame.
  14. Pull the inboard and outboard retaining clips that attach the side of seat trim to the frame away from seat cushion frame.
  15. Return the seat to upright position.
  16. Remove the driver seat cushion foam pad assembly from the seat frame assembly.
    Informational PurposesAn informational icon, calling your attention
    Note
    Lift the cushion straight off. Ensure the heating pad and the seat occupancy sensor harnesses are clear of the seat frame.
  17. Release the strap that attaches the seat cushion cover to the foam pad.
  18. Release the Velcro strips (x4) and hog rings (x5) to partially lift the seat cushion cover up.
    Warning IconA warning icon, calling your attention to a possibly risky situation
    CAUTION
    Be cautious while release the Velcro strips to avoid any damage on the foam pad.
  19. Partially remove the LH front seat heater.
    Warning IconA warning icon, calling your attention to a possibly risky situation
    CAUTION
    Do not damage the foam pad during removal. Gently lift the heater to access the occupancy sensor.
  20. Remove the LH front seat occupancy sensor.
    Warning IconA warning icon, calling your attention to a possibly risky situation
    CAUTION
    Do not damage the seat cushion when disassembling the occupancy sensor.

Install

  1. Remove the adhesion protector, and install the occupancy sensor onto the LH front seat cushion.
  2. Glue the seat cushion heater onto the seat cushion.
    Warning IconA warning icon, calling your attention to a possibly risky situation
    CAUTION
    Do not damage the foam pad during removal. Gently lift the heater to access the occupancy sensor.
  3. Put down the seat cushion cover, and secure the Velcro strips (x4) and hog rings (x5).
  4. Attach the strap that attaches the seat cushion cover to the foam pad.
  5. Install the seat cushion foam pad assembly onto the seat frame assembly.
    Informational PurposesAn informational icon, calling your attention
    Note
    Ensure the wiring harness are routed through the back of the seat frame.
  6. Maneuver the seat to gain access to the underside.
  7. Fasten the clips (x2) that attach the seat cushion to the seat suspension.
  8. Install the seat cushion cover to the seat cushion frame, and then fasten the clip strips (x3) that attach the seat cushion to the frame at the outboard and inboard sides, and at the front.
    Informational PurposesAn informational icon, calling your attention
    Note
    Make sure that the seat heater connector and seat occupied sensor assembly pass through the seat suspension or frame.
  9. Install the seat occupied sensor to the seat underside, and then fasten the clip that attaches the sensor to the seat underside.
  10. Connect the electrical wiring harness to the seat occupied sensor connector.
  11. Fasten the clip that attaches the seat pad heater connector to the seat underside, and then connect the electrical wiring harness to the seat pad heater connector.
  12. Fasten the clip that attaches the seat back heater connector to the seat underside, and then connect the electrical wiring harness to the seat back heater connector.
  13. Attach the clips (x2) that attach the lower section of the seat back cover to the seat suspension.
  14. Position the driver seat assembly in the upright position.
  15. Install the LH outer sideshield carrier. See Front Seat Covers And Pads -1st Row Sideshield Carrier, LH (Remove and Replace).
  16. Install the LH outboard sideshield. See Front Seat Covers And Pads -1st Row Outboard Sideshield, LH (Remove and Replace).
  17. Install the LH inner sideshield carrier. See Front Seat Covers And Pads -1st Row Sideshield Carrier, LH (Remove and Replace).
  18. Install the LH inboard sideshield. See Front Seat Covers And Pads -1st Row Inboard Sideshield, LH (Remove and Replace).
  19. Install the LH front seat. See Front Seat Assemblies -1st Row Seat Assembly, LH (Remove and Replace).
    Informational PurposesAn informational icon, calling your attention
    Note
    No need to reinstall the firmware or perform seat calibration.
  20. Raise the LH windows and close the LH doors.