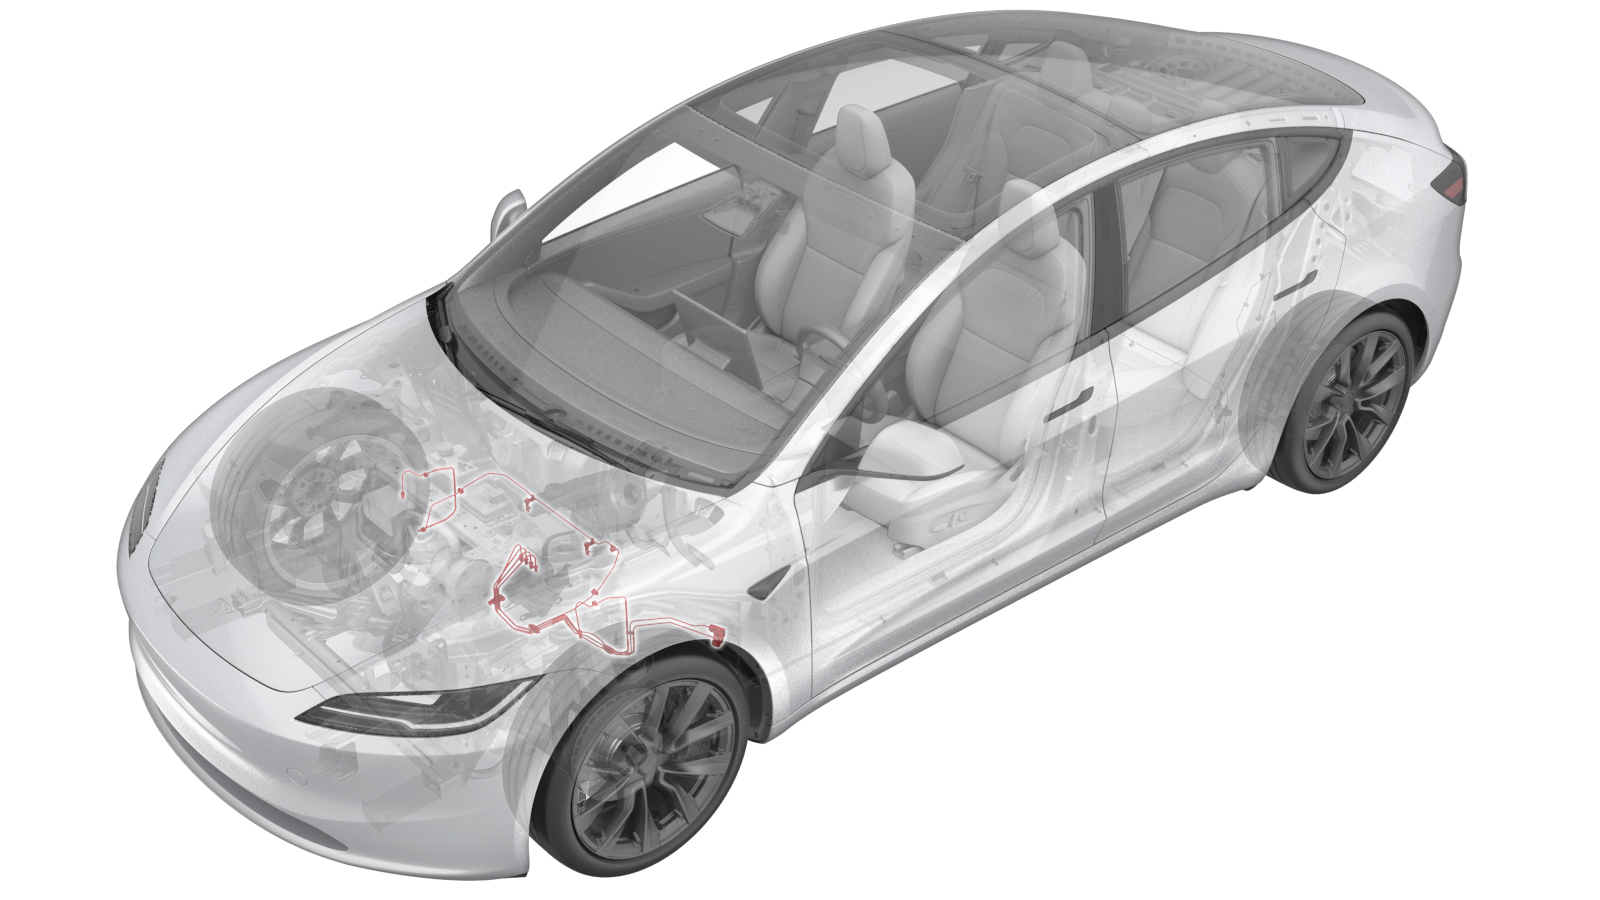
Assembly - Brake Lines - Front (Remove and Install)
 Correction code
3303010061
FRT
4.92
NOTE: Unless otherwise explicitly stated in the procedure, the correction code and FRT listed above reflect all of the work required to perform this procedure, including the linked procedures. Do not stack correction codes unless explicitly told to do so.
NOTE: See Flat Rate Times to learn more about FRTs and how they are created.
NOTE: See Personal Protection to make sure you
are wearing proper PPE when performing the procedure below.
NOTE: See Ergonomic Precautions for safe and healthy working practices.
Correction code
3303010061
FRT
4.92
NOTE: Unless otherwise explicitly stated in the procedure, the correction code and FRT listed above reflect all of the work required to perform this procedure, including the linked procedures. Do not stack correction codes unless explicitly told to do so.
NOTE: See Flat Rate Times to learn more about FRTs and how they are created.
NOTE: See Personal Protection to make sure you
are wearing proper PPE when performing the procedure below.
NOTE: See Ergonomic Precautions for safe and healthy working practices.
Equipment:
- 1076921-00-A Fluke 1587
- 1080568-00-A Fluid Catcher
- 1135762-00-A Kit, Svc Plug, Cooling Hose, Model 3
- 1044206-00-A Wheel Trim Removal Tool
- 1049463-00-A Steering Wheel Level
- 1054720-00-A Portable Bench
- 1133187-XX-A & -01-A Skt, 1/2" Dr, E18 Torx
- 1066521-00-A OTC Lift, 1,650LB Powertrain Table
- 1099645-00-C Fixture, Subframe, Model 3
- 1140311-00-A Lever Lock, HV Connector, Model 3
- 1143989-00-A Torque Wrench ½ in Dr.
- 1459409-00-A ADAPTER, HUB JACK, MODEL 3
- 1137855-00-A TOOL, REAR RIDE HEIGHT TORQUE, MODEL 3
- 1050448-00-B Vacuum Refill Tool
- 1080578-00-B Brake Bleed Adapter
- 1076971-02-A Torque Wrench ¼ in Dr. +Angle
- 1711245-00-A Snap On Ecotechnics Dual GAS AC Machine
- 1059330-00-B Skt, 1/4in Dr, 5-Lobe Torx Plus External
- 1130480-02-A Slim Test Probes
- 1090880-00-A Steering Wheel Holder **Std. w/ Hunter Alignment Equip.**
- 1119171-00-A Car Computer Fluid Port Plug
- 1463565-00-A Tool, Flexible Funnel
- 1081767-00-B Waste Oil Receiver
- 1060071-00-A Torque Wrench ¼ in Dr Hexagon
- 1081765-00-A 3/4 TON UNDERHOIST STAND
- 1065131-00-A Kit, Battery Coolant Drain
- 1479505-00-A M3/Y Vacuum Fill Adapter
- 1080579-00-A Brake Bleeder
- 1773092-00-A Diagnostic Harness Adapter - All Models
- 1137568-00-A Ethernet Cable, Diagnostics, Model 3
- 1705887-00-A ½" Dr. Electric Impact
| Description | Torque Value | Recommended Tools | Reuse/Replace | Notes |
|---|---|---|---|---|
| Bolts that secure the supermanifold to A/C line assembly to the HVAC assembly |
 22 Nm (16.2 lbs-ft) |
|
Reuse | |
| Bolts on the both sides of the shock tower brace |
55 Nm (40.6 lbs-ft) 62 Nm (45.7 lbs-ft) |
|
Reuse | |
| Nuts that attach the brake lines to the hydraulic control unit |
16 Nm (11.8 lbs-ft) |
|
Reuse | |
| Bolts that secure the front harness ground terminal |
8 Nm (5.9 lbs-ft) |
|
Reuse/Replace | |
| Nut that attaches the LH front brake line to the LH front brake hose |
16 Nm (11.8 lbs-ft) |
|
Reuse | |
| Nuts that attach the bottom side and the top side sill brake line tubes to the front brake pipe junction block |
16 Nm (11.8 lbs-ft) |
|
Reuse |
Remove
- Raise and support the vehicle. See Raise Vehicle - 2 Post Lift.
- Open all doors and lower all windows.
- Move both front seats forward.
- Unlock the vehicle gateway. See Gateway Unlock.
- On the touchscreen, tap the Service Mode "wrench" (at the bottom of the touchscreen UI), and then tap , and allow it to complete.
- Remove the underhood storage unit. See Underhood Storage Unit (Remove and Replace).
-
Recover the A/C refrigerant.
See A/C Refrigerant (Recovery and Recharge) (Restore).
NoteRecover the refrigerant while continuing this procedure.
- Remove the 2nd row lower seat cushion. See Seat Cushion - 2nd Row (Remove and Replace).
- Perform the Vehicle HV Disablement Procedure. See Vehicle HV Disablement Procedure (Test/Adjust).
- Remove the LV auxiliary battery. See LV Battery (Remove and Replace).
-
Remove the compressor
bracket. See Bracket Assembly - A/C Compressor (Remove and Replace).
NoteTerminate after disconnecting the HVIL connector.
-
Move the studs (x2) and lift
the cowl as needed to remove the fresh air intake assembly from the
vehicle.
- Position a fluid catcher underneath the front of the vehicle, and then remove the coolant bottle cap.
-
Disconnect the powertrain
bypass hose, the radiator outlet hose, and the radiator inlet hose from the
supermanifold, and plug the ends of all fittings as needed.
-
Disconnect the sensor
connectors (x2) on the chiller to battery hose and the powertrain supply
hose.
NoteDo not push down on the red tab. Pull the red tab to disengage the lock, and then pull it again to release the connector.
-
Disconnect the chiller to
battery hose, the powertrain supply hose, and the HV battery return hose
from the supermanifold, and plug the ends of all fittings as soon as
possible to avoid coolant loss.
NoteCoolant loss greater than 1L requires vacuum fill.
-
Depress the locking tab and
rotate to release the connector that attaches the thermal sub-harness to the
front controller.
-
Remove the clip that
attaches the thermal sub-assembly harness to the front harness guide
cover.
-
Remove the bolts (x2) that
secure the supermanifold to A/C line assembly to the HVAC assembly.
TIpUse of the following tool(s) is recommended:
- 6 in extension
- Cordless Ratchet/Impact Driver
- 13 mm socket
- Flex head ratchet/flex head torque wrench
-
Remove the bolts (x6) on the both sides of the shock tower brace.
TIpUse of the following tool(s) is recommended:
- 15 mm deep socket
- Cordless Ratchet/Impact Driver
- Flex head ratchet/flex head torque wrench
-
With an assistance, remove the thermal beam assembly.
- Remove the front subframe. See Subframe Assembly -Front (Remove and Replace).
-
Release the clips (x5) that
attach the chiller to the battery hose, and then remove the battery hose
from the vehicle.
NoteGently maneuver the hose as needed to clear the surrounding objects.
- Lower the vehicle to a comfortable working height and set the lift onto locks.
- Position a fluid catcher under the vehicle.
-
Remove the nuts (x4) that
attach the brake lines to the hydraulic control unit.
TIpUse of the following tool(s) is recommended:
- 12 mm socket
- Ratchet/torque wrench
- ¼ in to 3/8 in adapter
-
Release the LH and the RH
front brake line bundles from the bundle clips around the front rail
area.
-
Disengage the locking tab
and pull up on the connector to disconnect the hydraulic control unit
connector.
-
Release the clip that
secures the washer hose, and then remove the washer hose from the LH frame
rail area.
-
Release the front harness clips (x6) around the LH front frame rail
area.
-
Remove the bolts that secure
the front harness ground terminal, and then remove the brake lines from the
master cylinder control unit.
- If the bolts are self tapping tri-lobular bolts (1128269-00-A), discard them.
- If the bolts are normal bolts (1447438-00-A), put them aside for reuse.
TIpUse of the following tool(s) is recommended:- 10 mm socket
- Ratchet/torque wrench
- 2 in extension
-
Raise the vehicle to a
comfortable working height, and lower the lift onto locks.
CAUTION
Make sure there is an audible click of the locks on both sides before lowering, otherwise the vehicle may tilt to one side.
Make sure that the doors are clear of surrounding objects.
- Position the oil drain under the LH front brake hose area.
-
Remove the nut that attaches
the LH front brake line to the LH front brake hose.
TIpUse of the following tool(s) is recommended:
- 12 mm socket
- Ratchet/torque wrench
- ¼ in to 3/8 in adapter
-
Release the LH front brake
line clip.
-
Remove the nuts that attach
the bottom side and the top side sill brake lines to the front brake pipe
junction block.
TIpUse of the following tool(s) is recommended:
- 12 mm socket
- Ratchet/torque wrench
- ¼ in to 3/8 in adapter
-
Release the black clip, and
then release the brake lines from the LH front junction block.
- Perform step 33 to 35 for the RH side.
- Remove the oil drain from underneath the vehicle.
-
Raise the vehicle fully, and
lower the lift onto locks.
CAUTION
Make sure there is an audible click of the locks on both sides before lowering, otherwise the vehicle may tilt to one side.
Make sure that the doors are clear of surrounding objects.
-
Release the clip that attaches the front brake line bundle to the LH body
rail area.
-
Release the clips (x4) that
attach the RH front brake line to the vehicle, and then remove the front
bundle brake line from the vehicle.
Install
- Remove the RH front brake line from the new front brake line bundle.
-
Route the RH front brake line through the front subframe area out toward
the RH front wheel liner area, then route it to the LH frame rail area, and
then secure the clips (x5).
-
Route the front brake line bundle through the LH front wheel liner and then
the front subframe area, then route it to LH frame rail area, and the secure
the clip to the LH body rail area.
-
Install the nut that attaches the RH front brake line to the RH front brake
hose.16 Nm (11.8 lbs-ft)TIpUse of the following tool(s) is recommended:
- 12 mm socket
- Ratchet/torque wrench
- ¼ in to 3/8 in adapter
-
Secure the RH front brake line clips (x2).
-
Install the nut that
attaches the LH front brake line to the LH front brake hose.16 Nm (11.8 lbs-ft)TIpUse of the following tool(s) is recommended:
- 12 mm socket
- Ratchet/torque wrench
- ¼ in to 3/8 in adapter
-
Install the brake lines (x2) to the LH front junction block, and secure the
black clip.
-
Install the nuts that attach the bottom side and the top side sill brake
line tubes to the front brake pipe junction block.16 Nm (11.8 lbs-ft)TIpUse of the following tool(s) is recommended:
- 12 mm socket
- Ratchet/torque wrench
- ¼ in to 3/8 in adapter
- Lower the vehicle to a comfortable working height and set the lift onto locks.
-
Install the RH and the LH front brake line bundles to the bundle clips
around the front rail area.
-
Install the nuts (x4) that attach the brake lines to the hydraulic control
unit.16 Nm (11.8 lbs-ft)TIpUse of the following tool(s) is recommended:
- 12 mm socket
- Ratchet/torque wrench
- ¼ in to 3/8 in adapter
-
Gently push the connector downward, and engage the locking tab to connect
the hydraulic control unit connector.
-
Secure the front harness clips (x6) around the LH front frame rail
area.
-
Secure the clip that
attaches the washer hose to the LH front frame rail area.
-
Install the bolts that secure the front harness ground terminal.8 Nm (5.9 lbs-ft)TIpUse of the following tool(s) is recommended:
- 10 mm socket
- Ratchet/torque wrench
- 2 in extension
-
Raise the vehicle fully, and
lower the lift onto locks.
CAUTION
Make sure there is an audible click of the locks on both sides before lowering, otherwise the vehicle may tilt to one side.
Make sure that the doors are clear of surrounding objects.
-
Place the hose that attach the chiller to the battery properly, and then
install the clips (x5) to secure the hose.
NoteGently maneuver the hose as needed to clear the surrounding objects.
-
Install the front subframe. See Subframe Assembly -Front (Remove and Replace).
NoteTerminate after installing the intermediate shaft to the steering gear, and then go back to current procedure to perform the next step.
- With an assistance, place the thermal beam assembly into the vehicle properly.
-
Install the bolts (x6) on the both sides of the shock tower brace.55 Nm (40.6 lbs-ft)62 Nm (45.7 lbs-ft)TIpUse of the following tool(s) is recommended:
- 15 mm deep socket
- Cordless Ratchet/Impact Driver
- Flex head ratchet/flex head torque wrench
-
Install the bolts (x2) that secure the supermanifold to A/C line assembly
to the HVAC assembly.22 Nm (16.2 lbs-ft)TIpUse of the following tool(s) is recommended:
- 6 in extension
- Cordless Ratchet/Impact Driver
- 13 mm socket
- Flex head ratchet/flex head torque wrench
-
Remove the plugs on the ends of fittings, and then connect the radiator
inlet hose, the radiator outlet hose and the powertrain bypass hose from the
supermanifold.
NotePerform a push-pull-push test to make sure that the hoses are fully secured.
-
Install the clip that attaches the thermal sub-assembly harness to the
front harness guide cover.
-
Connect the connector that attaches the thermal sub-harness to the front
controller, and rotate fully to secure the locking tab.
-
Remove the plugs on the ends of fittings, and then connect the HV battery
return hose, the powertrain supply hose, and the chiller to battery hose to
the supermanifold.
NotePerform a push-pull-push test to make sure that the hoses are fully secured.
-
Engage the locking tabs to connect the sensor connectors on the chiller to
battery hose and the powertrain supply hose.
NoteThe harnesses and the coolant hoses are color coded. Match the harness color to the coolant hose color.
-
Move the studs (x2) and lift the cowl as needed to install the fresh air
intake assembly.
-
Install the compressor bracket. See Bracket Assembly - A/C Compressor (Remove and Replace).
NoteDo not install the underhood storage unit at this time.
-
Recover the A/C refrigerant.
See A/C Refrigerant (Recovery and Recharge) (Restore).
NoteRecover the refrigerant while continuing this procedure.
- Perform a cooling system vacuum refill. See Cooling System - Vacuum Refill (Test/Adjust).
- Remove the A/C hoses from the vehicle, and install caps onto the A/C ports.
- Bleed all the four calipers. See Brake Fluid Bleed/Flush (Maintenance).
- Install the underhood storage unit. See Underhood Storage Unit (Remove and Replace).
- Install the 2nd row seat cushion. See Seat Cushion - 2nd Row (Remove and Replace).
- Remove the lift arms from below the vehicle.