2026-06-02
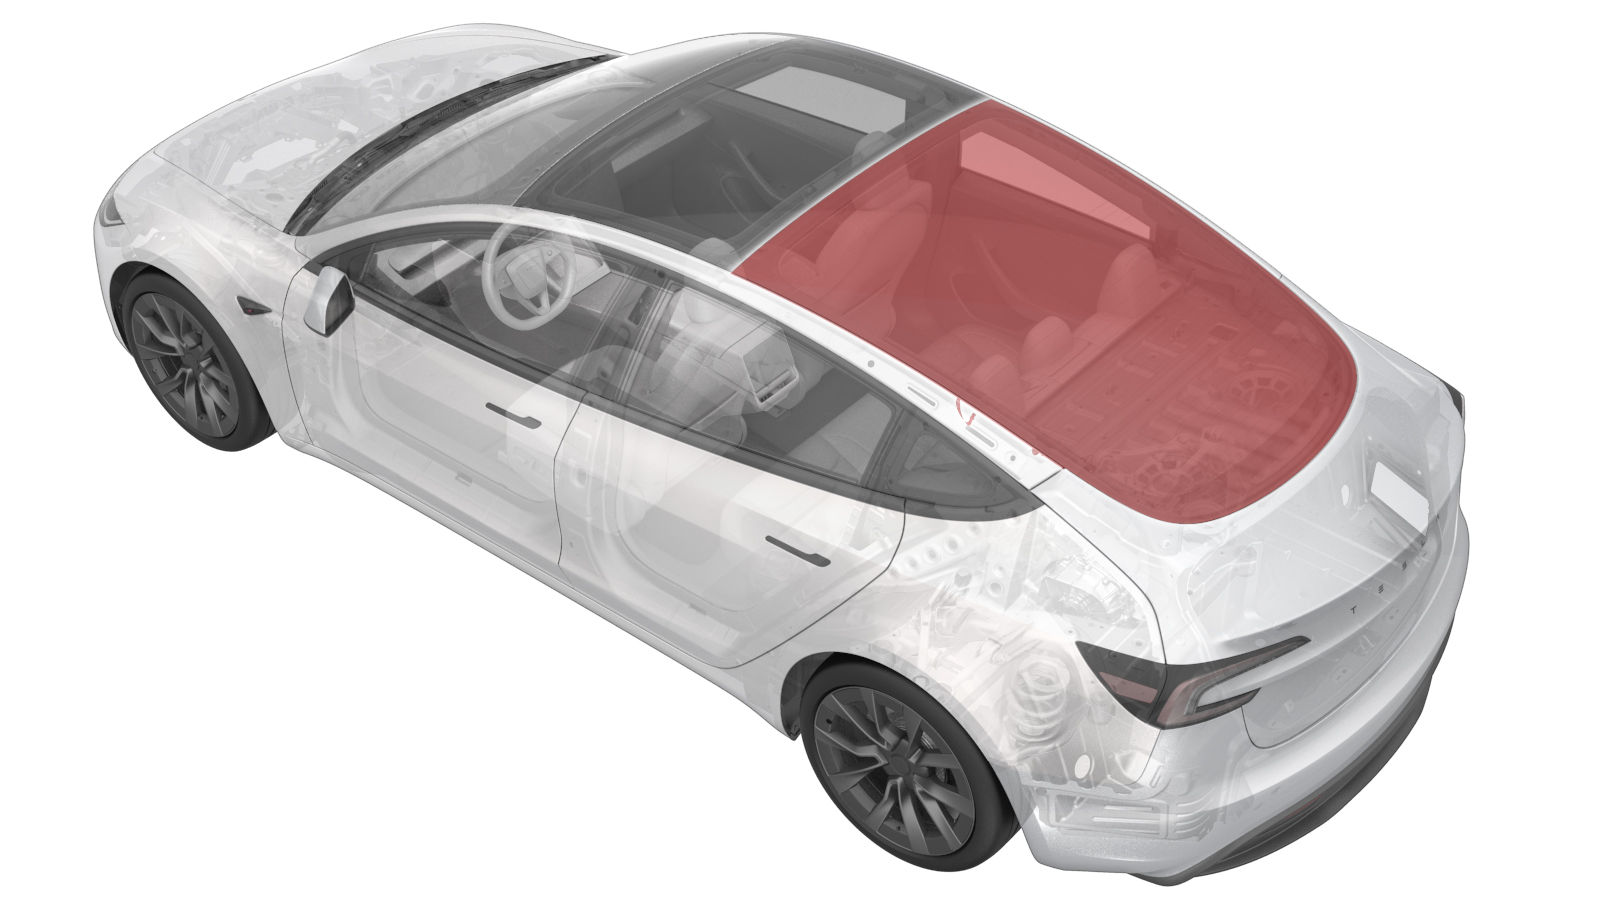
Glass - Backlight (Remove and Replace)
 Correction code
1020030042
FRT
1.44
NOTE: Unless otherwise explicitly stated in the procedure, the correction code and FRT listed above reflect all of the work required to perform this procedure, including the linked procedures. Do not stack correction codes unless explicitly told to do so.
NOTE: See Flat Rate Times to learn more about FRTs and how they are created.
NOTE: See Personal Protection to make sure you
are wearing proper PPE when performing the procedure below.
NOTE: See Ergonomic Precautions for safe and healthy working practices.
Correction code
1020030042
FRT
1.44
NOTE: Unless otherwise explicitly stated in the procedure, the correction code and FRT listed above reflect all of the work required to perform this procedure, including the linked procedures. Do not stack correction codes unless explicitly told to do so.
NOTE: See Flat Rate Times to learn more about FRTs and how they are created.
NOTE: See Personal Protection to make sure you
are wearing proper PPE when performing the procedure below.
NOTE: See Ergonomic Precautions for safe and healthy working practices.
- 2026-06-02: Added detailed instructions for using Spider tool. Added warnings to set drill clutch to 1 while using the Spider tool with a drill.
- 2024-12-10: Added new caution about Pre-Installation Glass Inspection service requirements.
Warning
Wear appropriate personal
protective equipment (PPE) including cut-resistant gloves and safety glasses when performing
this procedure.
CAUTION
New glass components
(windshield, roof, door, and fixed glass) must be inspected before installation to meet
Tesla’s internal standards of quality. Perform the inspection described in Pre-Installation Glass Inspection before beginning this
procedure.
Equipment:
- Portable Bench: 1054720-00-A
- Retractable Blade Knife: 1082497-00-A
- Double Suction Cup Handles: 1080599-00-A
- Gap and Flush Tool: 1588904-00-A
- Caulk and Adhesive Gun: 1080593-00-A
- 1571168-00-A WRD Spider 3 Glass Removal Kit
- 1126456-00-A Battery Powered Drill
Remove
-
Open all doors and lower the
windows.
NoteLatch the rear doors to prevent accidental closure.
- Move both front seats fully forward.
- Remove the LH side rail trim. See Trim - Side Rail - LH (Remove and Replace).
- Remove the LH side bolster. See Bolster - Side - Seat - 2nd Row - LH (Remove and Replace).
-
Remove the LH C-pillar trim. See Trim - C-Pillar - LH (Remove and Replace).
NoteNo need to remove the bolt that attaches the LH seatbelt anchor to the body.
-
Disconnect the LH antenna filter
harness connector.
-
Release the clip that attaches the LH
side backlight harness to the body.
- Repeat step 3 through step 7 on the RH side of the vehicle.
- Remove the package tray trim. See Trim - Package Tray (Premium) (Remove and Replace).
- Open the trunk.
-
Apply masking tape to the exterior of
both roof pillars to protect the paint.
-
Insert a starter tool from inside the
vehicle through the adhesive bead at the bottom area of the backlight glass.
CAUTIONUse a guard to prevent damage to the rear deck panel.
-
Release the line from the starter tool
and wrap the line around the exterior of the backlight glass assembly.
NoteEnsure that enough length is pulled through the glass. Verify that the line sits underneath the glass and seal.
-
Attach an anchor point to the interior
of the backlight glass assembly and secure the line.
-
Secure the interior side of the line
to the spider cutting tool.
CAUTIONFollow the instructions on the spider tool. Feed the line through the opening of the cutting tool and tie a knot to secure it in place. If the spindle is not turned in the proper direction, the cutting tool will be damaged.
-
Secure the spider cutting tool to the
interior side of the backlight glass assembly.
NoteNote the orientation of the cutting line. Make sure that the line wraps over the large pulley and holds at a 90° angle.
-
Install an angle driver to an electric drill and set the drill clutch to 1.
WarningFailure to set the drill clutch to 1 may result in serious injury.
-
Use the drill to turn the spindle on the cutting tool. Begin cutting urethane around
the glass.
WarningDo not begin cutting the windshield without first setting the drill clutch to 1. Failure to do so may result in serious injury.WarningWear appropriate eye and hand protection while cutting the glass assembly.CAUTIONPlace a plastic guard to protect the headliner and package tray when cutting in those areas.TIpMove the cutting tool as needed while keeping the line close to a 90° angle.
Figure 1. Plastic guard to protect the headliner -
Install suction cup handles (x2) and
remove the backlight assembly from the vehicle.
CAUTIONRecommend assistance.TIpLift up on the glass from the interior of the vehicle to ease removal. Lower the trunk right before it latches.
-
Scrape the old urethane from the
vehicle.
NoteTIpUse of the following tool(s) is recommended:
- Razor blade
Install
-
Clean the urethane path on the vehicle
with IPA. Allow 1 minute for the IPA to dry.
-
Secure double suction cup handles onto
both side of backlite glass
TIpClean the glass under the suction cups if needed. Allow 1 minute for IPA to dry.
-
Position the backlight glass onto the
vehicle for dry-fit and note any locations where net pads need to be adjusted.
CAUTIONRecommend assistance
-
Check the gap and flush of glass to
all of the surrounding areas.
Note
-
Remove the glass and place it upside
down on a stand.
CAUTIONRecommend assistance
-
Perform any net pad adjustments for
backlight glass if necessary.
Note6x side edge net pads, 3x upper net pads, 3x rear net pads
-
Apply urethane primer to the vehicle
along the old urethane path.
NoteMake sure to add primer over any areas that were scratched during windshield removal. Allow primer to dry before applying urethane.
-
Apply urethane primer to the backlight
glass along the old urethane path.
NoteAllow primer to dry before applying urethane.
-
Prepare the caulking gun and urethane.
The opening must be 8 mm wide and 13 mm tall.
-
Apply urethane to the body along the
original path.
-
Install the backlight glass onto the
vehicle.
CAUTIONRecommend assistanceTIpOpen the trunk again.
-
Remove the tape from the exterior of
both roof pillars.
-
Close the trunk via the interior
switch.
-
Check gaps and flush to vehicle before
fully seating the windshield.
Note
-
Wipe down any debris or visible
urethane from the glass and body. Allow 1 minute for IPA to dry.
-
Apply tape to secure the backlight
glass to the body while the urethane cures.
NoteRefer to the urethane instructions for dry time. Remove the suction cups from the glass.
- Install the package tray trim. See Trim - Package Tray (Premium) (Remove and Replace).
-
Fasten the clip that attaches the LH
side backlight harness to the body.
-
Connect the LH antenna filter harness
connector.
-
Install the LH C-pillar trim. See
Trim - C-Pillar - LH (Remove and Replace).
NoteNo need to install the bolt that attaches the LH seatbelt anchor to the body.
- Install the LH side bolster. See Bolster - Side - Seat - 2nd Row - LH (Remove and Replace).
- Install the LH side rail trim. See Trim - Side Rail - LH (Remove and Replace).
- Repeat step 17 through step 22 on the RH side of the vehicle.
- Move both front seats back to their original positions.
- Connect a laptop with Toolbox to the vehicle. See Toolbox (Connect and Disconnect).
-
In Toolbox, click the Actions tab, type "VCRIGHT"
into the search field, click on TEST-RESET_VCRIGHTvia Service Mode Plus:
- Low Voltage ➜ Power Distribution ➜ Reset VCRIGHT
- Mid Voltage ➜ Power Distribution ➜ Reset VCRIGHT
- Disconnect the laptop from the vehicle. See Toolbox (Connect and Disconnect).
- Raise all windows and close all doors.
-
Remove the masking tape after the
urethane has cured.
CAUTIONDo not drive the vehicle until the adhesive manufacturer’s recommended minimum drive-away time has passed. Dow Betaseal Express has a drive-away time of 1 hour minimum in temperatures of 0˚F (-18˚C) or warmer. If necessary, leave the tape applying pressure to the glass on the vehicle and advise the customer that they can remove it after 24 hours. Additionally, advise the customer that they should avoid high driving speeds and speed bumps for the next 24 hours.