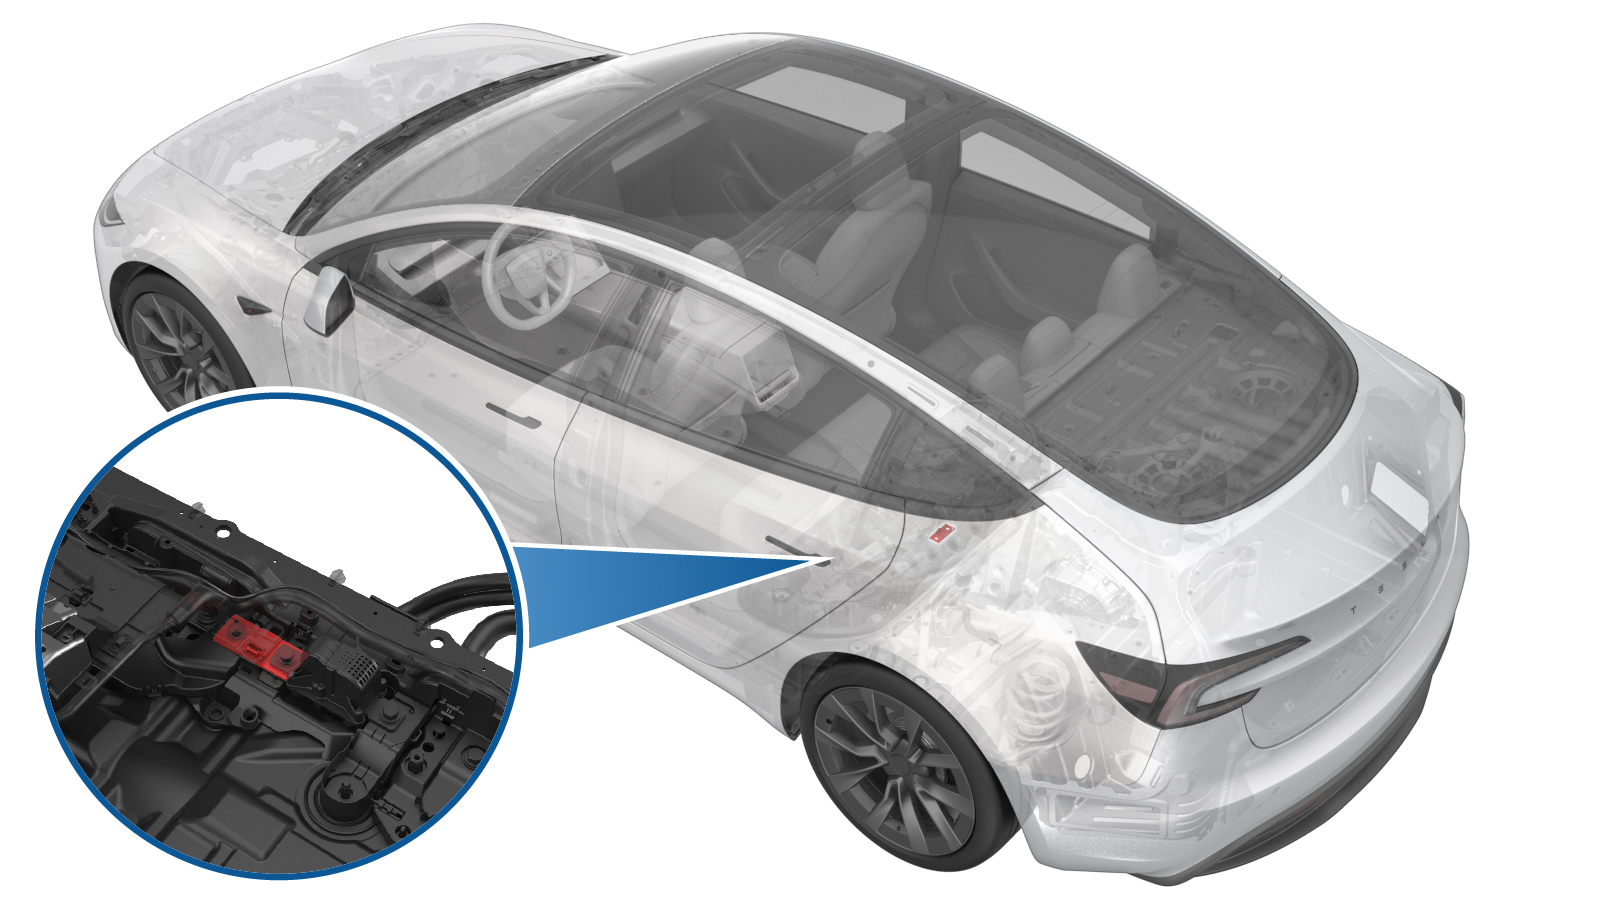
Shunt - Ancillary Bay (Remove and Replace)
 Correction code
1630010032
FRT
1.08
NOTE: Unless otherwise explicitly stated in the procedure, the correction code and FRT listed above reflect all of the work required to perform this procedure, including the linked procedures. Do not stack correction codes unless explicitly told to do so.
NOTE: See Flat Rate Times to learn more about FRTs and how they are created.
NOTE: See Personal Protection to make sure you
are wearing proper PPE when performing the procedure below.
NOTE: See Ergonomic Precautions for safe and healthy working practices.
Correction code
1630010032
FRT
1.08
NOTE: Unless otherwise explicitly stated in the procedure, the correction code and FRT listed above reflect all of the work required to perform this procedure, including the linked procedures. Do not stack correction codes unless explicitly told to do so.
NOTE: See Flat Rate Times to learn more about FRTs and how they are created.
NOTE: See Personal Protection to make sure you
are wearing proper PPE when performing the procedure below.
NOTE: See Ergonomic Precautions for safe and healthy working practices.
Equipment:
- 1057602-00-A Ratchet, 1/4" Sq Dr, HV Insulated
- 1057606-00-A Skt, 1/4" Sq Dr, 13mm, HV Insulated
- 1131071-00-A Dummy Disconnect, Pyro, Safety
- 1108272-00-B Cap, Logic Conn, Inv, 3DU
- 1076927-00-A Resistance meter, microohm, Hioki RM 3548
Only
technicians who have completed all required certification courses are permitted to
perform this procedure. Tesla recommends third party service provider technicians
undergo equivalent training before performing this procedure. For more information on
Tesla Technician requirements, or descriptions of the subject matter for third parties,
see HV Certification Requirements. Proper personal protective equipment (PPE) and insulating HV
gloves with a minimum rating of class 0 (1000V) must
be worn at all times a high voltage cable, busbar, or fitting is handled. Refer to Tech Note TN-15-92-003, High Voltage Awareness
Care Points
for additional safety
information.
- 2025-10-20: Updated the routine for different shunt types.
Torque Specifications
| Description | Torque Value | Recommended Tools | Reuse/Replace | Notes |
|---|---|---|---|---|
| Bolt that attaches the HV battery shunt to the busbar |
|
|
Replace |
Remove
-
Remove the ancillary bay cover. See Ancillary Bay Cover (Remove and Replace).
WarningHV insulating gloves and leather glove protectors must be worn throughout the remainder of this procedure. Do not remove gloves or protectors until otherwise noted.
- Remove the pyrotechnic battery disconnect. See Pyro Disconnect - HV Battery (Remove and Replace).
- Remove the HV battery shunt isolator. See Insulator - Access - Shunt (Remove and Replace).
-
Remove and discard the bolt that attaches the HV battery shunt to the
busbar.
TIpUse of the following tool(s) is recommended:
- 13 mm socket
-
Remove the pyrotechnic battery disconnect dummy.
-
Remove the HV battery shunt.
Install
-
Perform a zero adjust of the
Hioki resistance meter in preparation to measure resistances later in this
procedure.
WarningHV insulating gloves and leather glove protectors must be worn throughout the remainder of this procedure. Do not remove gloves or protectors until otherwise noted.
-
Write down new shunt bar resistance
and part number.
NoteThe resistance is in the range of 20000 to 30000 nano Ohms. For example, "R:25819nΩ” is a resistance of 25819 nano Ohms, so record "25819".NoteConvert the recorded resistance value from decimal to hexadecimal format.
- Use an IPA wipe to clean the HV mating surfaces of the shunt, busbar, and the pyrotechnic battery disconnect.
-
Position the HV battery shunt to the busbar, and then hand-tighten a new
bolt that attaches the HV battery shunt to the busbar.
- Use an IPA wipe to clean the HV mating surfaces of the shunt, busbar, and the pyrotechnic battery disconnect.
-
Set the multimeter to the
"LoZ" (low impedance) mode.
NoteFor Fluke multimeters without "LoZ" mode on the mode selector, see Multimeter (LoZ Setting).
-
Measure the voltage between the busbar (left) and shunt (right) for at
least 10 seconds, so as to balance the voltage across the pyrotechnic
battery disconnect mount points.
NoteThe voltage displayed on the multimeter is not as important as balancing the mount points.WarningThe video(s) included in this procedure are meant as an overview for supplemental purposes only. Follow all of the steps listed in the procedure to avoid damage to components and/or personal injury.
-
While still measuring the
voltage, have an assistant position the pyrotechnic battery disconnect into
the HV battery for installation. Make sure to align the pins of the
connector with the new pyrotechnic battery disconnect, and then press the
pyrotechnic battery disconnect down onto the busbars.
- Continue to measure the voltage for another 10 seconds after the pyrotechic battery disconnect has been set onto the busbars.
-
Install the new bolts (1104475-00-F
x2) that attach the pyrotechnic battery disconnect to the HV battery, and then mark the
bolts with a paint pen after they are torqued.
- Precondition the bolts by torquing to 15 Nm.
- Reverse the bolts 180°.
- Re-torque to 5 Nm.
- Torque an additional 60°.
- Mark the bolts with a paint pen.
TIpUse of the following tool(s) is recommended:- Insulated
tools:
- 13 mm socket
-
Install a new bolt that attaches the
HV battery shunt to the busbar.
- Torque bolt to
 15 Nm (11.1 lbs-ft)
 - Reverse bolt by 180°
- Retorque the bolt
to 5 Nm (3.7 lbs-ft)
- Torque bolt an additional 60°
TIpUse of the following tool(s) is recommended:- 13 mm socket
- Torque bolt to
-
Use the Hioki resistance
meter to measure the resistance at the HV joint between the pyrotechnic
battery disconnect and the LH busbar.
NoteThe maximum acceptable resistance is 0.048 mΩ (48 μΩ). There is too much resistance in the High Voltage joint. Remove the fastener, clean areas with isopropyl alcohol, install fastener back and test again
-
Use the Hioki resistance
meter to measure the resistance at the HV joint between the pyrotechnic
battery disconnect and the shunt.
NoteThe maximum acceptable resistance is 0.033 mΩ (33 μΩ). There is too much resistance in the High Voltage joint. Remove the fastener, clean areas with isopropyl alcohol, install fastener back and test again
-
Use the Hioki resistance meter to measure the resistance of the HV joint
between the shunt and the adjacent busbar.
NoteThe maximum acceptable resistance is 0.045 mΩ (45 μΩ). There is too much resistance in the High Voltage joint. Remove the fastener, clean areas with isopropyl alcohol, install fastener back and test again
- Install the HV battery shunt isolator. See Insulator - Access - Shunt (Remove and Replace).
- Remove the ancillary bay cover. See Ancillary Bay Cover (Remove and Replace).
- Connect a laptop with Toolbox to the vehicle. See Toolbox (Connect and Disconnect).
-
Select and operation, enter the shunt bar resistance value previously recorded in
step 2, and select corresponding shunt type based on the Part number. Click Run and allow the routine
to complete.
NoteShunt types includes Vishay whose part number looks like 2084224-XX-X and Cyntec whose part number looks like 1078835-XX-X or 1588177-XX-X.
- Disconnect the laptop with Toolbox from the vehicle. See Toolbox (Connect and Disconnect).