2025-04-11
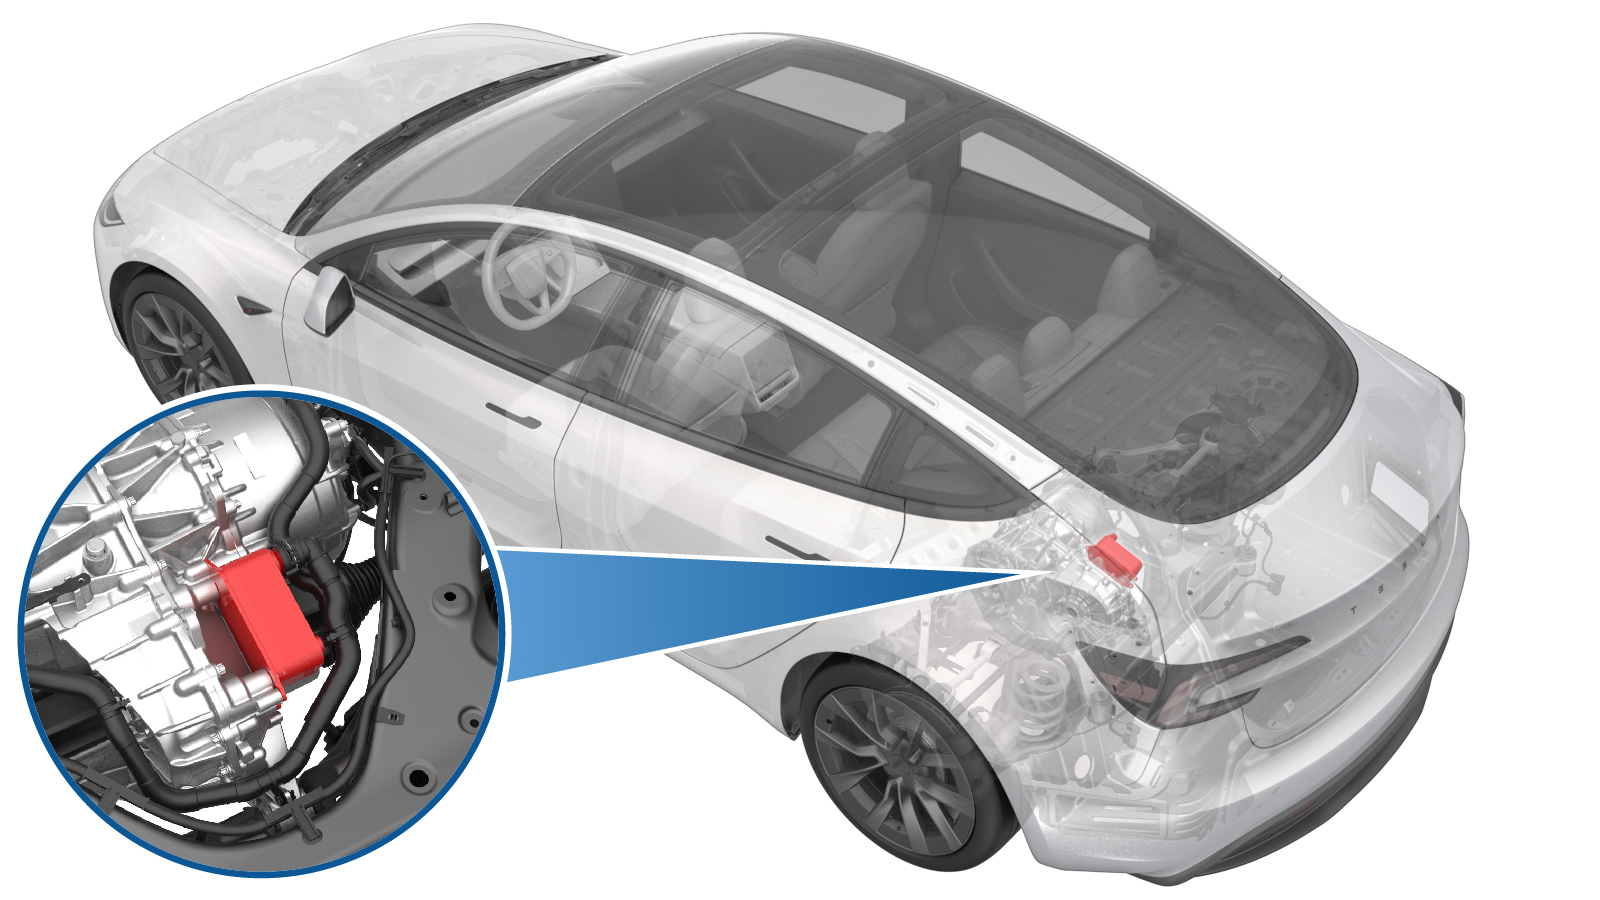
Heat Exchanger - Rear Drive Unit (3DU) (Remove and Replace)
 Correction code
4001020032
FRT
1.92
NOTE: Unless otherwise explicitly stated in the procedure, the correction code and FRT listed above reflect all of the work required to perform this procedure, including the linked procedures. Do not stack correction codes unless explicitly told to do so.
NOTE: See Flat Rate Times to learn more about FRTs and how they are created.
NOTE: See Personal Protection to make sure you
are wearing proper PPE when performing the procedure below.
NOTE: See Ergonomic Precautions for safe and healthy working practices.
Correction code
4001020032
FRT
1.92
NOTE: Unless otherwise explicitly stated in the procedure, the correction code and FRT listed above reflect all of the work required to perform this procedure, including the linked procedures. Do not stack correction codes unless explicitly told to do so.
NOTE: See Flat Rate Times to learn more about FRTs and how they are created.
NOTE: See Personal Protection to make sure you
are wearing proper PPE when performing the procedure below.
NOTE: See Ergonomic Precautions for safe and healthy working practices.
Equipment:
- 1096075-00-A Tool, Hub Puller, Hydraulic
- 1053589-00-A Slide Hammer
- 1498673-00-A Cable Axle Removal Kit
- 1135762-00-A Coolant Hose Plug Kit
- 1459409-00-A Hub Jack Adapter
- 1050448-00-B Vacuum Refill Tool
- 1065131-00-A Battery Coolant Drain Kit
- 1479505-00-A M3/Y Vacuum Fill Adapter
Torque Specifications
| Description | Torque Value | Recommended Tools | Reuse/Replace | Notes |
|---|---|---|---|---|
| Bolts (x2) that attach the rear drive unit heat exchanger to the rear drive unit |
 5 Nm (3.7 lbs-ft) + 30 degrees |
|
Reuse |
Remove
- Verify there is no abnormal tire wear per Courtesy Inspection.
- Move the vehicle to a 2 post lift. See Raise Vehicle - 2 Post Lift.
- Open all doors and lower all windows.
- Remove the rear underhood apron. See Underhood Apron - Rear (Remove and Replace).
- On the touchscreen, tap to place the vehicle into tow mode.
- Place the vehicle in Service Mode by using the touchscreen. See Service Mode.
- Unlock the vehicle gateway. See Gateway Unlock.
- On the touchscreen, tap the Service Mode "wrench" (at the bottom of the touchscreen UI), and then tap , click Run, and allow the routine to complete.
- Disconnect LV power. See LV Power (Disconnect and Connect).
- Remove the RH rear halfshaft. See Halfshaft - Rear Drive Unit - LH (Remove and Replace).
- Position the coolant drain collector underneath the RH rear of the HV battery.
-
Release the clip that attaches the rear drive unit outlet hose to the rear drive unit
heat exchanger.
-
Release the coolant outlet hose from
rear driver unit heat exchanger, and plug both ends.
NoteUse a shop towel to clean any residue coolant if necessary. Coolant loss greater than 1L requires vacuum fill.
-
Release the fir tree clip (x1) for
upper coolant hose.
-
Release the rear drive unit inverter
coolant hose from heat exchanger.
NoteUse a foldable funnel as required.
-
Remove the bolts (x2) that attach the rear drive unit heat exchanger to the rear
drive unit, and then remove the heat exchanger from the drive unit.
NoteThe number of fasteners may vary due to production changes.TIpUse of the following tool(s) is recommended:
- External Torx Plus EP10
- ¼ in to 3/8 in adapter
- 2 in extension
- 4 in extension
- Flex head ratchet/flex head torque wrench
-
Remove the heat exchanger from the drive unit assembly.
Install
-
Apply a light coat of KAF1 oil to the
O-rings of the heat exchanger, and then wipe away any residue.
-
Install the rear drive unit heat
exchanger onto the rear drive unit, and then install the bolts (x2) that attach the heat
exchanger to the drive unit.5 Nm (3.7 lbs-ft) + 30 degreesTIpUse of the following tool(s) is recommended:
- External Torx Plus EP10
- ¼ in to 3/8 in adapter
- 2 in extension
- 4 in extension
- Flex head ratchet/flex head torque wrench
-
Secure the rear drive unit inverter
coolant hose to heat exchanger.
NoteUse a foldable funnel as required.
-
Secure fir tree clip (x1) for upper
coolant hose.
-
Install coolant outlet hose to rear
driver unit heat exchanger and plug both ends.
NoteUse a shop towel to clean any residue coolant if necessary. Coolant loss greater than 1L requires vacuum fill.
-
Secure the clip that attaches the rear
drive unit outlet hose to the rear drive unit heat exchanger.
- Remove the coolant drain collector from under the vehicle.
- Install the RH rear halfshaft. See Halfshaft - Rear Drive Unit - LH (Remove and Replace).
- Refill the rear drive unit with gearbox fluid. See Gearbox Fluid - Rear Drive Unit (3DU) (Drain and Refill) (Remove and Replace).
- Perform a cooling system vacuum refill. See Cooling System - Vacuum Refill (Test/Adjust).
- Install the 2nd row seat cushion. See Seat Cushion - 2nd Row (Remove and Replace).
- Connect the LV battery power. See LV Power (Disconnect and Connect).
- Hold the brake pedal and select the park icon on the touchscreen to disable the EPB service mode.
- Disable Service Mode. See Service Mode.
- Install the rear underhood apron. See Underhood Apron - Rear (Remove and Replace).
- Raise all windows and close all doors.
- Remove the vehicle from the 2 post lift.
- Review the wheel alignment requirements and add correction code as needed.