2023-10-17
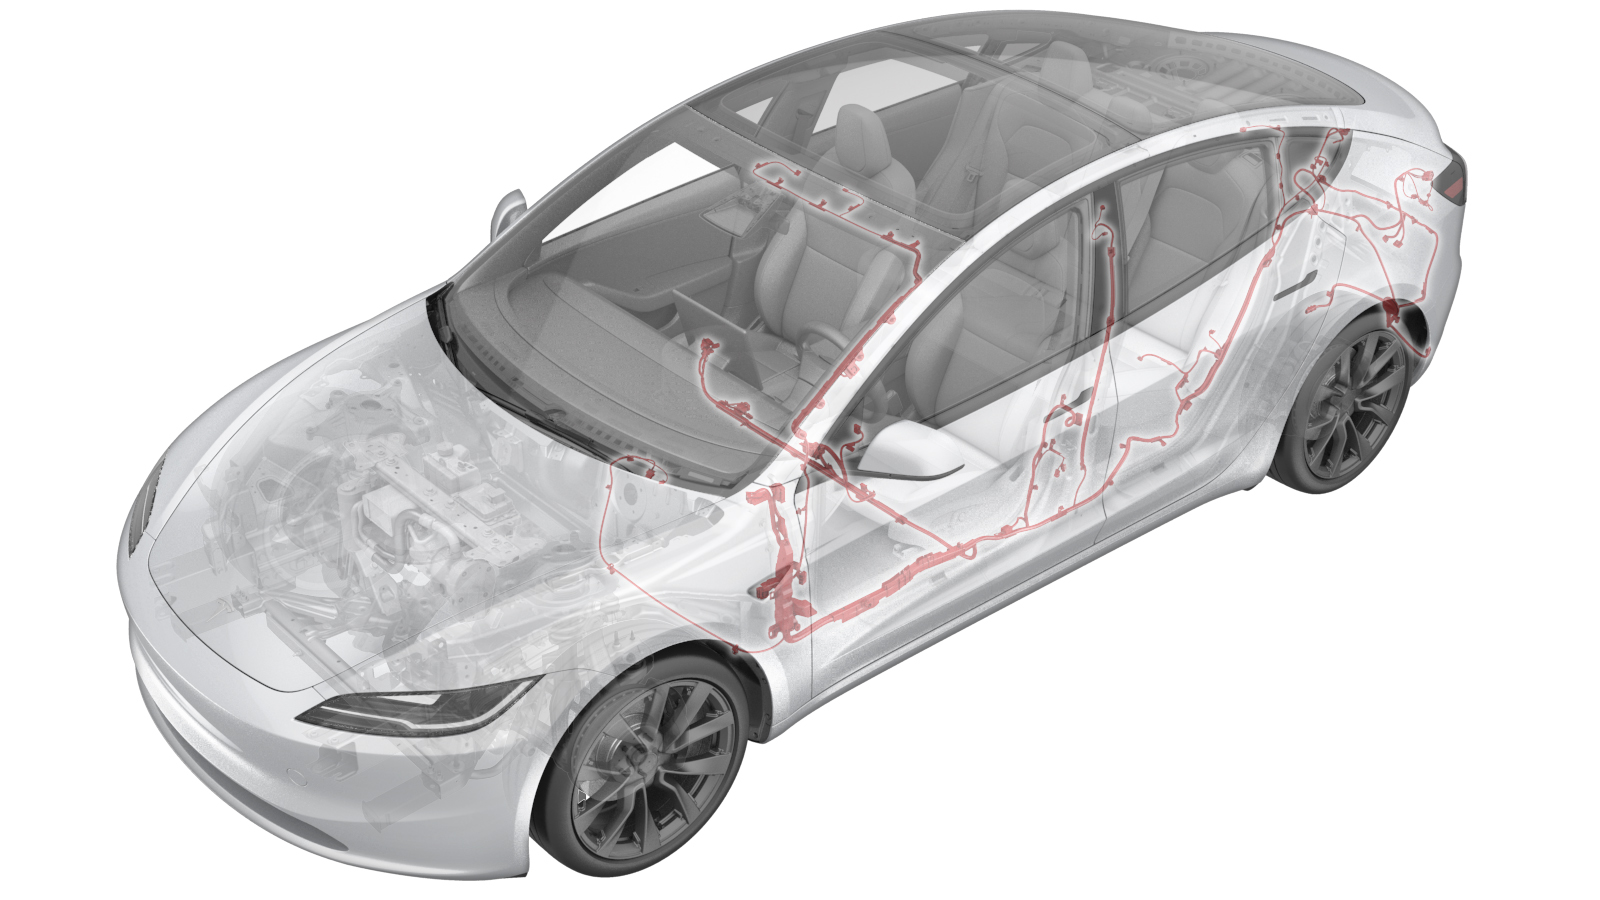
Harness - Body - LH (NA/EU) (Remove and Replace)
 Correction code
1710040052
FRT
3.54
NOTE: Unless otherwise explicitly stated in the procedure, the correction code and FRT listed above reflect all of the work required to perform this procedure, including the linked procedures. Do not stack correction codes unless explicitly told to do so.
NOTE: See Flat Rate Times to learn more about FRTs and how they are created.
NOTE: See Personal Protection to make sure you
are wearing proper PPE when performing the procedure below.
NOTE: See Ergonomic Precautions for safe and healthy working practices.
Correction code
1710040052
FRT
3.54
NOTE: Unless otherwise explicitly stated in the procedure, the correction code and FRT listed above reflect all of the work required to perform this procedure, including the linked procedures. Do not stack correction codes unless explicitly told to do so.
NOTE: See Flat Rate Times to learn more about FRTs and how they are created.
NOTE: See Personal Protection to make sure you
are wearing proper PPE when performing the procedure below.
NOTE: See Ergonomic Precautions for safe and healthy working practices.
Remove
- Raise and support vehicle.
- Open all four doors.
- Open trunk from exterior switch.
- Lower all four windows.
- Insert special removal tool into the bottom of the retractor, and then release it from LH front seat.
- Move LH and RH front seat forward and remove the front seat rear bolts.
- Move LH and RH front seat backward and remove the rear seat front bolts.
- Place vehicle into tow mode.
- Power off the vehicle from the center display.
- Remove the rear underhood apron. See Underhood Apron - Rear (Remove and Replace).
- Disconnect the LV battery. See LV Power (Disconnect and Connect).
- Remove the rear fascia . See Fascia Assembly - Rear (Remove and Install).
-
Disconnect the electrical
harness from the rear Bluetooth passive entry antenna connector.
-
Remove the clips that attach
the LH body harness to the body in the rear fascia and rear subframe
areas.
-
Disconnect the electrical
harness from the rear subframe electrical harness connector and the LH
electric parking brake connector.
-
Release the clips that
attach the electrical harness to the body, and then push the rear subframe
portion of the electrical harness through the LH side trunk bulkhead.
NoteThe LH body harness passes through the trunk near the rear section of the rear LH wheel liner area.
- Remove lift arms from below vehicle.
- Push vehicle away from lift.
- Place vehicle to wheel chocks.
- Remove the RH footwell cover. See Cover - Footwell - Front Passenger (Remove and Replace).
- Remove the RH instrument panel end cap. See End Cap - Instrument Panel - LH (Remove and Replace)
- Remove the RH upper A-pillar trim. See Trim - A-Pillar - Upper - LH (Remove and Replace)
- Remove the RH lower A-pillar trim. See Trim - A-Pillar - Lower - LH (Remove and Replace)
- Remove the driver seats. See Seat Assembly - 1st Row - No Lumbar - RH (Remove and Replace)
- Repeat step 20through step 24 for the RH side of the vehicle.
- Remove the 2nd row LH seat back assembly. See Seatback - 2nd Row - LH (Remove and Replace)
- Remove the 2nd row RH seat back assembly. See Seatback - 2nd Row - RH (Remove and Replace)
- Remove the LH side rear trunk trim. See Trim - Side - Trunk - LH (Remove and Replace)
- Remove the LH lower B-pillar trim. See Trim - B-Pillar - Lower - LH (Remove and Replace)
- Remove the LH middle B-pillar trim. See Trim - B-Pillar - Middle - LH (Remove and Replace)
- Remove the LH B-pillar applique. See Applique - B-Pillar - LH (Remove and Replace)
- Remove the sill rear trunk trim. See Trim - Trunk Sill (Remove and Replace)
-
Release the trunk carpet
clips from the body studs under the 2nd row seat cushion.
-
Release the clips that
attach the trunk carpet to the body, and then remove the trunk carpet from
the vehicle.
- Remove the LH side rear trunk trim. See Trim - Side - Trunk - LH (Remove and Replace).
- Remove the center console assembly. See Center Console (Remove and Replace).
- Remove LH front main cabin carpet from vehicle. See Carpet - Front - LH (Remove and Replace).
- Remove RH front main cabin carpet from vehicle. See Carpet - Front - RH (Remove and Replace).
- Remove RH 2nd row floor duct. See Duct - Floor - 2nd Row - RH (Remove and Replace)
- Remove LH 2nd row floor duct. See Duct - Floor - 2nd Row - LH (Remove and Replace)
-
Disconnect the LH headlight
connector.
- Partially release front roof headliner from body.
-
Remove connector from security controller and disconnect clips (X9) that
secures LH body wiring harness to LH A-pillar to body.
-
Disconnect front harness white connector (X909) from the LH body harness
and separate it from the front left body controller.
- Disconnect Body 1 (J2), Body 2 (J4) and Body 3 (J5), connectors from the LH front body controller.
-
Release LH body harness from LH body controller and A-pillar and move
aside.
-
Disconnect the electrical harness from the rear subframe electrical harness
connector and the LH electric parking brake connector.
-
Release the clips that
attach the electrical harness to the body under the front LH seat and RH
lower B-pillar areas.
-
Disconnect LH body harness connector from RCM.
-
Release the clips that attach the electrical harness to the body in the LH
lower B-pillar areas.
-
Disconnect the electrical
harness from the connectors in the RH lower B-pillar area.
-
Remove LH harness clips under front seats and center console, and
disconnect LH body harness connector from LH rear door harness connector at
outer B-pillar area.
-
Disconnect harness connectors from LH retractor.
-
Disconnect B-pillar impact accelerometer sensor connector.
-
Release the clips that
attach the harness to the body in the B-pillar area.
-
Remove and discard the bolt
that attaches the electrical harness ground strap to the body in the LH
lower B-pillar area.
-
Remove LH camera wire harness from B-pillar area and secure it to body
clip.
-
Disconnect 2nd row 60 seatback heater harness.
-
Disconnect LH rear seat belt buckle connector.
-
Disconnect clip securing LH rear seatbelt buckle harness to vehicle
body.
-
Disconnect harness connector for LH side curtain airbag.
-
Disconnect LH 2nd row seat belt retractor connector.
-
Remove LH body harness clips around LH side curtain airbag and retractor
area.
-
Remove LH body harness clips around lower C-pillar area.
-
Disconnect LH power strut connector.
-
Disconnect charge port ECU connector from LH body harness.
-
Disconnect DC logic connector from charge port assembly.
-
Release charge port actuator logic connector from charge port
assembly.
-
Release AC logic connector from charge port assembly.
-
Remove the LH body harness ground strap below LH tail lamp.
-
Remove LH body harness clips around LH side trunk area.
-
Remove LH body harness from vehicle.
Install
-
Install LH body harness
clips around LH side trunk area.
-
Install the LH body harness ground strap below LH tail lamp.
-
Connect AC logic connector to charge port assembly.
-
Connect charge port actuator logic connector to charge port assembly.
-
Connect DC logic connector to charge port assembly.
-
Connect charge port ECU connector to LH body harness.
-
Connect LH power strut connector.
-
Install LH body harness clips to lower C-pillar area.
-
Install LH body harness clips to LH side curtain airbag and retractor
area.
-
Connect LH 2nd row seat belt retractor connector.
-
Connect harness connector for LH side curtain airbag.
-
Connect clip securing LH rear seatbelt buckle harness to vehicle
body.
-
Install LH camera wire harness to B-pillar area and secure it to body
clip.
-
Install the new bolt that attaches the electrical harness ground strap to
the body in the LH lower B-pillar area.
-
Connect the clips that attach the harness to the body in the B-pillar
area.
-
Connect B-pillar impact accelerometer sensor connector.
-
Connect harness connectors from LH retractor.
-
Install LH harness clips under front seats and center console, and connect
LH body harness connector from LH rear door harness connector at outer
B-pillar area.
-
Connect the electrical harness to the connectors in the RH lower B-pillar
area.
-
Connect the clips that attach the electrical harness to the body in the LH
lower B-pillar areas.
-
Connect LH body harness connector to RCM.
-
Connect the clips that attach the electrical harness to the body under the
front LH seat and RH lower B-pillar areas.
-
Connect the electrical harness to the rear subframe electrical harness
connector and the LH electric parking brake connector.
-
Connect LH body harness to LH body controller and A-pillar.
- Connect Body 1 (J2), Body 2 (J4) and Body 3 (J5), connectors to the LH front body controller.
-
Connect front harness white connector (X909) to the LH body harness.
-
Install connector to security controller and connect clips (X9) that
secures LH body wiring harness to LH A-pillar to body.
-
Connect the LH headlight connector.
- Install LH 2nd row floor duct. See Duct - Floor - 2nd Row - LH (Remove and Replace)
- Install RH 2nd row floor duct. See Duct - Floor - 2nd Row - RH (Remove and Replace)
- Install RH front main cabin carpet from vehicle. See Carpet - Front - RH (Remove and Replace).
- Install LH front main cabin carpet from vehicle. See Carpet - Front - LH (Remove and Replace).
- Install the center console assembly. See Center Console (Remove and Replace).
- Install the LH side rear trunk trim. See Trim - Side - Trunk - LH (Remove and Replace).
-
Connect the clips that attach the trunk carpet to the body, and then
install the trunk carpet to the vehicle.
-
Connect the trunk carpet clips to the body studs under the 2nd row seat
cushion.
- Install the sill rear trunk trim. See Trim - Trunk Sill (Remove and Replace)
- Install the LH B-pillar applique. See Applique - B-Pillar - LH (Remove and Replace)
- Install the LH middle B-pillar trim. See Trim - B-Pillar - Middle - LH (Remove and Replace)
- Install the LH lower B-pillar trim. See Trim - B-Pillar - Lower - LH (Remove and Replace)
- Install the LH side rear trunk trim. See Trim - Side - Trunk - LH (Remove and Replace)
- Install the 2nd row RH seat back assembly. See Seatback - 2nd Row - RH (Remove and Replace)
- Install the 2nd row LH seat back assembly. See Seatback - 2nd Row - LH (Remove and Replace)
- Repeat step 38 through step 41 for the RH side of the vehicle.
- Install the driver seats. See Seat Assembly - 1st Row - No Lumbar - RH (Remove and Replace)
- Install the RH lower A-pillar trim. See Trim - A-Pillar - Lower - LH (Remove and Replace)
- Install the RH upper A-pillar trim. See Trim - A-Pillar - Upper - LH (Remove and Replace)
- Install the RH instrument panel end cap. See End Cap - Instrument Panel - LH (Remove and Replace)
- Install the RH footwell cover. See Cover - Footwell - Front Passenger (Remove and Replace).
- Place vehicle to wheel chocks.
- Install lift arms from below vehicle.
-
Connect the clips that attach the electrical harness to the body, and then
pull the rear subframe portion of the electrical harness through the LH side
trunk bulkhead.
NoteThe LH body harness passes through the trunk near the rear section of the rear LH wheel liner area.
-
Connect the electrical harness to the rear subframe electrical harness
connector and the LH electric parking brake connector.
-
Install the clips that attach the LH body harness to the body in the rear
fascia and rear subframe areas.
-
Connect the electrical harness to the rear Bluetooth passive entry antenna
connector.
- Install the rear fascia . See Fascia Assembly - Rear (Remove and Install).
- Connect the LV battery. See LV Power (Disconnect and Connect).
- Install the rear underhood apron. See Underhood Apron - Rear (Remove and Replace).
- Power on the vehicle from the center display.
- Exit vehicle of tow mode.
- Move LH and RH front seat forward and install the rear seat front bolts.
- Move LH and RH front seat backward and install the front seat rear bolts.
- Remove special removal tool from the bottom of the retractor.
- Raise all four windows.
- Close trunk from exterior switch.
- Close all four doors.