Check Valve - Supermanifold (Remove and Replace)
 Correction code
1840010122
FRT
0.78
NOTE: Unless
otherwise explicitly stated in the procedure, the above correction code and
FRT reflect all of the work required to perform this procedure, including
the linked procedures. Do
not stack correction codes unless explicitly told to do so.
NOTE: See Flat Rate
Times to learn more about FRTs and how
they are created. To provide feedback on FRT values, email ServiceManualFeedback@tesla.com.
NOTE: See Personal Protection
to make sure wearing proper PPE when performing the below procedure.
NOTE: See Ergonomic Precautions for safe and
healthy working practices.
Correction code
1840010122
FRT
0.78
NOTE: Unless
otherwise explicitly stated in the procedure, the above correction code and
FRT reflect all of the work required to perform this procedure, including
the linked procedures. Do
not stack correction codes unless explicitly told to do so.
NOTE: See Flat Rate
Times to learn more about FRTs and how
they are created. To provide feedback on FRT values, email ServiceManualFeedback@tesla.com.
NOTE: See Personal Protection
to make sure wearing proper PPE when performing the below procedure.
NOTE: See Ergonomic Precautions for safe and
healthy working practices.
Remove
- Raise and support the vehicle. See Raise Vehicle - 2 Post Lift.
- Open the LH front door and lower the LH front window.
- Enable Service Mode via vehicle touchscreen. See Service Mode.
- Unlock the vehicle gateway. See Gateway Unlock.
- On the touchscreen, touch and select Run to start the "Start Thermal Fill Drain (Refrigerant Only)" routine.
- Disconnect LV power. See LV Power (Disconnect and Connect).
- Remove the underhood storage unit. See Underhood Storage Unit (Remove and Replace).
- Remove the fresh intake duct. See Fresh Air Intake - HVAC (Remove and Replace).
- Recover the A/C refrigerant. See A/C Refrigerant (Recovery and Recharge) (Maintenance).
- Remove the LV battery. See LV Battery (Remove and Replace).
- Remove the front aero shield panel. See Panel - Aero Shield - Front (Remove and Replace).
- Remove the coolant bottle. See Service Kit - Coolant Reservoir (Remove and Replace).
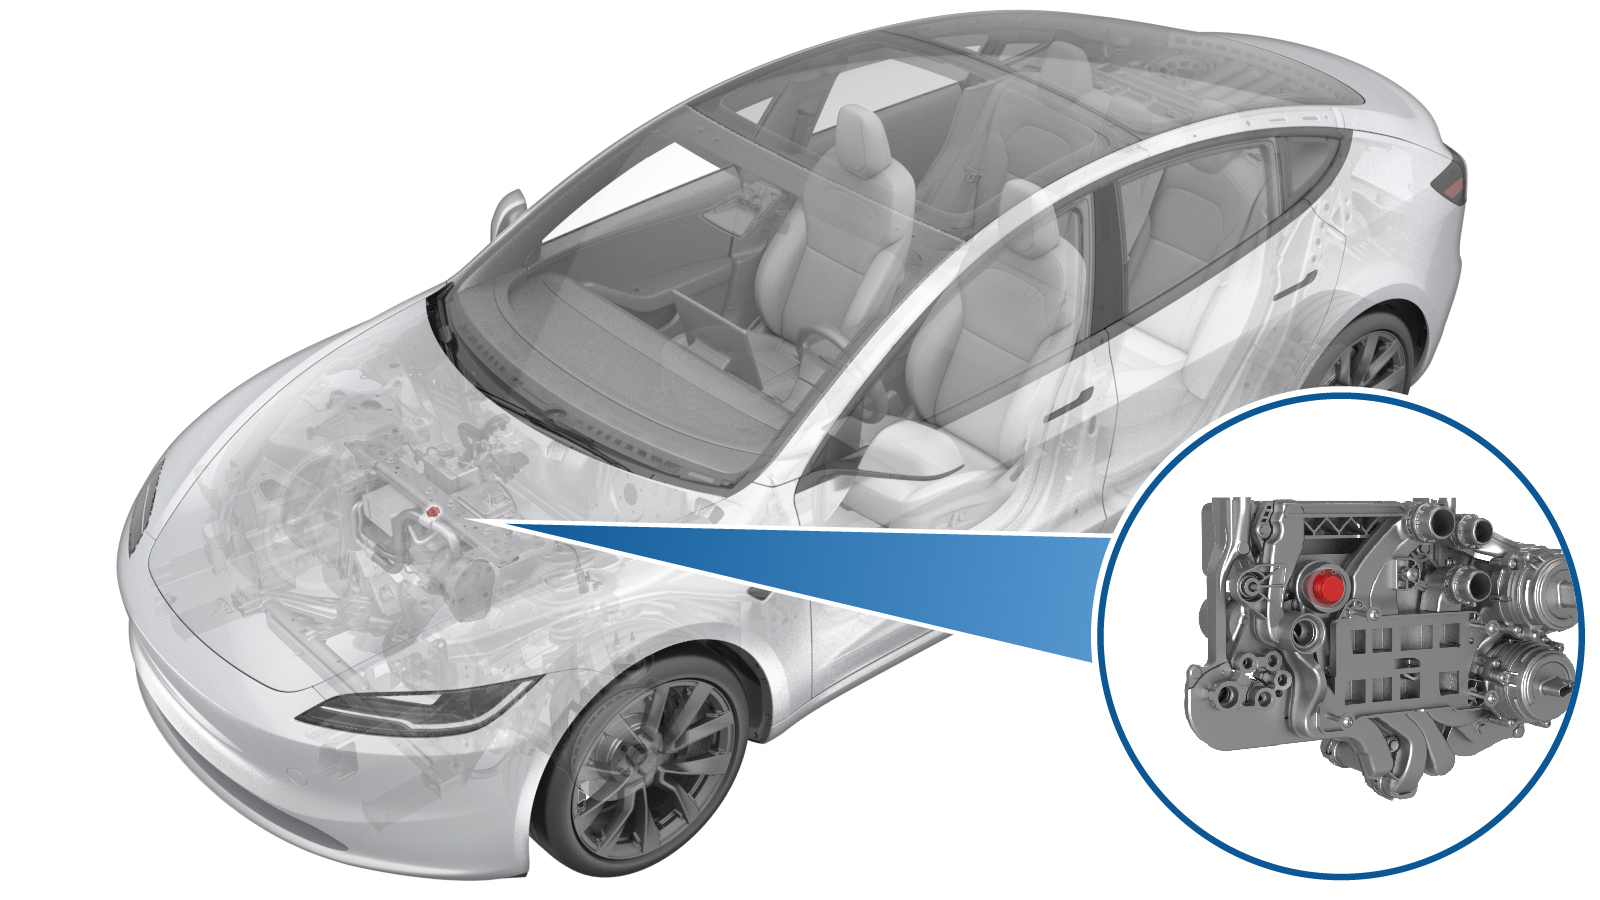
-
Remove and discard the liquid cooled
condenser check valve snap ring from the supermanifold.
TIpUse an inspection mirror as needed.WarningThe video(s) included in this procedure are meant as an overview for supplemental purposes only. Follow all of the steps listed in the procedure to avoid damage to components and/or personal injury.
-
Remove the liquid cooled condenser
check valve from the supermanifold.
CAUTIONIf the check valve separates from the aluminum cap during removal, do not use metal tools. Metal tools may scrape the supermanifold housing causing internal damage. Use fingers or wrap electrical tape around a 90 degree pick.
Install
-
Lubricate O-rings on the liquid cooled
condenser check valve with the appropriate A/C oil. See Fluids and Capacities for A/C oil specifications. Then
install the check valve into the supermanifold.
TIpUse an inspection mirror as needed.WarningThe video(s) included in this procedure are meant as an overview for supplemental purposes only. Follow all of the steps listed in the procedure to avoid damage to components and/or personal injury.
-
Install a new liquid cooled condenser
check valve snap ring onto the supermanifold.
NoteMake sure the snap ring is fully seated inside the groove in the supermanifold.TIpUse an inspection mirror as needed.
- Install the coolant bottle. See Service Kit - Coolant Reservoir (Remove and Replace).
- Install the LV battery. See LV Battery (Remove and Replace).
- Connect LV power. See LV Power (Disconnect and Connect).
- Install the front aero shield panel. See Panel - Aero Shield - Front (Remove and Replace).
- Perform the vacuum leak test and oil injection procedure. See Vacuum Leak Test and Oil Injection.
-
Recharge the A/C refrigerant. See
A/C Refrigerant (Recovery and Recharge) (Maintenance).
CAUTIONRecharge the refrigerant exactly as instructed. Failure to adhere to the instructions can cause catastrophic damage to the cooling system.
- If a refrigerant leak detector is available, make sure that there is no leak at the low pressure temperature sensor.
- Fill the coolant level to the "Max" line.
- Unlock the vehicle gateway. See Gateway Unlock.
- Access the thermal system routines on the touchscreen: Touch Quick Controls > Service Mode > Diagnostics > Thermal.
-
Touch Thermal > Coolant System >
Coolant Purge Start > Run and then allow the routine to complete.
NoteMake sure the vehicle is not in Drive.NoteThe test will last for approximately 10 minutes. Monitor and keep the superbottle topped off while the test is running.
-
Inspect the coolant level and top off
as necessary.
NoteEnsure that the coolant is filled to the "Max" line.
- Install the coolant bottle cap.
-
Perform the heat pump commissioning
through UI: Touch Thermal >
Sensors and Valves > Run Heat Pump Commissioning and then touch
Run.
NoteTouch Close once the routine is passed.
-
Perform the thermal performance test
through UI: Touch Thermal >
Actions > Test Thermal Performance and then touch Run.
NoteTouch Close once the routine is passed.
-
Perform the HVAC performance test
through UI: Touch Thermal >
Actions > Test HVAC Performance and then touch Run.
NoteTouch Close once the routine is passed.
- Exit Service Mode through UI. See Service Mode.
- Install the fresh intake duct. See Fresh Air Intake - HVAC (Remove and Replace).
- Install the underhood storage unit. See Underhood Storage Unit (Remove and Replace).