2023-12-12
Module - Air Suspension - ECU (Tesla) (RHD) (Remove and Replace)
Correction Code 31100212
- 2023-12-12: Condensed installation procedure.
Warning
If the 12V power
supply is disconnected, do not attempt to open any doors with door glass in
closed position. Failure to follow this instruction could result in door glass
shatter.
Note
Before
disconnecting the 12V power supply, ensure that the driver’s door window is
fully open. Failure to follow this instruction could result in vehicle
lockout.
Removal
- Open both front doors and lower the windows.
- Move the LH front seat to its rearmost position.
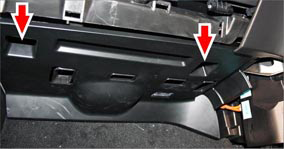
-
Release the clips (x4) that
attach the LH instrument panel side cover to the instrument panel,
disconnect the connector, and then remove the instrument panel side
cover.
-
Release the clips (x2) that
attach the LH middle A-pillar trim to the vehicle, and then remove the
middle A-pillar trim.
-
Release the clips (x4) that
attach the LH lower A-pillar trim to the vehicle, and then remove the LH
lower A-pillar trim.
NoteThe number of clips securing the trim varies depending on vehicle production date. Replace any damaged or missing clips prior to reinstalling the sill trim.
-
Release the clips that
attach the front section of the LH center console wrapped trim to the center
console.
NoteThe center console wrapped trim is attached to the console with 10 clips. Only release the clips that attach the front section of the wrapped trim to enable removal of the center console carpeted closeout extension.
-
Remove the clips (x6) that
attach the LH center console closeout panel to the center console, and then
remove the center console closeout panel.
NotePull the side panel back and slide the closeout panel down behind the side panel.
-
Release the clips (x6) that
attach the lower glove box trim, and then remove the lower glove box
trim.
- Release the clips (x2) that secure the LH footwell cover to the dash.
- Disconnect the footwell lamp harness connector.
- Remove the footwell cover.
-
Carefully fold back the
front section of the carpet at the LH footwell.
-
Remove the bolts (x3) that
attach the LH footwell harness cover to the vehicle (torque 4 Nm), and then
remove the footwell harness cover.
- Disconnect 12V power. See Disconnect 12V Power .
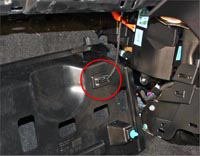
-
Remove the bolts (x3) that
attach the ECU bracket to the bulkhead (torque 2 Nm).
-
Disconnect the air
suspension module connectors (x2), and then remove the module from the
vehicle.
Installation
Installation procedure is the reverse of removal, except for the following:
- Reinstall the firmware (CAN redeploy) though the touchscreen. See Firmware Reinstall - Touchscreen.
- Confirm the vehicle ride height. See Ride Height - Adjust.
- Using the touchscreen, exit Service Mode via .