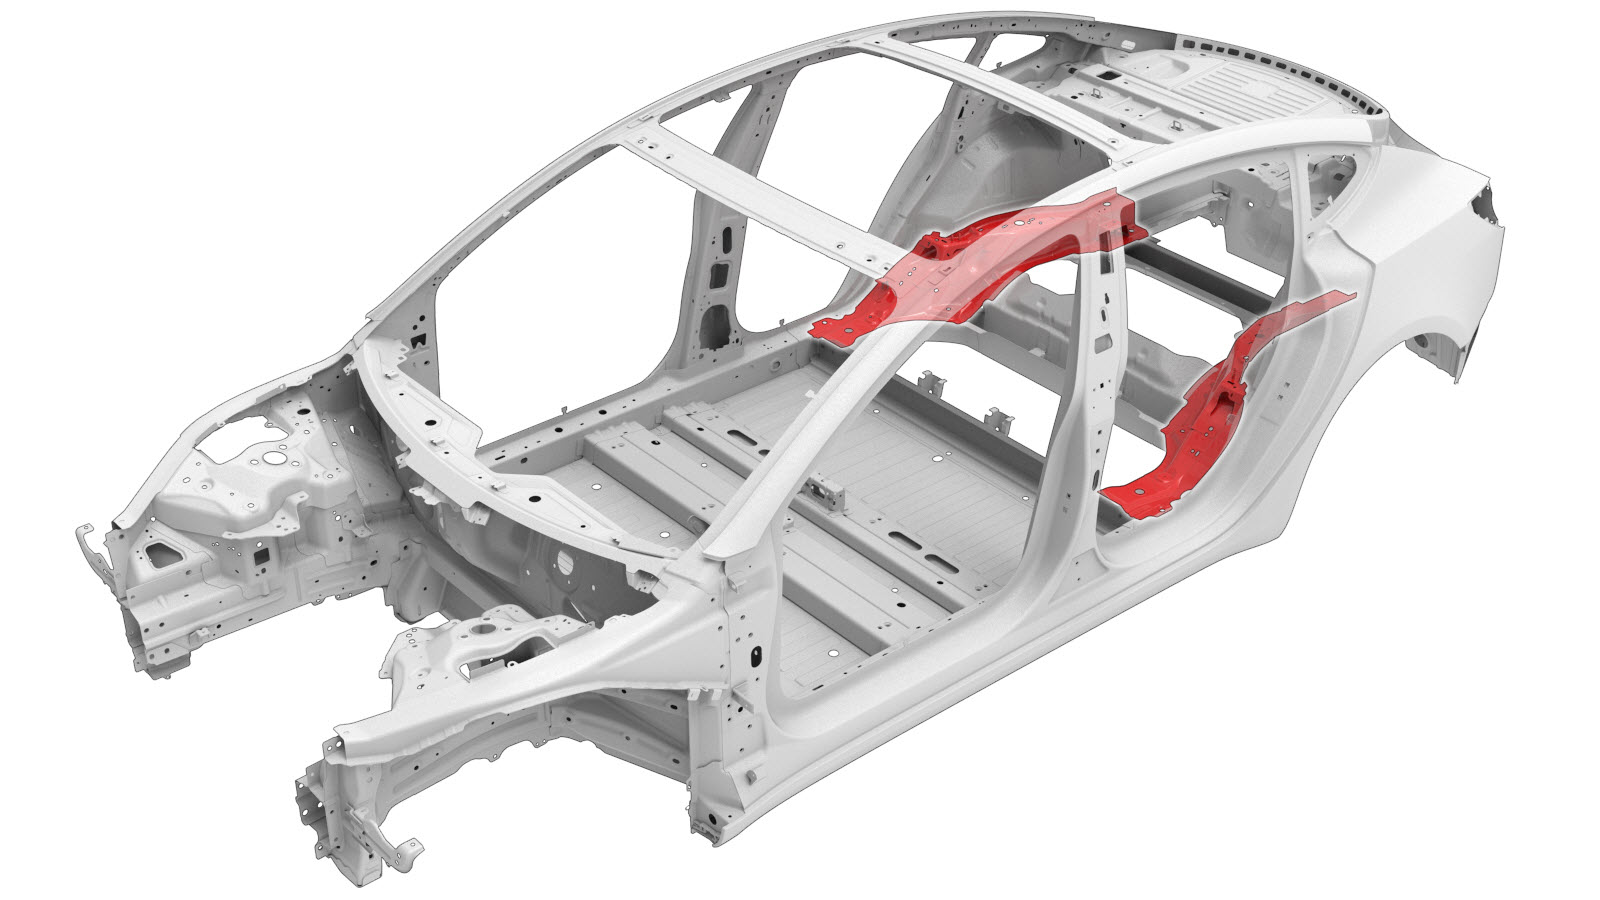
Rear Torque Box Inner
 Correction code:
10101802102
10101802302
NOTE:
Unless explicitly stated in the procedure, the above
correction code includes all Collision Repair and Service
repair work required to perform this procedure, including
the linked Collision Repair procedures and linked Service
procedures. Do not stack Collision Repair correction
codes unless explicitly told to do so. Depending
on the damage to the vehicle, additional repairs may be
required.
Correction code:
10101802102
10101802302
NOTE:
Unless explicitly stated in the procedure, the above
correction code includes all Collision Repair and Service
repair work required to perform this procedure, including
the linked Collision Repair procedures and linked Service
procedures. Do not stack Collision Repair correction
codes unless explicitly told to do so. Depending
on the damage to the vehicle, additional repairs may be
required.
Repair Information
- Review all collision repair general practices and safety documentation and wear the appropriate PPE (Personal Protective Equipment) before beginning this procedure.
- This procedure can be completed without using a frame bench.
Parts List
| Quantity | Description | Image / Notes |
|---|---|---|
| 1 | ASY, RR TORQUE BOX, INR (Rear Torque Box Inner) | |
| 21 | High Strength Structural Rivet, 6.5 mm | |
| 7 | Structural Bulb Rivet, 6.5 mm | |
| 12 | Structural Countersunk Rivet, 6.5 mm | |
| 1 | Countersunk Rivet, 4.8 mm Short | |
| 1 | Bolt | Tesla part number 1063260-00-C. |
When ordering parts, refer to the Parts Catalog and enter the VIN of the vehicle being repaired to find the correct parts (and the part numbers) for the vehicle. Alternatively, use the search function in the Parts Catalog to find a specific part for the vehicle.
Repair Procedure
- Remove the Carpet - Interior Complete (Remove and Replace).
- Remove the Door - Rear - LH (Remove and Install).
- Remove the Carpet - Rear Trunk (1-Piece) (Remove and Replace).
- Remove the Trim - Side - Trunk - LH (Remove and Replace).
- Remove the Trim - Side - Trunk - RH (Remove and Replace).
- Remove the Trim - Package Tray (Remove and Replace).
- Remove the Seatbelt - 2nd Row - LH (Remove and Replace).
- Remove the Wheel Arch Liner - Rear - LH (Remove and Replace).
- Remove the HV Battery (AWD) (Remove and Install).
- Remove the Subframe Assembly - Rear (Remove and Install).
-
Remove the Rear Subframe Upper Crossmember.
-
Remove the Third Row Seat Crossmember (Upper).
-
Remove the Heelboard Crossmember.
-
Remove the original component.
or Factory Spot Welds
or Drill through factory spot weldsNoteWhen drilling out spot welds, use a drill bit that creates a hole correctly sized for the fastener that will replace the spot weld.or Factory SPRs
or Bolts
-
Prepare for installation.
or High Strength Structural Rivets, 6.5 mm
- A = 33 mm.
- B = 9 mm.
- C = 15 mm.
- D = 6 mm.
- E = 33 mm.
or Structural Bulb Rivets, 6.5 mm
or Structural Countersunk Rivets, 6.5 mm
or Countersunk Rivets, 4.8 mm Short
or Bolts
or Installation Spot Welds
- Apply structural adhesive to the mating surfaces on the vehicle and the new component or components.
-
Install the new component or components.
Torque the bolts to 24 Nm.
-
Perform resistance spot
welding.
or Installation Spot Welds
WarningFailure to follow all welding safety precautions, including the use of personal protective equipment, could result in serious injury or property damage. Only technicians who have completed Tesla’s approved welding training are authorized to weld structural components on Tesla vehicles.CAUTIONDo not weld on a Tesla vehicle before performing the Vehicle Electrical Isolation Procedure (refer to the vehicle-specific Service Manual for more information on the Vehicle Electrical Isolation Procedure). Welding on a Tesla vehicle with an energized high or low voltage system might damage vehicle components. -
Install the Heelboard Crossmember.
-
Install the Third Row Seat Crossmember (Upper).
-
Install the Rear Subframe Upper Crossmember.
- Perform any necessary post-repair operations.
- Install the Subframe Assembly - Rear (Remove and Install).
- Install the HV Battery (AWD) (Remove and Install).
- Install the Wheel Arch Liner - Rear - LH (Remove and Replace).
- Install the Seatbelt - 2nd Row - LH (Remove and Replace).
- Install the Trim - Package Tray (Remove and Replace).
- Install the Trim - Side - Trunk - RH (Remove and Replace).
- Install the Trim - Side - Trunk - LH (Remove and Replace).
- Install the Carpet - Rear Trunk (1-Piece) (Remove and Replace).
- Install the Door - Rear - LH (Remove and Install).
- Install the Carpet - Interior Complete (Remove and Replace).