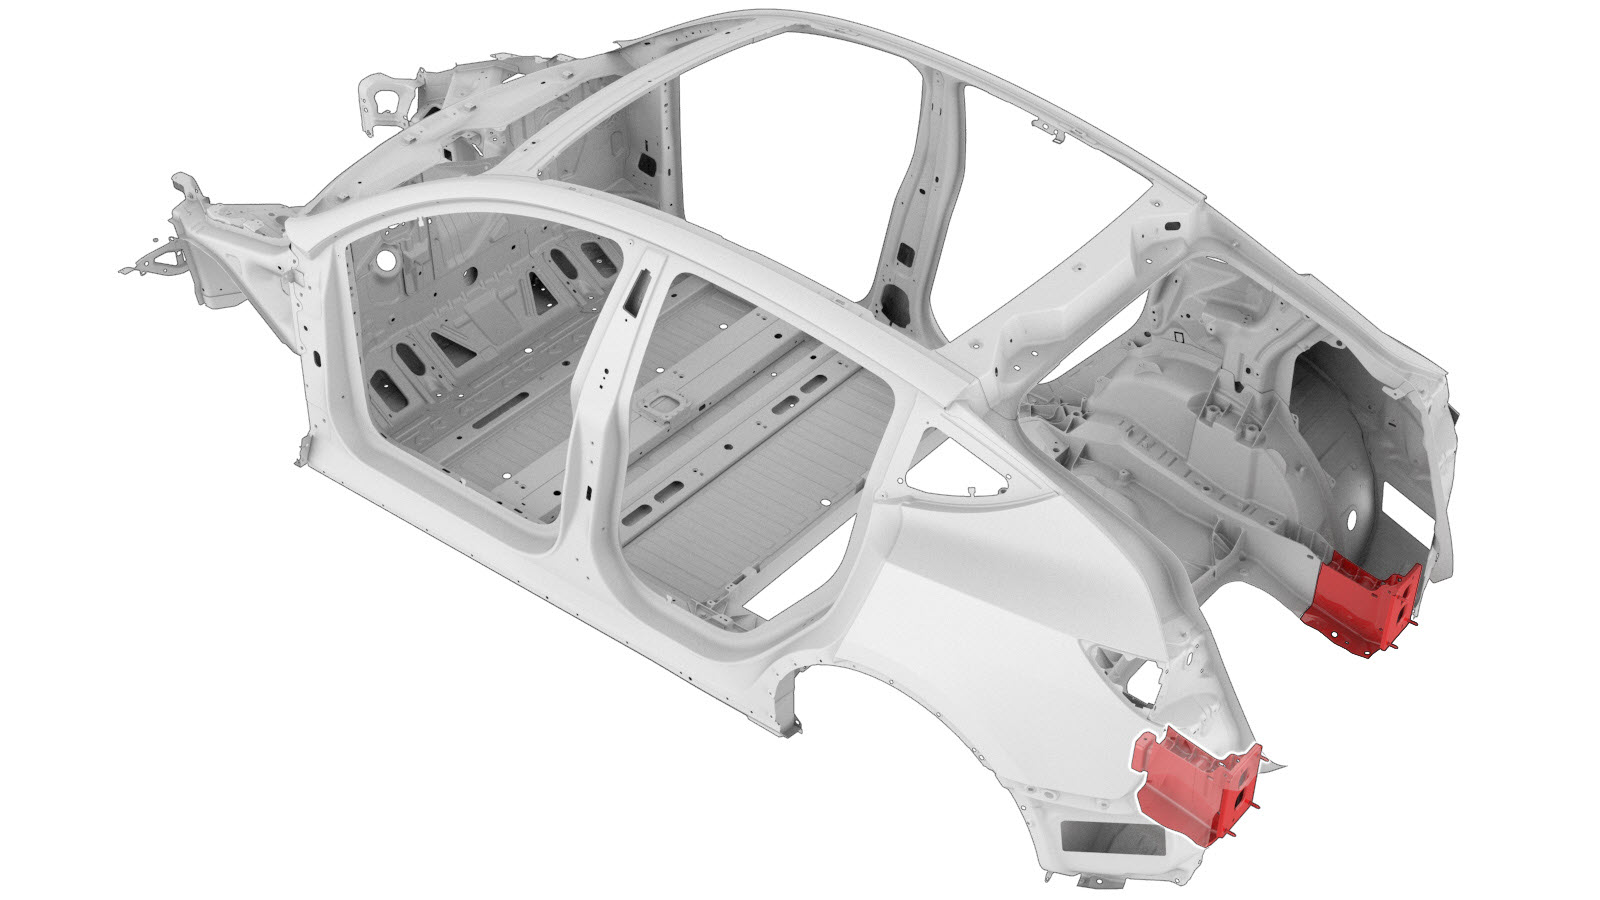
Hinterer Rahmenträger (Guss)
 Korrekturcode:
10102100702,
10102100602
HINWEIS: Sofern im Verfahren nicht ausdrücklich angegeben, spiegelt der obige Korrekturcode die gesamte für die Durchführung dieses Verfahrens erforderliche Reparaturarbeit wider, einschließlich der damit verbundenen Unfall-Reparaturverfahren. Schichten Sie keine Korrekturcodes für Unfallreparaturen, wenn Sie nicht ausdrücklich dazu aufgefordert werden. Fügen Sie alle zugehörigen mechanischen Verfahren hinzu, die zur Durchführung dieses Verfahrens erforderlich sind.
Korrekturcode:
10102100702,
10102100602
HINWEIS: Sofern im Verfahren nicht ausdrücklich angegeben, spiegelt der obige Korrekturcode die gesamte für die Durchführung dieses Verfahrens erforderliche Reparaturarbeit wider, einschließlich der damit verbundenen Unfall-Reparaturverfahren. Schichten Sie keine Korrekturcodes für Unfallreparaturen, wenn Sie nicht ausdrücklich dazu aufgefordert werden. Fügen Sie alle zugehörigen mechanischen Verfahren hinzu, die zur Durchführung dieses Verfahrens erforderlich sind.
Reparaturinformationen
- Beachten Sie alle allgemeinen Praktiken und die Sicherheitsdokumentation für Unfallreparaturen, und tragen Sie die geeignete PSA (persönliche Schutzausrüstung), bevor Sie mit diesem Verfahren beginnen.
- Je nach Beschädigung dieses Bauteils kann eine Reparatur des Bauteils möglich sein. Siehe Reparaturrichtlinien für Guss-Bodengruppe hinten (1-teilig) für weitere Informationen.
- Befestigen Sie das Fahrzeug ordnungsgemäß auf einer Rahmenwerkbank, wenn Sie dieses Verfahren ausführen.
Teileliste
| Menge | Beschreibung | Abbildung / Hinweise |
|---|---|---|
| 1 | GUSSTEIL RAHMENTRÄGER HI REP.-BAUGRUPPE (Rahmenträger hinten – Guss) | |
| 1 | BUTYL-FOLIENFLICKEN 300X150X2MM (Butyl-Folienflicken) |
Tesla-Teilenummer 1004969-00-A. |
| 5 | Hochfester struktureller Niet, 6,5 mm | |
| 4 | Torx-Schraube , M8X22,STL[10.9],PC | Tesla-Teilenummer 1056534-00-C. |
| 4 | Mutter , SECHSKANT, FLANSCHE, M8-1.25X18.2[8]-TBD | Tesla-Teilenummer 1014348-00-A. |
Beachten Sie beim Bestellen von Teilen den Teilekatalog, und geben Sie die VIN des zu reparierenden Fahrzeugs ein, um die richtigen Teile (und Teilenummern) für das Fahrzeug zu finden. Verwenden Sie alternativ die Suchfunktion im Teilekatalog, um ein spezifisches Teil für das Fahrzeug zu finden.
Reparaturverfahren
-
Entfernen Sie Rückwand-Seitenbaugruppe (für 1-teilige Guss-Bodengruppe).
-
Entfernen Sie Kotflügelhalterung (unten).
-
Entfernen Sie das ursprüngliche Bauteil.
- Schnittlinie
AnmerkungSchneiden Sie unmittelbar bis zur gegossenen Schnittlinie am ursprünglichen Bauteil, und schneiden Sie dann das ursprüngliche Bauteil passend zu. Halten Sie Lücken so klein wie möglich. -
Schneiden Sie das Service-Teile im angegebenen Bereich zu.
Schleifen und glätten Sie die Kanten des Service-Teils im rot dargestellten Bereich leicht, und schneiden Sie nur nach Bedarf zu, um einen ordnungsgemäßen Einbau zu gewährleisten. Schleifen Sie nicht mehr Material als nötig ab, und achten Sie darauf, dass kein Spalt entsteht. Das Schleifen kann bei Bedarf über den angegebenen Bereich hinaus reichen.AnmerkungHalten Sie die Menge des entfernten Materials so gering wie möglich, damit das Service-Teil ordnungsgemäß eingebaut werden kann, ohne dass ein Spalt entsteht. Wenn durch übermäßiges Schleifen ein Spalt entsteht, wenden Sie sich an Tesla Collision Repair, um Unterstützung zu erhalten.
-
Bereiten Sie den Einbau vor.
- Bezugslinie/-punkt
- Torx-Schraube A = 109 mm B = 37 mm C = 153 mm D = 34 mm
- Bereiten Sie den Einbau vor.
- Bereiten Sie den Einbau vor.
- Tragen Sie Strukturklebstoff auf die Passflächen des Fahrzeugs und des neuen Bauteils bzw. der neuen Bauteile auf.
-
Montieren Sie das neue Bauteil bzw. die neuen Bauteile.
Ziehen Sie die Schrauben mit 48 Nm fest.
-
Tragen Sie Nahtdichtungsmittel auf die Verbindung zwischen dem neuen Bauteil und der Guss-Bodengruppe auf.
-
Bereiten Sie den Einbau der Niete vor
, um die Endplatte des Rahmenträgers hinten am Rahmenträger hinten zu befestigen – Austauschteil aus Guss.
AnmerkungPositionieren Sie 1 Niet an der Außenseite des Fahrzeugs.AnmerkungMontieren Sie den Niet noch nicht.
- Bezugslinie/-punkt
- oder Hochfeste strukturelle Niete, 6,5 mm E = 15 mm F = 30 mm
-
Bereiten Sie den Einbau der Niete vor
, um die Endplatte des Rahmenträgers hinten am Rahmenträger hinten zu befestigen – Austauschteil aus Guss.
AnmerkungPositionieren Sie 2 Niete an der Innenseite des Fahrzeugs.AnmerkungMontieren Sie die Niete noch nicht.
- Bezugslinie/-punkt
- oder Hochfeste strukturelle Niete, 6,5 mm E = 15 mm F = 30 mm G = 80 mm
-
Wenn das neue Bauteil nicht über Strukturklebstoff zur Befestigung der Endplatte des Rahmenträgers hinten und des Rahmenträgers hinten verfügt, entfernen Sie die Endplatte des Rahmenträgers hinten.
AnmerkungBewahren Sie die Endplatte des Rahmenträgers hinten auf (sie wird in einem späteren Schritt montiert).
- Wenn das neue Bauteil nicht über Strukturklebstoff zur Befestigung der Endplatte des Rahmenträgers hinten und des Rahmenträgers hinten verfügt, tragen Sie Strukturklebstoff auf die Passflächen an der Endplatte des Rahmenträgers hinten und am Rahmenträger hinten auf.
-
Wenn das neue Bauteil nicht über Strukturklebstoff zur Befestigung der Endplatte des Rahmenträgers hinten und des Rahmenträgers hinten verfügt, montieren Sie die Endplatte des Rahmenträgers hinten.
- Montieren Sie die Niete, mit denen die neue Endplatte des Rahmenträgers hinten am neuen Rahmenträger hinten befestigt wird.
-
Montieren Sie Kotflügelhalterung (unten).
-
Montieren Sie Rückwand-Seitenbaugruppe (für 1-teilige Guss-Bodengruppe).
-
Bringen Sie den Butyl-Folienflicken wie gezeigt an.
- Führen Sie alle notwendigen Arbeitsgänge nach der Reparatur durch.