Karosserieseite außen (Fahrzeuge, die nach dem 17. Februar 2022 hergestellt wurden)
 10100142902
10100143002
10100142902
10100143002
Reparaturinformationen
- Beachten Sie alle allgemeinen Praktiken und die Sicherheitsdokumentation für Unfallreparaturen, und tragen Sie die geeignete PSA (persönliche Schutzausrüstung), bevor Sie mit diesem Verfahren beginnen.
- Dieses Verfahren kann ohne Rahmenwerkbank ausgeführt werden.
- Prüfen, ob dies das korrekte Verfahren ist: Siehe Karosserieseite außen
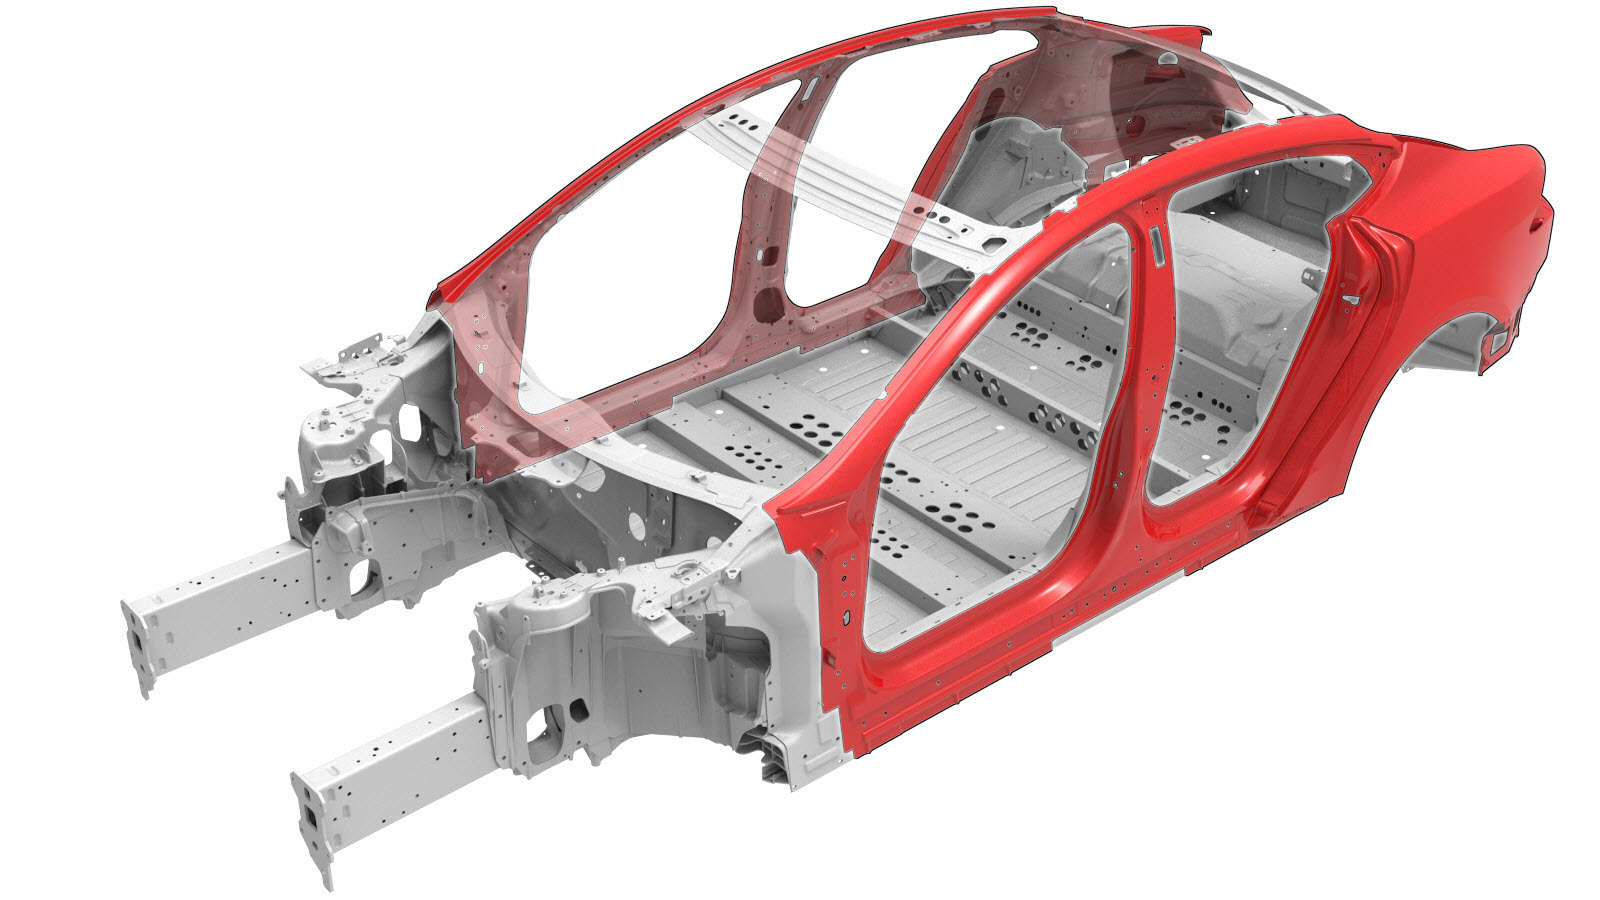
- Die Karosserieseite außen kann:
- In einer einzigen Reparatur als komplettes Bauteil ausgetauscht werden, indem Sie das Reparaturteil Karosserieseite außen komplett verwenden und den Anweisungen im Abschnitt Reparaturverfahren dieses Dokuments folgen.
- Mit einer der unter Reparaturbaugruppen der Karosserieseite außen gezeigten vorgeschnittenen Reparaturbaugruppen repariert werden. Wenn Sie einen Teil der Karosserieseite außen (nicht die gesamte Baugruppe Karosserieseite außen) mithilfe einer Reparaturbaugruppe ersetzen, verwenden Sie die jeweiligen Passagen jedes Schritts unter Reparaturverfahren, um zu bestimmen, welche Teile und Befestigungsmittel sowie welche Arbeitsschritte erforderlich sind, um die Reparatur auszuführen.
- In Abschnitten repariert werden, die größer oder kleiner sind als die Reparaturbaugruppen. Jeder einzelne Abschnitt oder jede Kombination von Abschnitten an der Baugruppe Karosserieseite außen kann ausgetauscht werden, solange die Richtlinien aus Richtlinien zum Teilen befolgt werden.
Prüfen, ob dies das korrekte Verfahren ist
Es gibt mehrere Variationen des Verfahrens für die Karosserieseite außen. Wenden Sie dieses Verfahren nur dann an, wenn das Fahrzeug nach dem 17. Februar 2022 hergestellt wurde. Wenn das Fahrzeug bis zum 17. Februar 2022 hergestellt wurde, siehe das Verfahren Karosserieseite außen (Fahrzeuge, die bis zum 17. Februar 2022 hergestellt wurden).
Wenn das Herstellungsdatum des Fahrzeugs nicht sicher ist, finden Sie weitere Informationen unter Karosserieseite außen.
Teileliste
| Menge | Beschreibung | Abbildung / Hinweise |
|---|---|---|
| 1 | KAROSSERIESEITE AUSSEN KOMPLETT (Karosserieseite außen komplett) | |
| 2 | Senkniet, 4,8 mm, kurz | |
| 10 | Struktureller Bolzenniet 6,5 mm | |
| 2 | Struktureller Senkniet, 6,5 mm | |
| 3 | Flow-Form-Niet S08 | |
| 5 | Flow-Form-Niet S18 | |
| 9 | Flow-Form-Niet S28 | |
| 15 | Flow-Form-Niet S38 | |
| 7 | Flow-Form-Niet S48 | |
| 7 | Schraube , M8x27 | Tesla-Teilenummer 1621820-00-A. |
| 2 | Instapak (Dehnschaumpaket) | Tesla-Teilenummer 1046403-00-A. |
Beachten Sie beim Bestellen von Teilen den Teilekatalog, und geben Sie die VIN des zu reparierenden Fahrzeugs ein, um die richtigen Teile (und Teilenummern) für das Fahrzeug zu finden. Verwenden Sie alternativ die Suchfunktion im Teilekatalog, um ein spezifisches Teil für das Fahrzeug zu finden.
Reparaturbaugruppen der Karosserieseite außen
| Reparaturbaugruppen der Karosserieseite außen | |
|---|---|
| BGR – KAROSSERIE SEIT AUSS KOMP | BGR – BLECH-KAROSSERIE SEIT AUSS |
| BGR – KAROSSERIE SEIT AUSS A-SÄULE | BGR – KAROSSERIE SEIT AUSS C-SÄULE |
Richtlinien zum Teilen
- Wenn die Reparatur eines Abschnitts den Aus- oder Einbau zusätzlicher Bleche oder Baugruppen erfordert, führen Sie die notwendigen Verfahren mit dem spezifischen Reparaturverfahren für jedes Blech bzw. jede Baugruppe aus.
- Beim Teilen in dem Bereich, in dem die C-Säule auf die Seitenwand trifft:
- Schneiden Sie wie folgt:
Schnittlinie
Bezugslinie/-punkt
- A = 30 mm.
- B = 25 mm.
- C = 110mm.
- Stellen Sie ein Trägerblech her, und montieren Sie es unter der Stoßfuge:
MSG-Schweißen
oder Aluminiumlochschweißungen
- Schneiden Sie wie folgt:
- Beim Teilen in dem Bereich, in dem die obere C-Säule auf den Dachrahmen trifft:
- Entfernen Sie die Schweißpunkte im oberen Bereich, wo die C-Säule auf den Dachrahmen trifft:
oder Werkseitige Punktschweißungen
- Bereiten Sie den Einbau vor.
- Entfernen Sie die Schweißpunkte im oberen Bereich, wo die C-Säule auf den Dachrahmen trifft:
- Es ist zulässig, wie unten beschrieben durch ein Durchgangsloch oder ein nicht funktionierendes Loch (Außenverkleidungsloch) zu schneiden.
- Schneiden Sie nicht innerhalb von 25 mm von der Mitte eines Schraubenlochs.
- Für Abschnitte sind keine Befestigungsmittel an den Stoßfugen erforderlich, wenn nicht ausdrücklich angegeben.
- An einer Stoßfuge zwischen den Abschnitten kann ein Füllblech angebracht werden (wie unter Herstellen und Anbringen von Füllblechen beschrieben).
- Die Lücken zwischen den Blechen von Stoßfugen sollten so klein wie möglich sein, um die Festigkeit der Verbindung zu maximieren.
- Führen Sie eine MSG-Schweißung an Stoßfugen von Abschnitten durch.
- Dichten Sie alle offenen Nähte nach dem Schweißen ab.
- Wenn eine Stoßfuge einen Flansch umfasst, darf an diesem nicht geschweißt werden. (Flansche werden nur mit Strukturklebstoff befestigt.)
| Aufteilen der Karosserieseite außen | |
|---|---|
|
Anmerkung Die Aufteilung von Reparaturbaugruppen der Karosserieseite außen ist identisch mit dem entsprechenden Bereich der Karosserieseite außen (vollständig). |
|
| Beim Teilen im Bereich des Radkastens kann der Radkastenflansch im rot hervorgehobenen Bereich geschweißt werden. |
Basierend auf den verwendeten Farben in der obigen Abbildung sind folgende Reparaturen zulässig:
| Farbe des Bereichs | Reparierbarkeit des Bereichs |
|---|---|
| Grüne Bereiche: | In diesen Bereichen ist Aufteilen zulässig. |
| Gelbe Bereiche: | In diesen Bereichen ist Aufteilen zulässig. In diesem Bereichen kann sich hinter dem Außenwandblech Schaum befinden. Anmerkung Entfernen Sie beim Teilen in diesen Bereichen den Schaumstoff, und reinigen Sie den Bereich, um eine Verschmutzung der Schweißnähte zu vermeiden. |
| Rote Bereiche: | Eine Aufteilung ist nicht zulässig. |
Reparaturverfahren
-
Bei Reparatur des Seitenblechabschnitts (gebogene Form) der Karosserieseite außen: Entfernen Sie Seitenwand-Außenhaut (Fahrzeuge gebaut nach 17. Februar 2022).
-
Trennen Sie den Hinterradlaufflansch.
AnmerkungWenn Sie nur einen Teil der Karosserieseite außen reparieren, trennen Sie nur den notwendigen Teil der Falzverbindung.
-
Entfernen Sie das ursprüngliche Bauteil.
oder Werkseitige Punktschweißungen
oder Durch werkseitige Punktschweißungen bohrenAnmerkungVerwenden Sie zum Ausbohren von Punktschweißungen einen Bohrer, der ein Loch in der richtigen Größe für das Befestigungsmittel herstellt, das die Punktschweißung ersetzen wird.oder Werkseitige SPRs
oder Schrauben
-
Tragen Sie Schweißnaht-Dichtmittel auf das neue Bauteil auf.
-
Bereiten Sie den Einbau vor.
AnmerkungDas rote X weist auf eine Stelle hin, an der ein werkseitig installiertes Befestigungselement nicht ersetzt wird.
oder Strukturelle Bolzenniete, 6,5 mm
oder Strukturelle Senkniete, 6,5 mm
oder Flow-Form-Niete, S08
oder Flow-Form-Niete, S18
oder Flow-Form-Niete, S28
oder Flow-Form-Niete, S38
oder Flow-Form-Niete, S48
oder Schrauben
- Bei Reparatur eines Abschnitts der Karosserieseite außen: Wenn Platz unter den Stoßfugen zwischen Abschnitten vorhanden ist, unter jeder Stoßfuge ein Füllblech herstellen und anbringen.
- Tragen Sie Strukturklebstoff auf die Passflächen des Fahrzeugs und des neuen Bauteils bzw. der neuen Bauteile auf.
-
Montieren Sie das neue Bauteil bzw. die neuen Bauteile.
Ziehen Sie die Schrauben mit 24 Nm fest.
-
Bei Austausch eines Abschnitts der Karosserieseite außen schweißen Sie die Stoßfugen mit dem MSG-Schweißverfahren.
MSG-Schweißen
oder Aluminiumlochschweißungen
WarnungSchweißen Sie das Blech nicht an Stellen, an denen es in direkten Kontakt mit den hochfesten Blechen darunter kommt. Die Schweißwärme kann zu einer Schwächung der hochfesten Stahlstruktur darunter führen.WarnungWenn beim Schweißen die Sicherheitsvorkehrungen nicht getroffen werden und keine persönliche Schutzausrüstung getragen wird, drohen schwere Verletzungen oder Sachschäden. Nur Techniker, die das Schweißtraining von Tesla erfolgreich abgeschlossen haben, dürfen Strukturteile an Tesla-Fahrzeugen schweißen.WarnungUm die Integrität des Fahrzeugs bei einem Unfall aufrechtzuerhalten, dürfen beim MSG-Schweißen von Aluminium an Tesla-Fahrzeugen nur ein zugelassener Schweißdraht und ein zugelassenes MSG-Schweißgerät verwendet werden. Informationen über zugelassene MSG-Schweißgeräte und Schweißdraht erhalten Sie unter Zugelassene MSG-Schweißgeräte und Schweißdrähte.WarnungStellen Sie vor dem MSG-Schweißen sicher, dass sich der Strukturklebstoff trocken anfühlt. Wenn sich der Strukturklebstoff vor dem MSG-Schweißen noch nicht trocken anfühlt, kann dies die Stärke der Klebstoffverbindung schwächen.ACHTUNGFühren Sie vor jeglichen Schweißarbeiten an einem Tesla-Fahrzeug zunächst das Verfahren zur elektrischen Isolierung von Fahrzeugen aus. (Weitere Informationen zum Verfahren zur elektrischen Isolierung von Fahrzeugen finden Sie im Servicehandbuch für das jeweilige Fahrzeug.) Beim Schweißen an einem Tesla-Fahrzeug mit aktivem Hochspannungs- oder Niederspannungssystem können Fahrzeugkomponenten beschädigt werden.AnmerkungVor dem MSG-Schweißen sollte eine Testschweißung an Material derselben Dicke und Art durchgeführt werden, um zu gewährleisten, dass mit den Einstellungen des Schweißgeräts eine den Anforderungen entsprechende Schweißverbindung hergestellt wird. -
Bei Reparatur des Seitenblechabschnitts (gebogene Form) der Karosserieseite außen: Montieren Sie Seitenwand-Außenhaut (Fahrzeuge gebaut nach 17. Februar 2022).
-
Klappen Sie den Radkastenflansch um.
-
Installieren Sie Instapaks.
Installieren Sie Instapaks im Hohlraum zwischen der Seitenwandverkleidung und der C-Säulen-Verstärkung.
- Führen Sie alle notwendigen Arbeitsgänge nach der Reparatur durch.