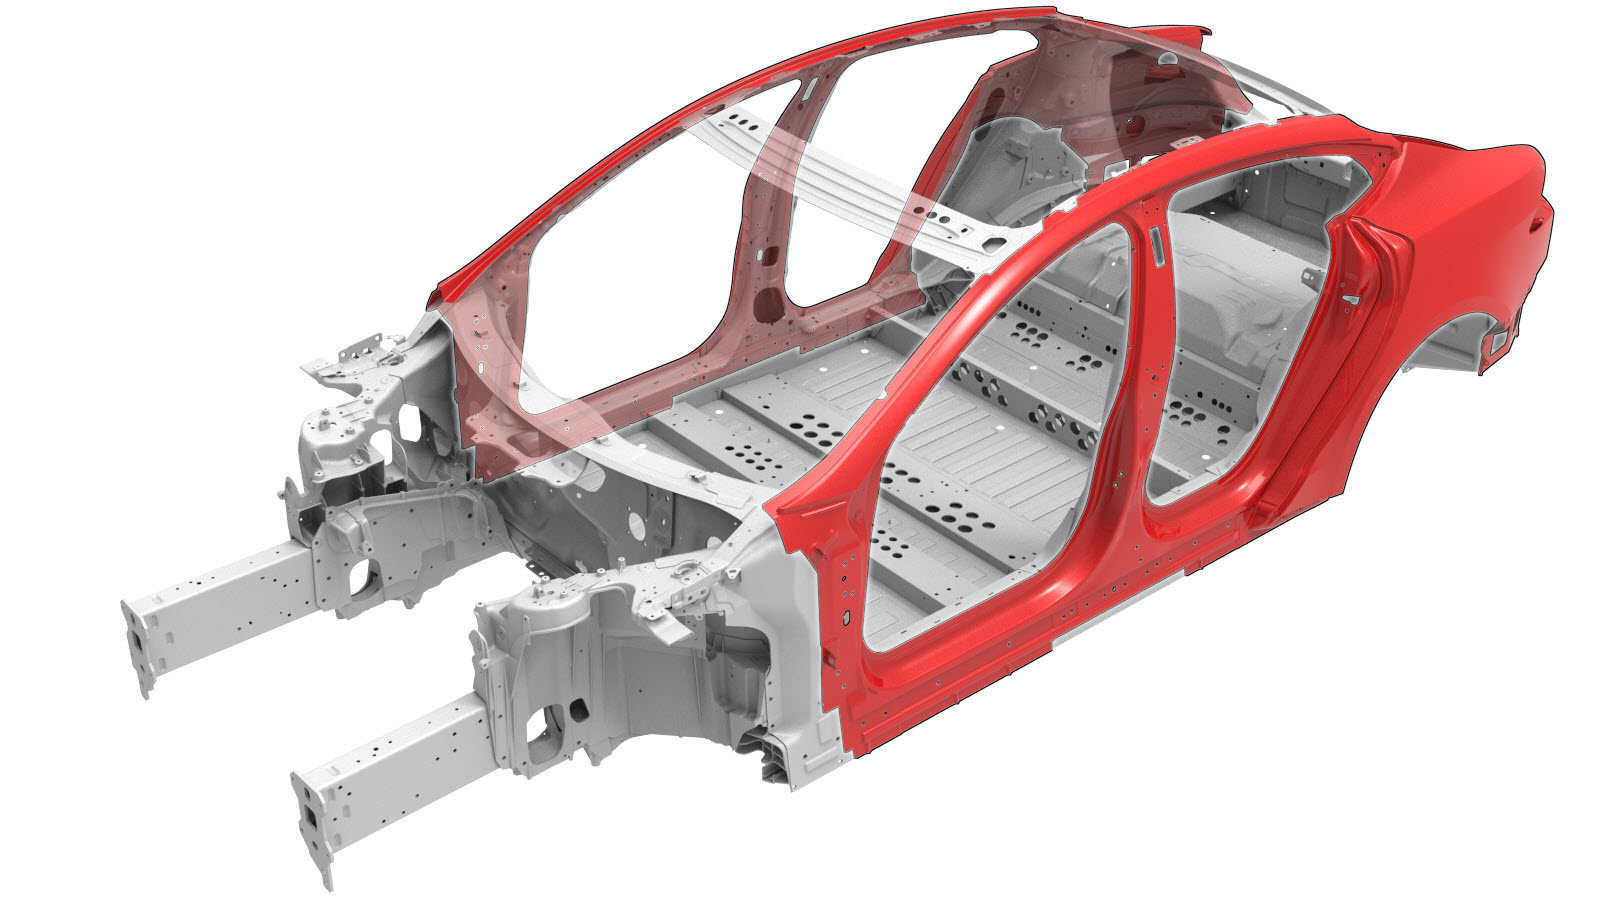
חלק חיצוני של צד המרכב (כלי רכב שנבנו לאחר 17 בפברואר 2022)
 10100142902
10100143002
10100142902
10100143002
נתוני תיקון
- סקרו את כל השיטות הכלליות לתיקון התנגשויות ומסמכי הבטיחות והשתמשו בציוד מיגון אישי (PPE) המתאים לפני התחלת תהליך זה.
- תהליך זה ניתן להשלמה ללא שימוש במתקן הרמה.
- יש לאמת שזהו ההליך הנכון: עיינו ב חלק חיצוני של המרכב
- צד חיצוני של המרכב ניתן:
- להחלפה בתיקון אחד כרכיב שלם יחיד, באמצעות חלק שירות חלק חיצוני שלם של המרכב וההוראות במקטע תהליך התיקון של מסמך זה.
- לתיקון באמצעות כל אחד ממכלולי השירות החתוכים מראש המוצגים ב- מכלולי שירות של צד מרכב חיצוני. אם מבוצעת החלפת מקטע בחלק חיצוני של המרכב (לא במכלול חיצוני של צד המרכב בשלמותו), יש להשתמש בחלקים הרלוונטיים לכל שלב ב- תהליך התיקון כדי לקבוע אלו חלקים ומהדקים נדרשים ואלו שלבים נדרשים כדי להשלים את התיקון.
- תיקונים במקטעים אשר גדולים או קטנים ממכלולי השירות. כל מקטע פרטני או כל שילוב מקטעים של מכלול חיצוני של צד המרכב ניתן להחלפה ככל וקווי החיתוך המאוזכרים בקווים המנחים ב- קווים מנחים לחיתוך של מסמך זה הנם בשימוש.
יש לאמת שזה התהליך הנכון
ישנן מספר גרסאות של תהליך חלק חיצוני של המרכב. השתמשו בהליך זה רק אם כלי הרכב נבנה לאחר 17 בפברואר 2022. אם כלי הרכב נבנה עד 17 בפברואר 2022, עיינו בהליך חלק חיצוני של צד המרכב (כלי רכב שנבנו עד 17 בפברואר 2022).
אם תאריך הבנייה של הרכב לא ודאי, עיינו ב-חלק חיצוני של המרכב לקבלת מידע נוסף.
רשימת חלקים
| כמות | תיאור | תמונה / הערות |
|---|---|---|
| 1 | BODY SIDE OUTER COMPLETE (צד מרכב חיצוני שלם) | |
| שני | מסמרת משוקעת ראש, 4.8 מ"מ קצר | |
| 10 | מסמרת נורה מבנית, 6.5 מ"מ | |
| שני | מסמרת משוקעת ראש מבנית, 6.5 מ"מ | |
| 3 | מסמרת Flow Form S08 | |
| חמישה | מסמרת Flow Form S18 | |
| 9 | מסמרת Flow Form S28 | |
| 15 | מסמרת Flow Form S38 | |
| 7 | מסמרת Flow Form S48 | |
| 7 | בורג , M8x27 | מספר חלק של Tesla 1621820-00-A. |
| 2 | Instapak (מארז קצף מתרחב) | מספר חלק של Tesla 1046403-00-A. |
בעת הזמנת חלקים, עיינו במדריך החלקים והזינו את מספר השלדה (VIN) של הרכב המתוקן כדי למצוא חלקים נכונים (ואת מספרי החלקים) עבור הרכב. לחילופין, השתמשו בפונקציית החיפוש של מדריך החלקים כדי למצוא את החלק המסוים עבור כלי הרכב.
מכלולי שירות של צד מרכב חיצוני
| מכלולי שירות של צד מרכב חיצוני | |
|---|---|
| ASSY - BODY SIDE OTR COMP | ASSY - PNL-BODY SIDE OTR |
| ASSY - BODY SIDE OTR A-PILLAR | ASSY - BODY SIDE OTR C-PILLAR |
קווים מנחים לחיתוך
- אם מקטע התיקון נדרש בהסרה או תקנה של לוחות נוספים או מכלולים, יש לבצע את התהליכים ההכרחיים באמצעות תהליך התיקון המסוים עבור כל לוח או מכלול.
- כאשר מבצעים חיתוך באזור אשר בו קורת C-Pillar פוגשת חיפוי מרכב אחורי:
- יש לחתוך כפי שמתואר להלן:
קו חיתוך
קו/נקודת מראה מקום
- A = 30 מ"מ.
- B = 25 מ"מ.
- C = 100 מ"מ.
- צרו והתקינו את לוחית הגיבוי מתחת למחבר השקה:
ריתוך GMA
או ריתוכי מגופה אלומיניום
- יש לחתוך כפי שמתואר להלן:
- כאשר מבצעים חיתוך באזור אשר בו קורת C-Pillar העליונה פוגשת את מסילת הגג:
- הסירו את ריתוכי הנקודה באזור העליון אשר בו קורת C-Pillar פוגשת את חיפוי המרכב האחורי:
או ריתוכי נקודה של המפעל
- הכינו להתקנה.
- הסירו את ריתוכי הנקודה באזור העליון אשר בו קורת C-Pillar פוגשת את חיפוי המרכב האחורי:
- מותר לחתוך דרך חור גישה או חור לא-פונקציונלי (חור קישוט חיצוני), כפי שמתואר להלן.
- אין לחתוך במרחק 25 מ"מ ממרכז חור הברגה.
- מקטעים אינם דורשים מהדקים כגון מחברי השקה אלא אם מצוין במפורש.
- ניתן להתקין לוחית גיבוי במחבר השקה בין מקטעים (כפי שמתואר ב-יצירת והתקנה לוחיות גיבוי).
- פערים בין לוחות של מחברי השקה צריכים להיות קטנים ככל הניתן על מנת למקסם את חוזק המחבר.
- יש לבצע ריתוכי GMA למקטע מחברי השקה.
- אטמו את כל התפרים הפתוחים לאחר ריתוך.
- אם מחבר השקה כולל אוגן, אין לרתך על האוגן (אוגנים מאובטחים באמצעות דבק מבני בלבד).
| חיתוך צד המרכב החיצוני | |
|---|---|
|
הערה חיתוך של מכלולי שירות של צד מרכב חיצוני זהה לאזור התואם של צד המרכב החיצוני (שלם). |
|
| בעת חיתוך באזור בית ההגה, אוגן בית ההגה באזור המוצג באדום ניתן לריתוך. |
בהתבסס על הצבעים בשימוש בתמונה לעיל, התיקונים המאושרים הנם:
| צבע האזור | יכולת תיקון של אזור |
|---|---|
| אזורים ירוקים: | חיתוך מותר באזורים אלו. |
| אזורים צהובים: | חיתוך מותר באזורים אלו. קצף עשוי להופיע מאחורי הלוח החיצוני באזורים אלה. הערה אם אתם מבצעים חיתוך באזורים אלה, הסירו את הקצף ונקו את האזור כדי להימנע מזיהום ריתוך. |
| אזורים אדומים: | חיתוך אינו מותר. |
תהליך התיקון
-
אם אתם מבצעים תיקון חיתוך מקטע Dog Let של צד המרכב החיצוני: הסירו את ה- סקין לחיפוי מרכב חיצוני (כלי רכב שנבנו לאחר 17 בפברואר 2022).
-
הפרידו את אוגן קשת הגלגל האחורי.
הערהאם מתקנים רק חלק מהחלק החיצוני של המרכב, הפרידו רק את החלק הנחוץ של האוגן המכופף.
-
הסירו את הרכיב המקורי.
או ריתוכי נקודה של המפעל
או קדחו דרך נקודות הריתוך של המפעלהערהבעת קדיחת נקודות ריתוך, יש להשתמש במקדח שיוצר חור בגודל הנכון למהדק אשר יחליף את נקודת הריתוך.או SPR של המפעל
או ברגים
-
הניחו אטם תפר על הרכיב החדש.
-
הכינו להתקנה.
הערהX אדום מציין מיקום בו מהדק בהתקנת מפעל לא מוחלף.
או מסמרות נורה מבניות, 6.5 מ"מ
או מסמרות משוקעות ראש, 4.8 מ"מ קצר
או מסמרות מבניות משוקעות ראש, 6.5 מ"מ
או ברגים
- אם אתם מתקנים חיתוך של צד המרכב החיצוני: אם ישנו מרחב זמין מתחת למחברי ההשקה בין המקטעים, צרו והתקינו לוחית גיבוי מתחת לכל מחבר השקה.
- יש לשים דבק מבני על משטחי הצימוד של הרכב והרכיב החדש או הרכיבים החדשים.
-
התקינו את הרכיב או הרכיבים החדשים.
סובבו את הברגים עד למומנט 24 Nm.
-
אם אתם מחליפים מקטע של צד מרכב חיצוני,
בצעו ריתוך GMA על מחברי ההשקה.
ריתוך GMA
או ריתוכי מגופה אלומיניום
אזהרהאין לרת לוח אשר נוגע ישירות בלוחות עם חוזק גבוה תחתיו. החום מהריתוך עלול להחליש את חוזק מבנה הפלדה חזקה במיוחד מתחת.אזהרהאי עמידה באזהרות הבטיחות, כולל שימוש בציוד מיגון אישי, עלול להוביל פציעות חמורות או נזק לרכוש. רק טכנאים אשר השלימו בהצלחה את הכשרת הריתוך המורשת של Tesla מורשים לרתך רכיבים מבניים ברכבי Tesla.אזהרהכדי לשמור על שלמות הרכב בתאונה, יש להשתמש רק בחוטי ריתוך מאושרים ורתכת GMA מאושרת כדי לבצע ריתוכי GMA ברכבי Tesla. עיינו ב- רתכות וחוטי ריתוך Gas Metal Arc (GMA) מאושרות, למידע על רתכות GMA וחוטי ריתוך מאושרים.אזהרהלפני ריתוך GMA, יש לוודא כי הדבק המבני יבש למגע. אם הדבק המבני לא יבש למגע לפני ריתוך GMA, חוזק ההדבקה עלול להיות פגום.זהירותאל תרתכו כלי רכב של Tesla לפני ביצוע תהליך בידוד חשמלי של כלי הרכב (עיינו במדריך השירות הייעודי לכלי הרכב למידע נוסף על תהליך בידוד חשמלי של כלי הרכב). ריתוך בכלי רכב של Tesla עם מערכת מתח גבוה או נמוך ללא בידוד עלול לגרום לנזק לרכיבי כלי הרכב.הערהלפני ריתוך GMA, יש לבצע בדיקת ריתוך באמצעות חומר בעל אותה מדידה וסוג כדי לוודא שסביבת ציוד הריתוך תפיק חיבור מספק. -
אם אתם מבצעים תיקון חיתוך מקטע Dog Let של צד המרכב החיצוני: התקינו את ה-סקין לחיפוי מרכב חיצוני (כלי רכב שנבנו לאחר 17 בפברואר 2022).
-
קפלו את אוגן קשת הגלגל.
-
התקינו את ה-Instapaks.
התקינו רכיבי Instapak בחור בין סקין לחיפוי מרכב חיצוני וחיזוק קורת C-Pillar.
- בצעו את התפעולים הנדרשים לאחר תיקון.