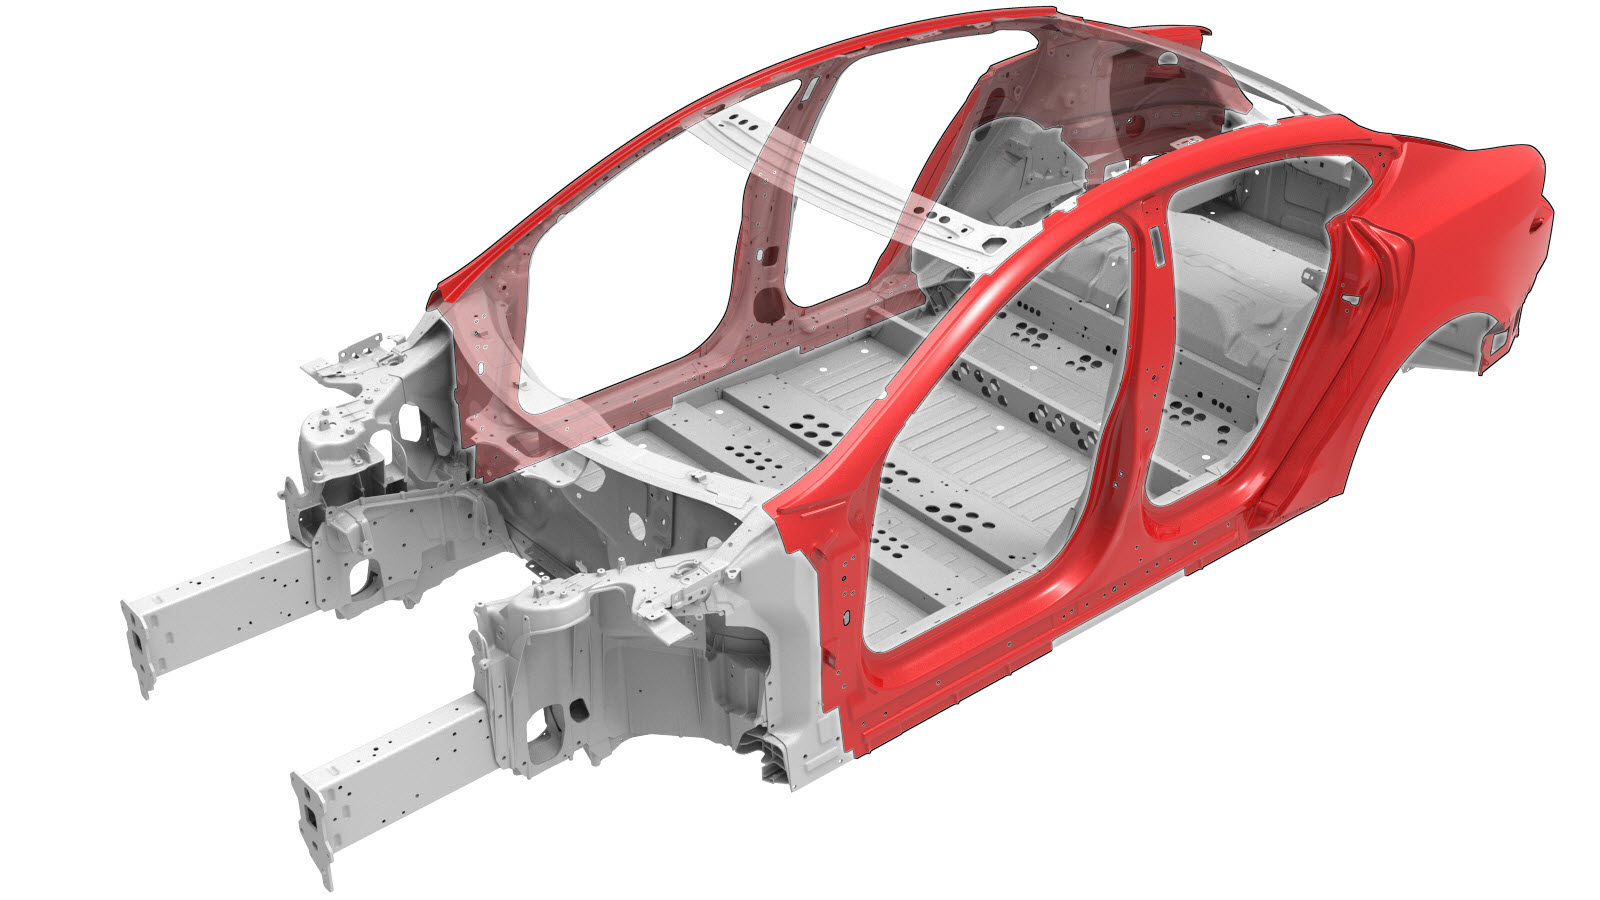
Côté extérieur de la carrosserie (véhicules construits après le 17 février 2022)
 10100142902
10100143002
10100142902
10100143002
Informations relatives à la réparation
- Lisez attentivement toutes les pratiques générales et la documentation de sécurité relatives aux réparations après collision et enfilez un équipement de protection individuel (ÉPI) avant de commencer cette procédure.
- Cette procédure n’exige pas l’utilisation d’un banc de redressage.
- Assurez-vous qu'il s'agit de la bonne procédure : Reportez-vous à Côté extérieur de la carrosserie
- Le côté extérieur de la carrosserie peut être :
- Remplacé en une seule réparation en tant que composant complet en utilisant la pièce de rechange du côté extérieur de la carrosserie complète et les instructions dans la section Procédure de réparation du présent document.
- Réparé à l’aide de l’ensemble de rechange prétaillé montré dans Ensembles de rechange de la partie extérieure latérale de la carrosserie. Si vous remplacez une portion de la partie extérieure latérale de la carrosserie (et non l’ensemble extérieur latéral complet de la carrosserie) en utilisant un ensemble de rechange, utilisez seulement les parties pertinentes de chaque étape dans le Procédure de réparation pour établir quelles pièces et attaches sont nécessaires et les étapes requises pour effectuer la réparation.
- Réparé en sections plus grandes ou plus petites que les ensembles de remplacement. Toute section individuelle ou toute combinaison de sections de l’ensemble extérieur latéral de la carrosserie peut être remplacée à condition de respecter les directives du Directives de coupe.
Vérifiez qu'il s'agit de la bonne procédure
Il existe plusieurs variantes de la procédure du côté extérieur de la carrosserie. Utilisez cette procédure seulement si le véhicule a été construit après le 17 février 2022. Si le véhicule a été construit le 17 février 2022 ou avant, veuillez vous référer à la procédure Cô extérieur de la carrosserie (véhicules construits le 17 février 2022 et avant).
Si vous n'êtes pas certain de la date de construction du véhicule, référez-vous à Côté extérieur de la carrosserie pour plus d'informations.
Liste des pièces
| Quantité | Description | Image/notes |
|---|---|---|
| 1 | CÔTÉ EXTÉRIEUR DE LA CARROSSERIE COMPLET (Côté extérieur de la carrosserie complet) | |
| 2 | Rivet à tête fraisée, 4,8 mm court | |
| 10 | Rivets de structure à tête ampoulée de 6,5 mm | |
| 2 | Rivets de structure à tête fraisée, 6,5 mm | |
| 3 | Rivet fluotourné S08 | |
| 5 | Rivet fluotourné S18 | |
| 9 | Rivet fluotourné S28 | |
| 15 | Rivet fluotourné S38 | |
| 7 | Rivet fluotourné S48 | |
| 7 | Boulon , M8x27 | Numéro de pièce Tesla 1621820-00-A. |
| 2 | Instapak (trousse de mousse expansive) | Numéro de pièce Tesla 1046403-00-A. |
Lorsque vous commandez des pièces, consultez le Manuel des pièces et inscrivez le NIV du véhicule en réparation afin de trouver les bonnes pièces (et les numéros de pièce) pour le véhicule. Vous pouvez aussi utiliser la fonction de recherche dans le Manuel des pièces pour trouver une pièce précise pour le véhicule.
Ensembles de rechange de la partie extérieure latérale de la carrosserie
| Ensembles de rechange de la partie extérieure latérale de la carrosserie | |
|---|---|
| ENS - CARROSSERIE LAT. EXT. COMPLET | ENS - PNL-CARROSSERIE LAT. EXT. |
| ENS. - CARROSSERIE LAT. EXT. MONTANT A | ENS. - CARROSSERIE LAT. EXT. MONTANT C |
Directives de coupe
- Si une réparation de section exige le retrait ou l'installation de panneaux ou d'ensembles supplémentaires, exécutez les procédures nécessaires selon la procédure de réparation qui s'applique spécifiquement à chaque panneau ou ensemble.
- Lors de la coupe dans la zone où le montant C rencontre la custode arrière :
- Coupez tel que décrit ci-dessous :
Ligne de coupe
Ligne/point de référence
- A = 30 mm.
- B = 25 mm
- C = 110 mm
- Créez et installez une plaque d’appui sous le joint d'about :
Soudure MIG
ou Soudures par bouchonnage sur aluminium
- Coupez tel que décrit ci-dessous :
- Lors de la coupe dans la zone où le montant C rencontre le rail de toit :
- Retirez les points de soudure dans la zone supérieure où le montant C rencontre la custode arrière :
ou Points de soudure d’usine
- Préparation en vue de l’installation.
- Retirez les points de soudure dans la zone supérieure où le montant C rencontre la custode arrière :
- Il est permis de couper à travers un trou de dégagement ou un trou non fonctionnel (trou de garniture extérieure), comme décrit ci-dessous.
- Ne coupez pas à moins de 25 mm du centre du trou du boulon.
- Les sections ne requièrent pas d’attaches aux joints bout à bout sauf s’il est précisément indiqué que oui.
- Une plaque d’appui peut être installée au joint bout à bout entre les sections (comme décrit dans créer et installer une plaque d’appui).
- Les espacements entre les panneaux avec joints bout à bout devraient être aussi petits que possible afin d’assurer une résistance maximale au niveau du joint.
- Soudure GMA aux sections avec joints bout à bout.
- Scellez tous les joints ouverts après le soudage.
- Si un joint bout à bout comprend une bride, ne soudez pas sur la bride (les brides sont fixées seulement à l’aide d’adhésif structural).
| Sectionnement de la partie extérieure latérale de la carrosserie | |
|---|---|
|
Remarque Le sectionnement de Ensembles de rechange de la partie extérieure latérale de la carrosserie est identique à la zone correspondante de la partie extérieure latérale complète de la carrosserie. |
|
| Lors de la coupe dans la zone du passage de roue, la bride du passage de roue dans la zone indiquée en rouge peut être soudée. |
Sur la base des couleurs utilisées dans l’images ci-dessus, les réparations autorisées sont les suivantes :
| Couleur de la zone | Réparabilité de la zone |
|---|---|
| Zones vertes : | Le sectionnement est permis dans ces zones. |
| Zones jaunes : | Le sectionnement est permis dans ces zones. De la mousse peut être située derrière le panneau extérieur dans ces zones. Remarque Si la coupe se situe dans ces zones, retirez toute mousse, puis nettoyez la zone pour éviter de contaminer la soudure. |
| Zones rouges : | Sectionnement non permis. |
Procédure de réparation
-
Si vous réparez la section en angle du côté extérieur de la carrosserie : Retirez Revêtement extérieur de custode (véhicules fabriqués après le 17 février 2022).
-
Séparez la bride de passage de roue arrière.
RemarqueSi seulement une section de la carrosserie est réparée, séparez seulement la partie nécessaire de la bride ourlée.
-
Retirez le composant d’origine.
ou Points de soudure d’usine
ou Percer à travers les points de soudure d’usineRemarqueLorsque vous percez dans les points de soudure, utilisez un foret qui permettra de créer un trou de la taille parfaite pour la fixation qui remplacera le point de soudure.ou Rivets auto-perceurs d’usine
ou Boulons
-
Appliquez le scellant pour joints sur le nouveau composant.
-
Préparation en vue de l’installation.
RemarqueUn X rouge indique un emplacement où une fixation installée en usine n’est pas remplacée.
ou Rivets de structure à tête ampoulée, 6,5 mm
ou Rivets à tête fraisée, 4,8 mm court
ou Rivets de structure à tête fraisée, 6,5 mm
ou Boulons
- Si vous réparez une section du côté extérieur de la carrosserie : S’il y a de la place sous les joints bout à bout entre les sections, créez et installez une plaque d’appui sous chaque joint bout à bout.
- Appliquez de l’adhésif structural sur les surfaces de contact du véhicule et les nouveaux composants (le cas échéant).
-
Installez le ou les nouveaux composants.
Serrez les boulons à un couple de 24 Nm.
-
Si vous remplacez une section de la carrosserie extérieure,
effectuez un soudage GMA sur les joints bout à bout.
Soudure MIG
ou Soudures par bouchonnage sur aluminium
AvertissementNe soudez pas le panneau où il entre directement en contact avec les panneaux haute résistance sous-jacents. La chaleur risque d’affaiblir la structure en acier haute résistance sous-jacente.AvertissementLe non-respect de toutes les mesures de sécurité, notamment l’utilisation de l’équipement de protection individuelle, peut entraîner des blessures graves ou des dommages matériels. Seuls les techniciens qui ont suivi la formation relative aux soudures approuvées de Tesla sont autorisés à souder des composants structuraux sur les véhicules Tesla.AvertissementPour préserver l’intégrité du véhicule en cas d’accident, utilisez exclusivement les fils de soudure approuvés et une soudeuse GMA approuvée pour effectuer des soudures GMA sur des véhicules Tesla. Reportez-vous à Soudeuses GMA (soudage à l'arc sous protection gazeuse) et fil de soudage approuvés pour de l'information sur les soudeurs et fils de soudure MIG approuvés.AvertissementAvant de procéder à une soudure GMA assurez-vous que l’adhésif structural est sec au toucher. Si l’adhésif structurel n’est pas sec au toucher avant que vous procédiez à une soudure MIG, la force de la liaison adhésive peut être compromise.ATTENTIONN’effectuez pas de soudure sur un véhicule Tesla avant d’avoir fait la procédure d’isolation des véhicules électriques (rapportez-vous au Manuel d’entretien du véhicule en question pour en savoir plus sur la procédure). Le soudage sur un véhicule Tesla dont le circuit haute tension ou basse tension est alimenté peut endommager des composants du véhicule.RemarqueAvant de procéder à une soudure MIG, effectuez une soudure d’essai à l’aide d’un matériau de même épaisseur et de même type pour vous assurer que les réglages de l’équipement de soudure permettent d’obtenir un joint satisfaisant. -
Si vous réparez la section en angle du côté extérieur de la carrosserie : Installez le (ou la) Revêtement extérieur de custode (véhicules fabriqués après le 17 février 2022).
-
Repliez la bride du passage de roue.
-
Installez les Instapaks.
Installez des Instapak dans la cavité entre le revêtement extérieur de custode et le renfort du montant C.
- Effectuez toutes les opérations après réparation nécessaires.