Connecting the Tow Hitch
The Model 3 towing package includes a weight-carrying hitch with a 50 mm ball coupling. When not in use, the hitch should be removed and stored in a dry location to prevent rust and corrosion. Keep the dust cover over the hitch housing to prevent dirt and debris from entering.
Note
Some images in this procedure show a vehicle manufactured before
approximately Janaury 2024. For vehicles manufactured as of approximately January 2024,
use the images as a reference but double check to ensure you are following the written
instructions.

Warning
You must use the Model 3 trailer hitch when towing a
trailer. Never attempt to attach a different type of trailer hitch.
Note
Always attach safety chains when
towing. Cross the chains under the trailer tongue and attach to the trailer eyelets to
ensure the security of the trailer load.
Note
The maximum permissible rear overhang
for the coupling point is 1053 mm.
To install the trailer hitch:

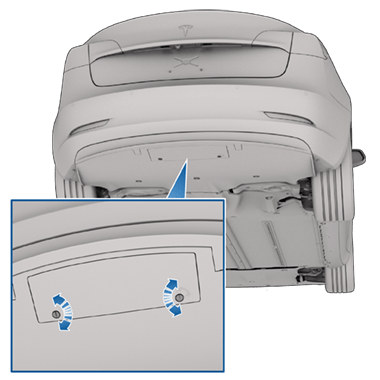
- Remove the dust cover from the hitch
housing by inserting a small object, such as a flat screwdriver, into the push clips
on each side of the dust cover. Turn the push clips until they are in an unclasped
position, take them out, and remove the dust cover.
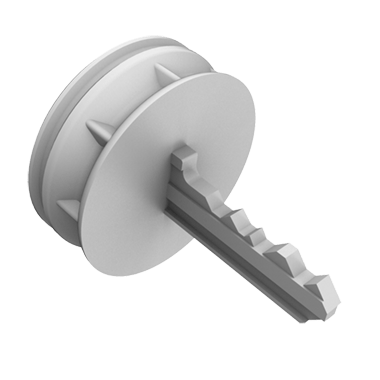
- Insert the key into the locking cylinder on the hitch, and turn the cylinder so the top of the key is aligned with the “Open” position.
- Pull the locking cylinder out of the
adapter approximately 0.5 cm, and turn clockwise until the Unlock icon is fixated at
the top of the locking cylinder.
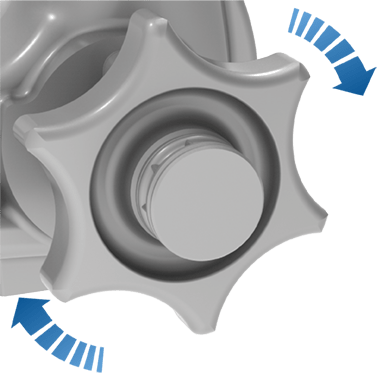 CAUTIONBe careful when turning the locking cylinder. If it does not lock into the "Open" position, it automatically retracts into its original "Closed" position and can pinch your fingers.
 - Firmly grasp the hitch from the
bottom and align with the corresponding cutouts in the hitch housing.NoteDo not grasp the locking cylinder because it needs to rotate freely.
- Push the hitch into the hitch housing until the locking cylinder quickly rotates counter-clockwise and automatically locks into the "Closed" position.
- Check to confirm that the hitch is
fully inserted into the housing by pulling down on the hitch. The hitch should not
drop when you pull down.NoteIf the hitch does not lock into the housing, it falls out when you pull down on the hitch.
- Turn the key so the arrows align with the Lock icon on the locking cylinder.
- Remove the key and store it in a safe
place (preferably inside the vehicle).NoteThe key can be removed only if the hitch is locked. This indicates a proper connection. Do not use the hitch if the key is not removed.NoteTesla recommends making a note of the key code. You need this key code if you lose the keys and need to order a replacement.
 NoteThe trailer hitch is attached to the body of the vehicle with 6 bolts.


Disconnecting the Tow Hitch
After towing, remove the hitch:
- Insert the key and turn to align the top of the key with the Unlock icon.
- While firmly holding the bottom
of the hitch (to prevent it from dropping to the ground), pull the locking
cylinder out approximately 0.5 cm, and turn it clockwise until the Lock icon
shifts to the top. At this point, the locking cylinder is unlocked in the "Open"
position and the hitch drops out of the housing.WarningBe careful when turning the locking cylinder. If it does not lock into the "Open" position, it automatically retracts into its original "Closed" position and can pinch your fingers.
- Reinstall the dust cover on the hitch housing to prevent dirt from accumulating inside the housing by snapping in the push clips.
- Close the dust cover on the
hitch's locking cylinder and store the hitch in a secure location.NoteTo maintain the hitch, regularly grease its surface with non-resinous grease.