Replacing the Low Voltage Lead-Acid Battery
This procedure is intended for vehicles in
North America only.
CAUTION
It is your responsibility to monitor the low
voltage battery health. Damage to the low
voltage battery due to running out of range is
not covered by the warranty.
CAUTION
To avoid damage that is not covered by the warranty, replace your low voltage
lead-acid battery with the same type of battery. The low voltage lead-acid battery for North
American vehicles is AtlasBX / Hankook
85B24LS 12V 45Ah. You can purchase a new lead-acid low voltage battery that is
compatible with your vehicle from your local service center
Note
Vehicles manufactured between approximately July 2017 and October 2020 do not
have a heat pump and should use Vehicles Manufactured Before Approximately October 2020. Vehicles
manufactured afterward have a heat pump and should use Vehicles Manufactured After Approximately October 2020.
Note
Vehicles manufactured in
Gigafactory Shanghai before approximately October 2021, and in the Fremont Factory before
approximately December 2021, are equipped with a Lead-Acid low voltage battery. Vehicles
manufactured after these dates are equipped with a Lithium-Ion low voltage battery. Before
performing this procedure, it is your responsibility to double check and confirm whether
your vehicle is equipped with a Lead-Acid or Lithium-Ion low voltage battery.
Warning
Do not remove the rear seats for the purpose of storing or placing items.
Doing so exposes the low and high voltage connections, which can cause vehicle damage or
serious injury.
You can purchase a new low voltage battery, or dispose of an old one, at a Tesla Service Center.
Vehicles Manufactured Before Approximately October 2020
Perform the following procedure to replace the lead-acid low voltage battery. Wear appropriate personal protection equipment (such as safety glasses, leather gloves when handling the lead-acid battery etc.).
Removal:
- Prepare the vehicle to remove the low voltage lead-acid battery:
- Ensure the vehicle is in Park.
- Lower all windows.
- Open the front trunk.
- Leave a door propped open so you can get back into the vehicle if needed.
- Disconnect the charge cable from the charge port.
- Move the driver and front passenger seat fully forward.
- Under the rear seat, press the left and right tabs to the side and lift the seat cushion up. The seat separates from the base but is still restrained by one wire harness on each side.
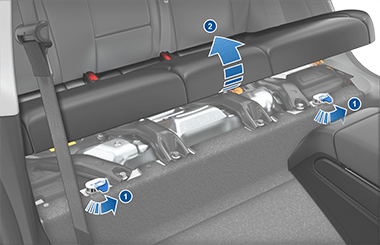
- Disconnect the wire harnesses and remove the seat cushion. Set the cushion aside.
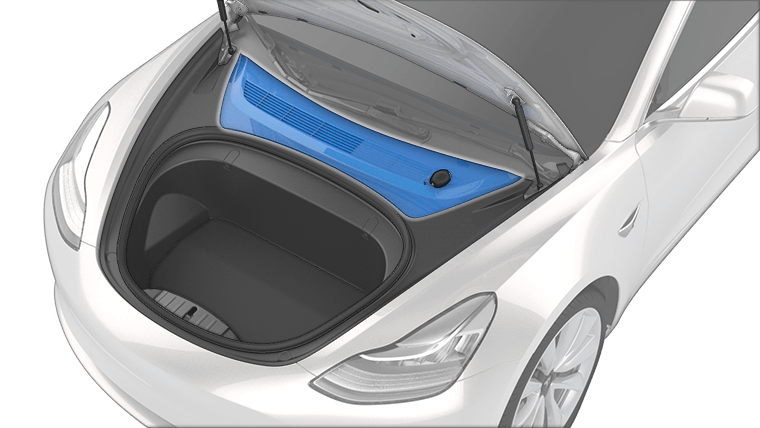
- In the front trunk, remove the vehicle’s underhood apron by inserting a small, non-marring flat tool or your fingers underneath the panel. Pull up to loosen the clips and set the underhood apron aside.
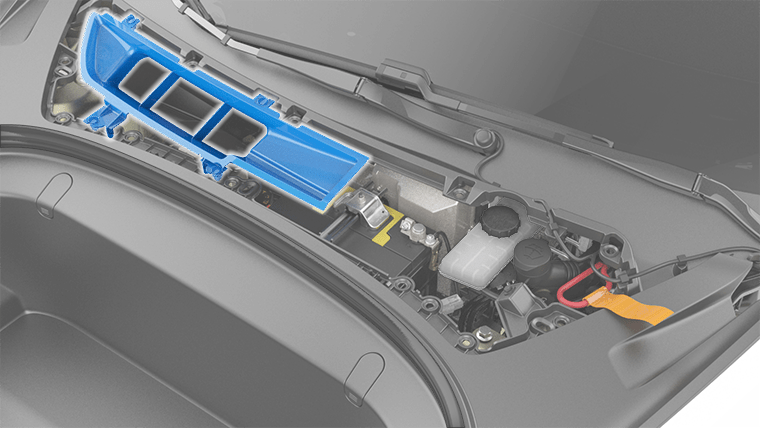
- Remove the cabin intake duct and set it aside.
- Power off the vehicle by navigating to on the touchscreen.
- With a 10mm socket, loosen the nut that secures the negative (-) terminal clamp to the negative (-) post on the low voltage lead-acid battery. Release the terminal clamp from the negative (-) post.
- Disconnect the low voltage cable from penthouse:
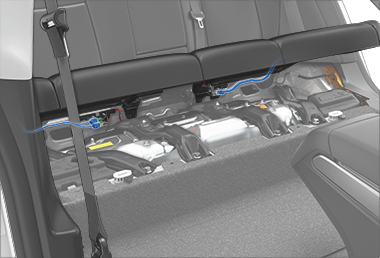
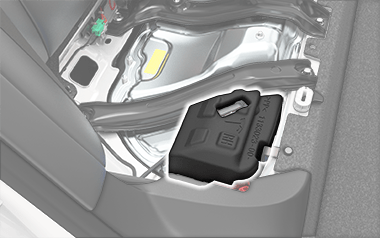
- In the rear passenger seat, remove the foam cover and set it aside. The foam covers the low voltage cable.
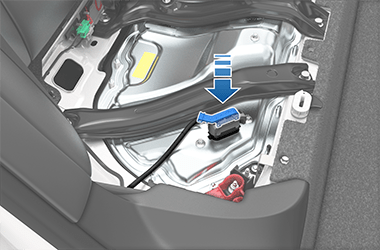
- Release and pull down the gray lever-arm on the side of the low voltage connector.
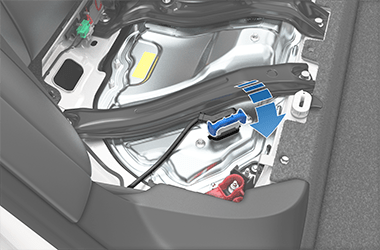
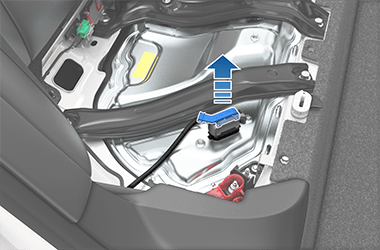
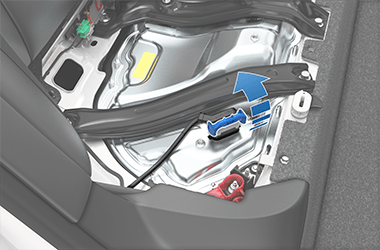
- Pull the connector upward to disconnect it from the penthouse.
WarningThe area under the seat cushion houses the high voltage Battery. DO NOT TOUCH OR PLACE ITEMS ON THE METAL HOUSING! Doing so can cause serious damage or injury. - In the rear passenger seat, remove the foam cover and set it aside. The foam covers the low voltage cable.
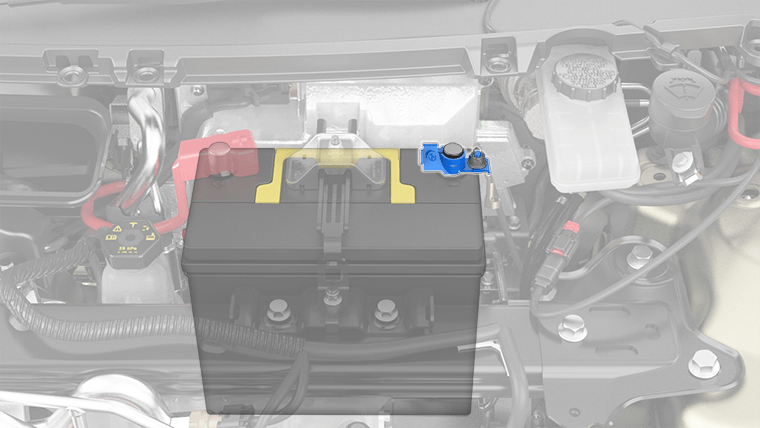
- With a 10mm socket, release the terminal cover and loosen the nut that secures the positive (+) terminal clamp to the positive (+) post on the low voltage lead-acid battery. Release the terminal clamp from the positive (+) post and cover the terminal clamp with a dry rag. CAUTIONDo not allow the positive (+) terminal clamp to contact nearby components like the low voltage battery hold down bracket or A/C cooling lines.
- Unplug the vent tube hose from the negative (-) terminal side of the low voltage lead-acid battery.
- With a 10mm socket, loosen the nut and release the battery hold down from the top of the low voltage lead-acid battery by unhooking and sliding it back, taking care to ensure it does not slip into the vehicle.

- Using the battery handle, carefully remove the low voltage lead-acid battery, taking care not to touch or damage the surrounding components. WarningWhen lifting the low voltage lead-acid battery, stand in front of the vehicle and use proper lifting technique. The low voltage battery weighs approximately 25 lb (12 kg). Failure to do so may cause serious injury.
- Inspect the new low voltage lead-acid
battery to ensure it is equipped a red plug on the positive (+) terminal side. If the new
low voltage battery does not have a red plug, use a small trim tool transfer the red plug
from the old battery to the new one.CAUTIONDispose of the old low voltage lead-acid battery at a Tesla Service Center, or according to local laws (such as dropping it off at a battery recycling facility). Keep the low voltage battery upright and place it on a towel or piece of cardboard when transporting.


Installation:
- Carefully maneuver the new low voltage battery into place, taking care not to touch or damage nearby components.
- Install the low voltage battery hold down and use a 10mm socket to tighten the bolt that secures it to the low voltage lead-acid battery. Torque the bolt to 6 Nm (4.4 ft-lb).
- In the rear passenger seat, connect the penthouse cable to the connector:
- Ensure the gray lever-arm is down, then install the connector.
- Secure the connector by gently tugging the gray lever-arm upward until it clicks into place.
- Replace the foam cover on top of the penthouse cable.
WarningThe area under the seat cushion houses the high voltage Battery. DO NOT TOUCH OR PLACE ITEMS ON THE METAL HOUSING! Doing so can cause serious damage or injury. - Ensure the gray lever-arm is down, then install the connector.
- Remove the protective caps from the positive (+) and negative (-) posts on new low voltage lead-acid battery.
- Connect the positive (+) terminal by positioning the terminal clamp over the terminal post. Using a 10mm socket, torque the nut to 6 Nm (4.4 ft-lb). Install the positive (+) terminal cover.
- Connect the negative (-) terminal by positioning the terminal clamp over the connector. Using a 10mm socket, torque the nut to 6 Nm (4.4 ft-lb).
- Connect the vent tube hose into the negative (-) terminal side of the low voltage lead-acid battery.
- Replace the cabin intake duct.
- Open one of the vehicle’s doors to make sure power has been correctly restored and the touchscreen turns on (this may take several minutes).
- In the rear seat, connect the seat wire harnesses (one on each side) and replace the seat cushion.
- Press the seat cushion back into the base until it clicks into place.

- Replace the underhood apron by aligning the clips into their openings in the front trunk. Press down to lock them in place. The clips make an audible clicking sound when secured.
- Close the front trunk. If an alert to replace to low voltage lead-acid battery was previously shown on the touchscreen, ensure the alert no longer appears.


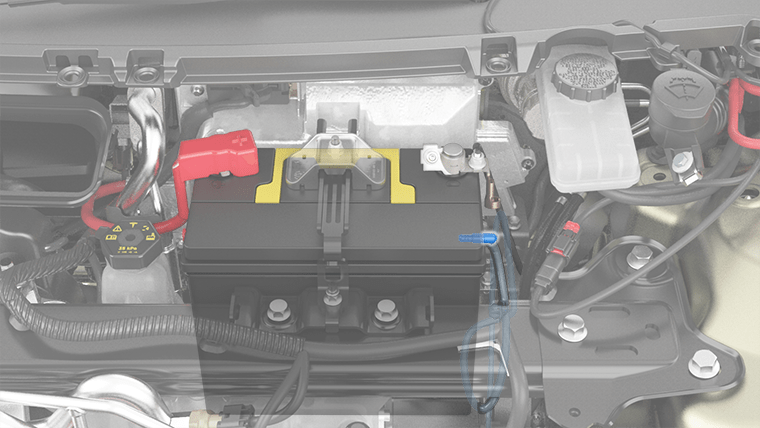
Vehicles Manufactured After Approximately October 2020
Removal:
- Prepare the vehicle to remove the low voltage lead-acid battery:
- Ensure the vehicle is in Park.
- Lower all windows.
- Open the front trunk.
- Leave a door propped open so you can get back into the vehicle if needed.
- Disconnect the charge cable from the charge port.
- Remove the vehicle’s underhood apron by inserting a small, non-marring flat tool or your fingers underneath the panel. Pull up to loosen the clips and set the underhood apron aside.
- In the front trunk, remove the cabin intake duct and set it aside.
- Power off the vehicle by navigating to on the touchscreen.
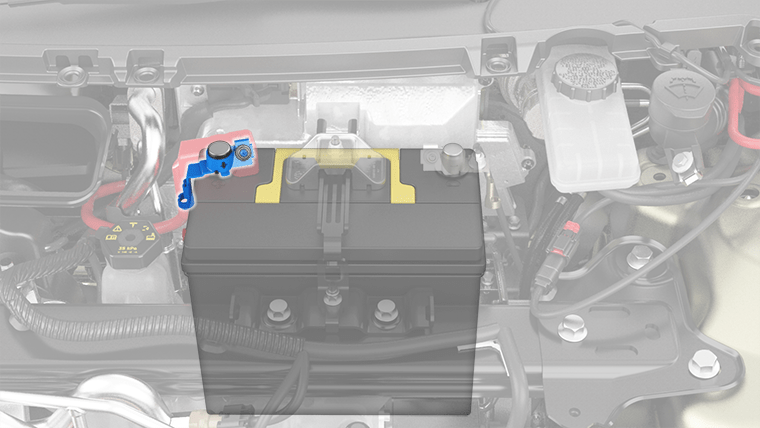
- With a 10mm socket, loosen the nut that secures the negative (-) terminal clamp to the negative (-) post on the low voltage lead-acid battery. Release the terminal clamp from the negative (-) post.
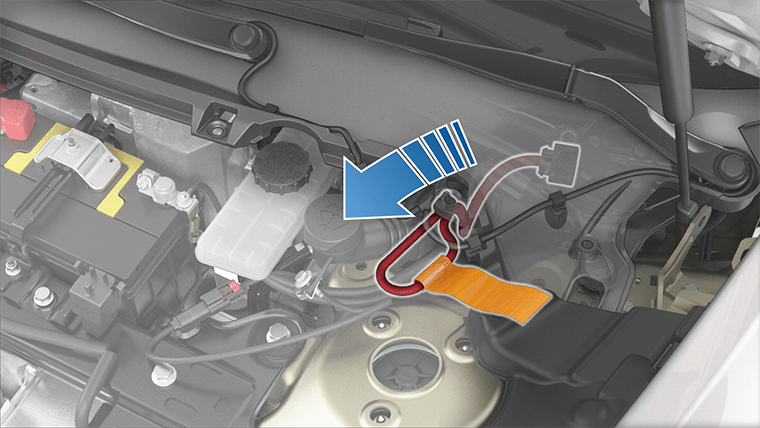
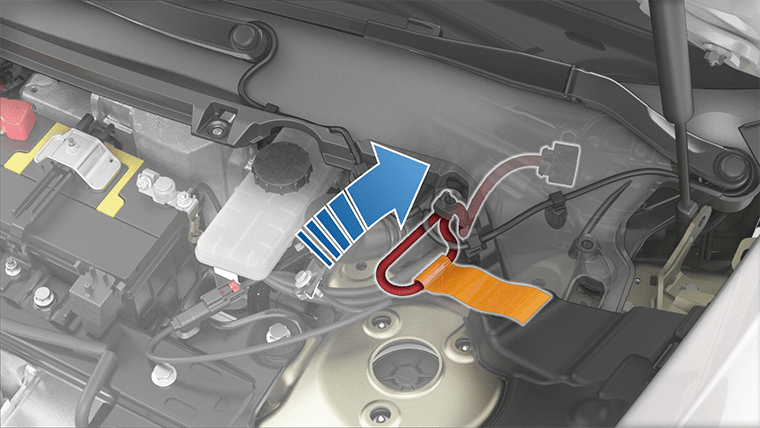
- In the front trunk, disconnect the first responder loop by sliding the red locking tab toward you, pressing the black tab, and releasing it. Set the first responder loop aside.
- With a 10mm socket, release the terminal cover and loosen the nut that secures the positive (+) terminal clamp to the positive (+) post on the low voltage lead-acid battery. Release the terminal clamp from the positive (+) post and cover the terminal clamp with a dry rag.CAUTIONDo not allow the positive (+) terminal clamp to contact nearby components like the low voltage lead-acid battery hold down bracket or A/C cooling lines.
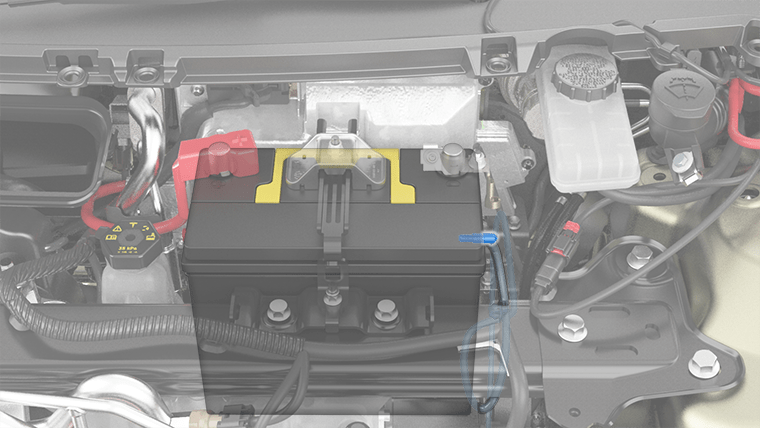
- Unplug the vent tube hose from the negative (-) terminal side of the low voltage battery.
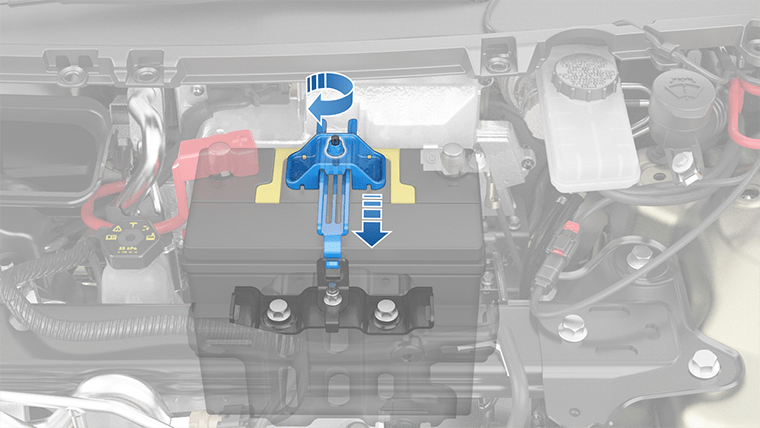
- With a 10mm socket, loosen the nut and release the battery hold down from the top of the low voltage lead-acid battery by unhooking and slipping it back. If needed, tilt the battery hold down backward so it does not slip into the vehicle.
- Carefully remove the low voltage lead-acid battery, taking care not to damage the surrounding components.WarningWhen lifting the lead-acid battery, stand in front of the vehicle and use proper lifting technique. The lead-acid battery weighs approximately 25 lb (12 kg). Failure to do so may cause serious injury.
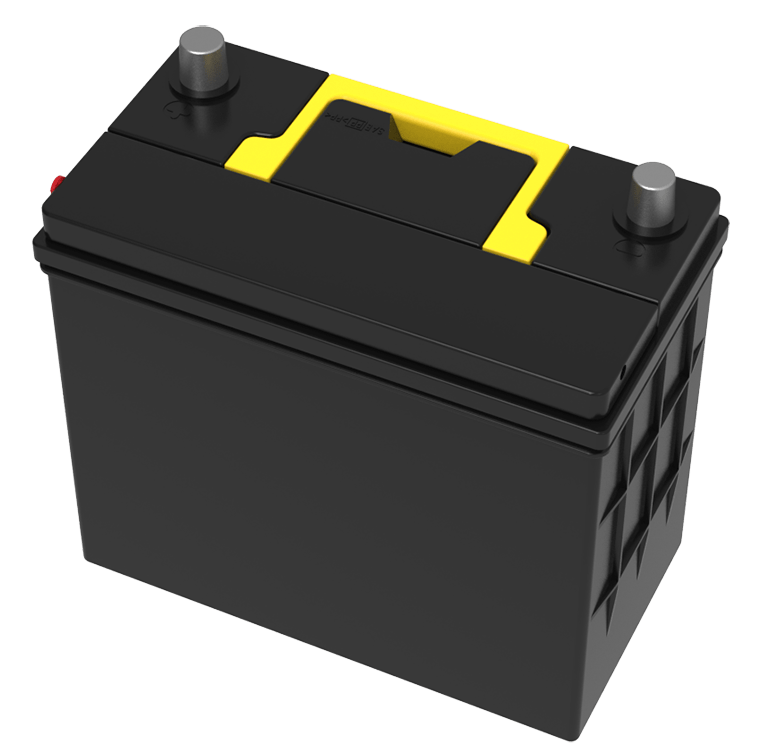
- Inspect the new low voltage lead-acid
battery to make sure it is equipped with a red plug on the positive (+) terminal side. If
the new lead-acid battery does not have a red plug, transfer the red plug from the old
battery to the new one.CAUTIONDispose of the old low voltage lead-acid battery at a Tesla Service Center, or according to local laws (such as dropping it off at a battery recycling facility). Keep the low voltage battery upright and place it on a towel or piece of cardboard when transporting.

Installation:
- Carefully place the new lead-acid battery in the vehicle, taking care not to damage nearby components.
- Install the low voltage lead-acid battery hold down and use a 10mm socket to tighten the nut that secures it to the battery. Torque the nut to 6 Nm (4.4 ft-lb).
- Reconnect the first responder loop.
- Remove the protective caps from the positive (+) and negative (-) posts on the new low voltage lead-acid battery.
- Reconnect the positive (+) terminal by positioning the terminal clamp over the terminal post. Using a 10mm socket, torque the nut to 6 Nm (4.4 ft-lb). Reinstall the positive (+) terminal cover.
- Reconnect the negative (-) terminal by positioning the terminal clamp over the connector. Using a 10mm socket, torque the nut to 6 Nm (4.4 ft-lb).
- Connect the vent tube hose into the negative (-) terminal side of the low voltage lead-acid battery.
- Open one of the vehicle’s doors to make sure power has been correctly restored and the touchscreen turns on (this may take several minutes).
- Reinstall the cabin intake duct.
- Replace the underhood apron by aligning the clips into their openings in the front trunk. Press down to lock them in place. The clips make an audible clicking sound when secured.
- Close the front trunk. If an alert to replace to low voltage lead-acid battery was previously shown on the touchscreen, ensure the alert no longer appears.
