Carrozzeria esterna (veicoli costruiti dopo il 17 febbraio 2022)
 10100142902
10100143002
10100142902
10100143002
Informazioni sulla riparazione
- Rivedere tutte le pratiche generali di riparazione in seguito a un incidente e la documentazione sulla sicurezza e indossare i DPI (dispositivi di protezione individuale) appropriati prima di iniziare questa procedura.
- Questa procedura può essere completata senza utilizzare un ponte sollevatore.
- Verificare che questa sia la procedura corretta: Fare riferimento a Carrozzeria esterna
- La carrozzeria esterna può essere:
- Sostituita in una singola riparazione come un unico componente completo, utilizzando la parte di ricambio della carrozzeria esterna completa e le istruzioni riportate nella sezione Procedura di riparazione del presente documento.
- Riparato utilizzando uno dei gruppi di ricambio pre-tagliati mostrati in Gruppi di ricambio carrozzeria esterna. Se si sostituisce una porzione della carrozzeria esterna (non l'intero gruppo carrozzeria esterna), servendosi di un gruppo di ricambio, utilizzare solo le porzioni pertinenti di ogni passaggio in Procedura di riparazione per determinare quali parti e dispositivi di fissaggio sono necessari e i passaggi richiesti per completare la riparazione.
- Riparato in sezioni più grandi o più piccole rispetto ai gruppi di ricambio. Qualsiasi sezione singola o combinazione di sezioni del gruppo carrozzeria esterna può essere sostituita a condizione che vengano seguite le linee guida di Linee guida per il sezionamento.
Verificare che questa sia la procedura di riparazione corretta
Esistono diverse varianti della procedura per la carrozzeria esterna. Utilizzare questa procedura solo se il veicolo è stato costruito dopo il 17 febbraio 2022. Se il veicolo è stato costruito fino al 17 febbraio 2022, fare riferimento alla proceduraCarrozzeria esterna (veicoli costruiti fino al 17 febbraio 2022).
Se la data di costruzione del veicolo non è certa, fare riferimento a Carrozzeria esterna per ulteriori informazioni.
Elenco parti
| Quantità | Descrizione | Immagine / Note |
|---|---|---|
| 1 | BODY SIDE OUTER COMPLETE (carrozzeria esterna completa) | |
| 2 | Rivetto svasato, 4,8 mm, corto | |
| 10 | Rivetto strutturale a strappo, 6,5 mm | |
| 2 | Rivetto strutturale svasato, 6,5 mm | |
| 3 | Rivetto Flow-Form S08 | |
| 5 | Rivetto Flow-Form S18 | |
| 9 | Rivetto Flow-Form S28 | |
| 15 | Rivetto Flow-Form S38 | |
| 7 | Rivetto Flow-Form S48 | |
| 7 | Bullone , M8x27 | Numero parte Tesla 1621820-00-A. |
| 2 | Instapak (imballaggio in schiuma espansa) | Numero parte Tesla 1046403-00-A. |
quando si ordinano i pezzi di ricambio, fare riferimento al Catalogo delle parti di ricambio e inserire il VIN del veicolo in riparazione per trovare le parti corrette (e i numeri di parte) per il veicolo. In alternativa, utilizzare la funzione di ricerca nel Catalogo delle parti di ricambio per trovare una parte specifica per il veicolo.
Gruppi di ricambio carrozzeria esterna
| Gruppi di ricambio carrozzeria esterna | |
|---|---|
| ASSY - BODY SIDE OTR COMP | ASSY - PNL-BODY SIDE OTR |
| ASSY - BODY SIDE OTR A-PILLAR | ASSY - BODY SIDE OTR C-PILLAR |
Linee guida per il sezionamento
- Se per la riparazione di una sezione è necessario rimuovere o installare gruppi o pannelli aggiuntivi, eseguire le procedure di riparazione specifiche di ciascun gruppo o pannello.
- Quando si esegue il sezionamento nell'area in cui il montante C si congiunge alla fiancata posteriore:
- Eseguire il taglio come descritto di seguito:
Linea di taglio
Linea/punto di riferimento
- A = 30 mm.
- B = 25 mm.
- C = 110mm.
- Creare e installare una piastra di supporto sotto il giunto di testa:
Saldatura GMA
o saldature a fori in alluminio
- Eseguire il taglio come descritto di seguito:
- Quando si esegue il sezionamento nell'area in cui il montante C superiore si congiunge alla guida del tetto:
- Rimuovere le saldature a punti nell'area superiore in cui il montante C si congiunge alla fiancata posteriore:
o saldature a punti di fabbrica
- Predisporre l'installazione.
- Rimuovere le saldature a punti nell'area superiore in cui il montante C si congiunge alla fiancata posteriore:
- È consentito creare un foro passante o un foro non funzionale (foro rivestimento esterno), come descritto di seguito.
- Non tagliare entro 25 mm dal centro di un foro per bullone.
- Le sezioni non richiedono dispositivi di fissaggio in corrispondenza dei giunti di testa se non espressamente indicato.
- È possibile installare una piastra di supporto in corrispondenza di un giunto di testa tra le sezioni (come descritto in creare e installare delle piastre di supporto).
- Gli spazi tra i pannelli dei giunti di testa devono essere quanto più piccoli possibile per ottimizzare la resistenza dei giunti.
- Eseguire una saldatura dei giunti di testa tra le sezioni.
- Sigillare tutte le giunture aperte dopo la saldatura.
- Se un giunto di testa include una flangia, non eseguire la saldatura sulla flangia (le flange vengono fissate solo tramite adesivo strutturale).
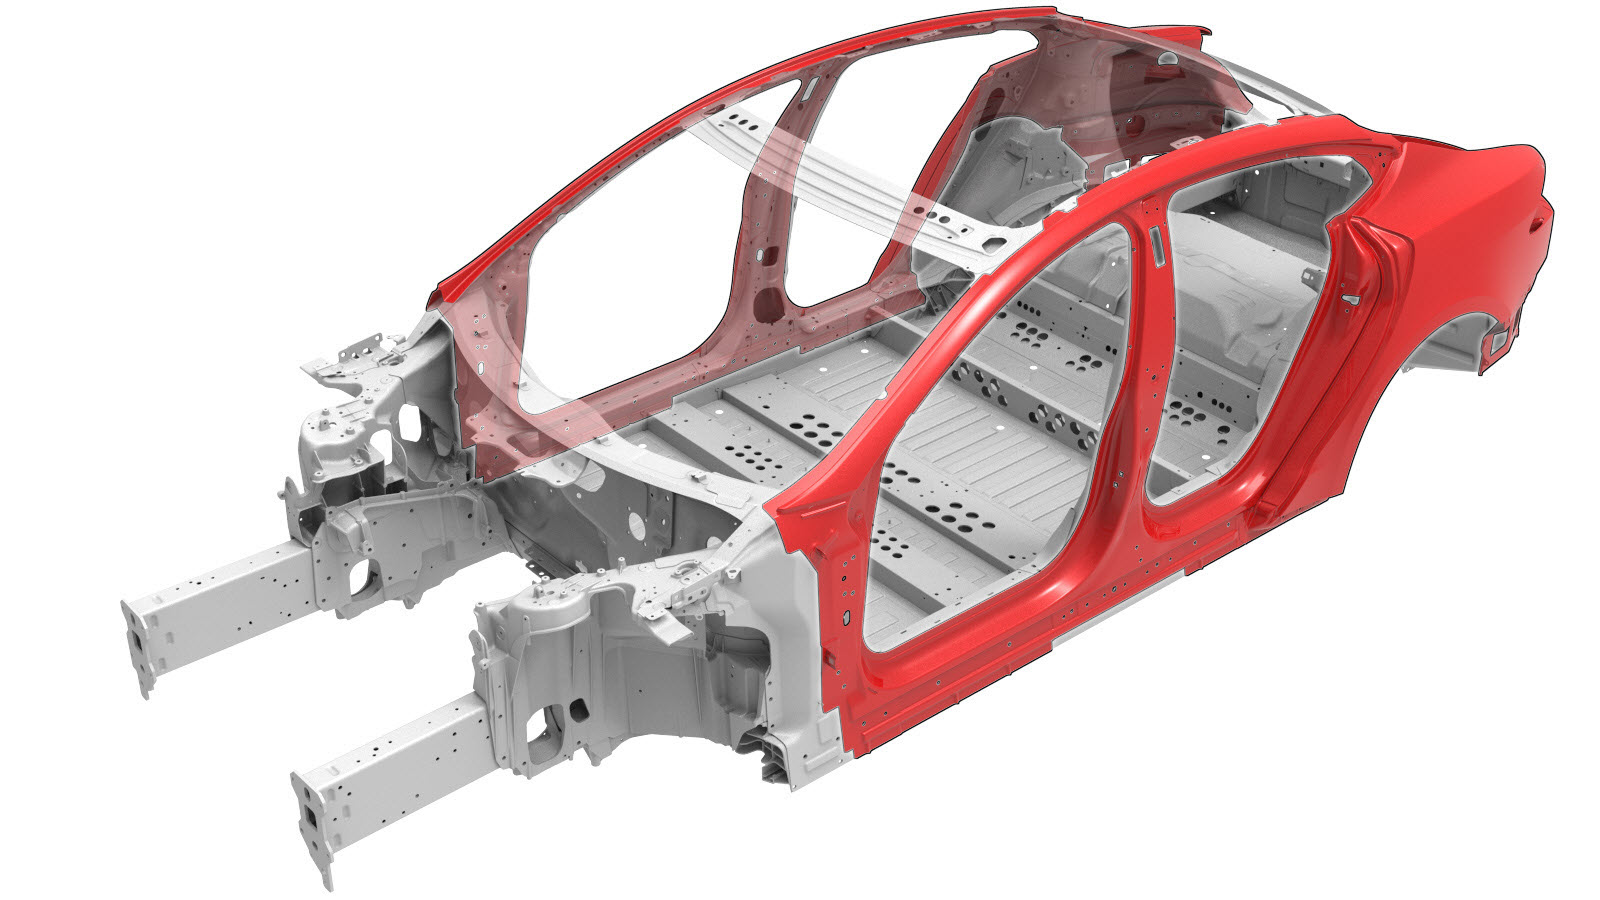
| Sezionamento carrozzeria esterna | |
|---|---|
|
Nota Il sezionamento di Gruppi di ricambio carrozzeria esterna è identico all'area corrispondente della carrozzeria esterna (completa). |
|
| Quando si esegue il sezionamento nell'area del passaruota, la flangia del passaruota nell'area mostrata in rosso può essere saldata. |
In base ai colori utilizzati nell'immagine sopra, le riparazioni consentite sono le seguenti:
| Colore area | Riparabilità dell'area |
|---|---|
| Aree verdi: | In queste aree il sezionamento è consentito. |
| Aree gialle: | In queste aree il sezionamento è consentito. Dietro il pannello esterno, in queste aree, potrebbe esserci schiuma. Nota Se si esegue il sezionamento in queste aree, rimuovere la schiuma e pulire l'area per evitare la contaminazione della saldatura. |
| Aree rosse: | Il sezionamento non è consentito. |
Procedura di riparazione
-
Se si ripara la sezione dog leg della carrozzeria esterna: Rimuovere Rivestimento fiancata esterno (veicoli costruiti dopo il 17 febbraio 2022).
-
Separare la flangia del passaruota posteriore.
NotaSe si sta riparando solo una sezione della carrozzeria esterna, separare solo la porzione necessaria di flangia bordata.
-
Rimuovere il componente originale.
o saldature a punti di fabbrica
o perforazione delle saldature a punti di fabbricaNotaDurante la perforazione di saldature a punti, utilizzare una punta da trapano che crei un foro delle giuste dimensioni per il dispositivo di fissaggio che sostituirà la saldatura a punti.o SPR di fabbrica
o bulloni
-
Applicare del sigillante per giunzioni sul nuovo componente.
-
Predisporre l'installazione.
NotaUna X rossa indica la posizione in cui un dispositivo di fissaggio installato in fabbrica non viene sostituito.
o rivetti strutturali a strappo, 6,5 mm
o rivetti svasati, 4,8 mm, corti
o rivetti strutturali svasati, 6,5 mm
o bulloni
- Se si ripara una sezione della carrozzeria esterna: Se vi è spazio sotto i giunti di testa tra le sezioni, creare e installare una piastra di supporto sotto ciascun giunto di testa.
- Applicare adesivo strutturale sulle superfici di accoppiamento del veicolo e del/i nuovo/i componente/i.
-
Installare il/i nuovo/i componente/i.
Serrare i bulloni a 24 Nm.
-
Se si sostituisce una sezione della carrozzeria esterna,
eseguire una saldatura GMA sui giunti di testa.
Saldatura GMA
o saldature a fori in alluminio
AvvertenzaNon saldare il pannello laddove entra direttamente in contatto con i pannelli ad alta resistenza sottostanti. Il calore della saldatura potrebbe indebolire la resistenza della sottostante struttura in acciaio ad alta resistenza.AvvertenzaLa mancata osservanza di tutte le precauzioni di sicurezza per la saldatura, incluso l'uso di dispositivi di protezione individuale, potrebbe causare gravi lesioni personali o danni alla proprietà. Solo i tecnici che hanno completato la formazione sulla saldatura approvata da Tesla sono autorizzati a saldare componenti strutturali sui veicoli Tesla.AvvertenzaPer mantenere l'integrità in caso di incidente del veicolo, utilizzare esclusivamente fili per saldatura approvati e saldatrici GMA approvate per eseguire una saldatura GMA sui veicoli Tesla. Fare riferimento a Saldatrici e filo per saldatura GMA (gas metal arc) approvati per informazioni sulle saldatrici GMA e sui fili per saldatura GMA approvati.AvvertenzaPrima di eseguire una saldatura GMA, assicurarsi che l'adesivo strutturale sia asciutto al tatto. Se l'adesivo strutturale non è asciutto al tatto prima della saldatura GMA, la forza del legame adesivo potrebbe essere compromessa.AvvertenzaNon effettuare saldature su un veicolo Tesla prima di aver eseguito la procedura di isolamento elettrico del veicolo (consultare il Manuale di manutenzione specifico del veicolo per ulteriori informazioni sulla procedura di isolamento elettrico del veicolo). Eventuali operazioni di saldatura su un veicolo Tesla con un sistema ad alta o bassa tensione eccitato potrebbe danneggiare i componenti del veicolo.NotaPrima di eseguire la saldatura GMA, effettuare una saldatura di prova utilizzando del materiale dello stesso calibro e tipo per assicurarsi che le impostazioni dell'attrezzatura di saldatura diano un risultato soddisfacente. -
Se si ripara la sezione dog leg della carrozzeria esterna: Installare Rivestimento fiancata esterno (veicoli costruiti dopo il 17 febbraio 2022).
-
Ripiegare la flangia del passaruota.
-
Installare Instapak.
Installare Instapak nella cavità tra il rivestimento esterno della fiancata e il rinforzo del montante C.
- Eseguire le eventuali operazioni post-riparazione necessarie.