车门安装环外件
 校正代码:
10100132602,
10100132502
注意: 除非本程序中有明确规定,否则上述校正代码涵盖执行本程序(包括关联碰撞维修程序以及服务程序)所需的所有碰撞维修和服务维修工作。除非明确要求,否则请勿堆叠碰撞维修校正代码。可能需要进行额外维修,具体视车辆损坏情况确定。
校正代码:
10100132602,
10100132502
注意: 除非本程序中有明确规定,否则上述校正代码涵盖执行本程序(包括关联碰撞维修程序以及服务程序)所需的所有碰撞维修和服务维修工作。除非明确要求,否则请勿堆叠碰撞维修校正代码。可能需要进行额外维修,具体视车辆损坏情况确定。
维修信息
- 只要使用本文档中 车门安装环外件区块说明 部分指定的参考切割线,即可更换车门安装环外件的任何一个区块或多个区块的任意组合。
- 在开始本程序之前,请查看所有碰撞维修一般实践和安全文档并佩戴适当的 PPE(个人防护装备)。
- 执行本程序时,请将车辆正确固定到车架工作台上。
零件清单
| 数量 | 描述 | 图片/备注 |
|---|---|---|
|
整体维修:1 注 仅适用于区块维修:一些区块维修需要第二个零件。请参阅车门安装环外件区块说明,以确定计划的区块维修是否需要其他零件。 |
MY ASY – DOOR RING OUTER SVC E-COATED(车门安装环外件) |
|
| 2 | 结构型灯笼铆钉,6.5 mm | |
| 3 | 流型铆钉 S28 | |
| 8 | 流型铆钉 S38 |
如需订购零件,请参阅零件目录,输入需维修车辆 VIN,查找车辆正确零件(以及零件号)。或者,也可以在零件目录中搜索,查找车辆专用零件。
车门安装环外件区块说明
| 车门安装环外件、次总成和次总成分区 | ||
|---|---|---|
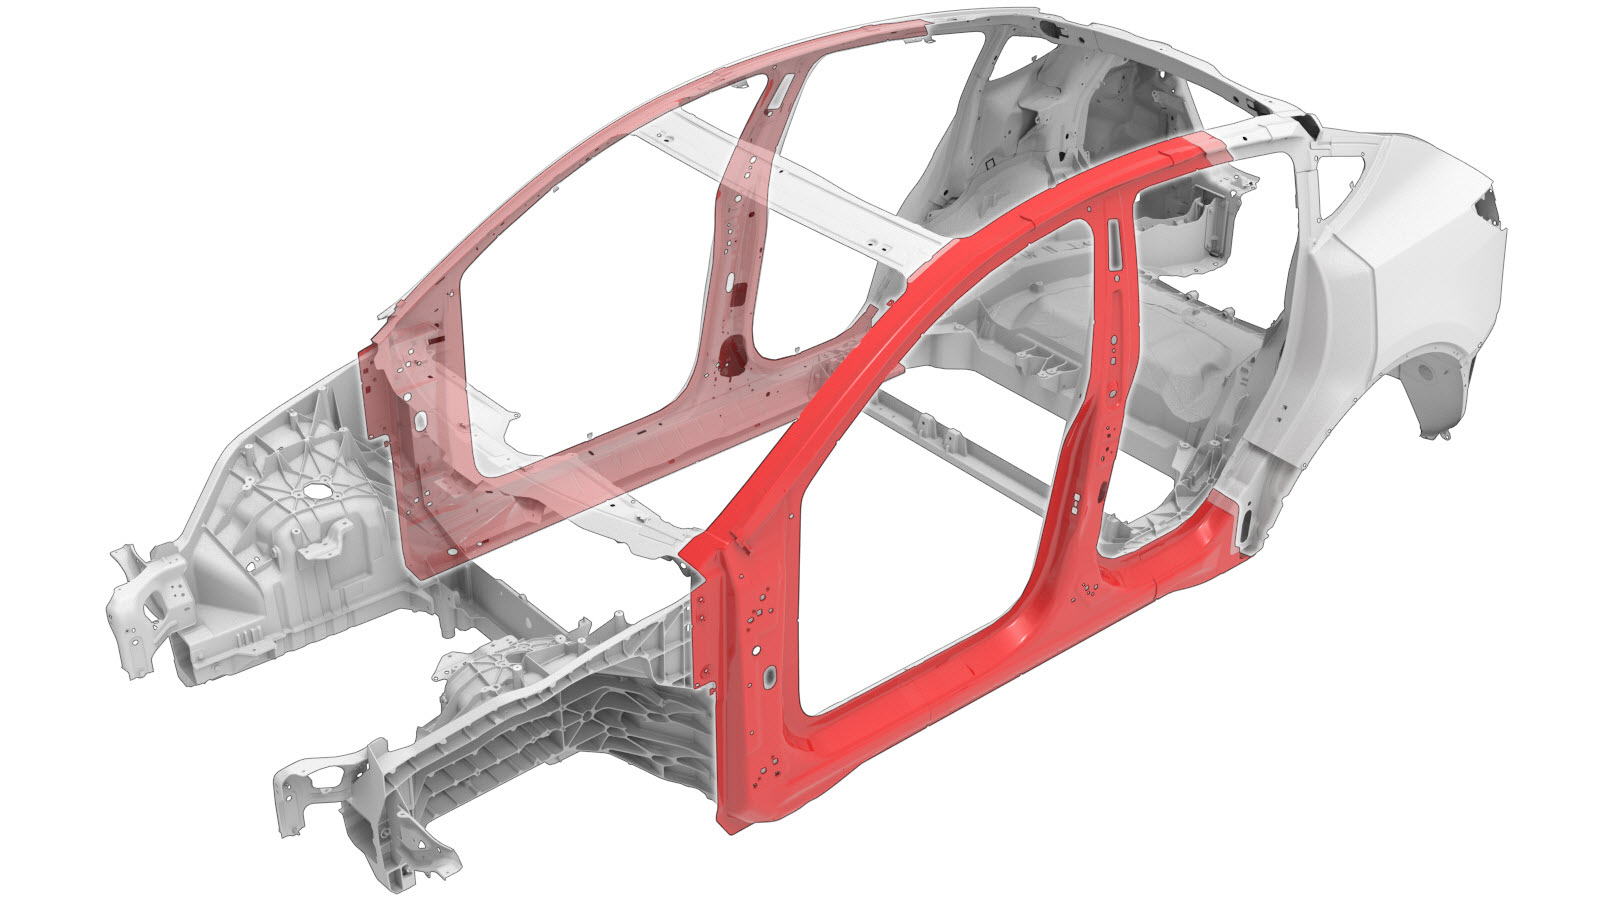
| 车门安装环外件(如下所示)属于单个组件,可整体维修: | ||
|
|
||
|
或者,也可以不更换整个车门安装环外件,而是使用本文档所述的切割线,分区域更换车门安装环外件的各个部分。 |
||
|
|
||
| 车门安装环外件区块 |
| 车门安装环外件区块说明 | |
|---|---|
|
铰链柱下部区块 切割线 参考线/点
注 执行该区块的维修时,再订购一个车门安装环外件。 注 对于铰链柱下部至 B 柱下部接头,制作并安装 80 毫米宽的加固板。均匀放置结构型灯笼铆钉,为靠近侧门槛插件的铆钉留出足够的底部间隙。 注 对于铰链柱下部至铰链柱上部接头,制作并安装 80 毫米宽的衬垫板,然后按指示进行安装。 或 结构型灯笼铆钉,6.5 毫米 – 最多 20。 |
铰链柱下部至 B 柱下部切割线
铰链柱上部至铰链柱下部切割线 铰链柱下部至 B 柱下部加固板 铰链柱上部至铰链柱下部衬垫板
|
|
铰链柱上部区块 切割线 参考线/点
注 执行该区块的维修时,再订购一个车门安装环外件。 注 对于铰链柱下部至铰链柱上部接头和铰链柱上部至 A 柱上部接头,制作并安装 80 毫米宽的衬垫板,然后按指示进行安装。 注 安装完 车身侧外件 组件之后再安装红圈标示的铆钉。 或 结构型灯笼铆钉,6.5 毫米 – 最多 15。 或 铆钉,4.8 毫米 – 最多 2。 |
铰链柱上部至铰链柱下部切割线 铰链柱上部至 A 柱上部切割线 铰链柱上部至铰链柱下部衬垫板
铰链柱上部至 A 柱上部衬垫板 |
|
A 柱上部区块 切割线 参考线/点
注 对于铰链柱上部至 A 柱上部接头和 A 柱上部至 B 柱上部接头,制作并安装 80 毫米宽的衬垫板,然后按指示进行安装。 或 结构型灯笼铆钉,6.5 毫米 – 最多 16。 或 铆钉,4.8 毫米 – 最多 4。 |
铰链柱上部至 A 柱上部切割线 A 柱上部至 B 柱上部切割线 铰链柱上部至 A 柱上部衬垫板 A 柱上部至 B 柱上部衬垫板 |
|
B 柱上部区块 切割线 参考线/点
注 执行该区块的维修时,再订购一个车门安装环外件。 注 对于 A 柱上部至 B 柱上部接头和 B 柱上部至 B 柱下部接头,制作并安装 80 毫米宽的衬垫板,然后按指示进行安装。 或 结构型灯笼铆钉,6.5 毫米 – 4。 或 铆钉,4.8 毫米 – 最多 8。 |
A 柱上部至 B 柱上部切割线 B 柱上部至 B 柱下部切割线 A 柱上部至 B 柱上部衬垫板 B 柱上部至 B 柱下部衬垫板 |
|
B 柱下部区块 切割线 参考线/点
注 执行该区块的维修时,再订购一个车门安装环外件。 注 对于 B 柱上部至 B 柱下部接头,制作并安装 80 毫米宽的衬垫板,然后按指示进行安装。 注 对于 B 柱下部至门槛后部接头,制作并安装 80 毫米宽的加固板,然后按指示进行安装。 或 结构型灯笼铆钉,6.5 毫米 – 最多 14。 或 铆钉,4.8 毫米 – 最多 8。 |
B 柱上部至 B 柱下部切割线 B 柱下部至门槛后部切割线 B 柱上部至 B 柱下部衬垫板 B 柱下部至门槛后部加固板 |
|
门槛后部区块 切割线 参考线/点
注 执行该区块的维修时,再订购一个车门安装环外件。 注 对于 B 柱下部至门槛后部接头,制作并安装 80 毫米宽的加固板,然后按指示进行安装。 或 结构型灯笼铆钉,6.5 毫米 – 10。
|
B 柱下部至门槛后部切割线 B 柱下部至门槛后部加固板 |
维修程序
-
拆下车身侧外件的必要部分,露出要更换的底层组件。
- 如果要更换车门安装环外件的某个区块:在 车门安装环外件区块说明 中指定的区块切割线位置标记车门安装环外件。
-
拆卸原装部件。
- 或 钻透原厂点焊焊缝
注钻除点焊焊缝时,请确保使用的钻头能钻出一个大小合适的孔,以便用紧固件代替点焊焊缝。- 或 原厂点焊焊缝
-
拆卸原装部件。
- 或 钻透原厂点焊焊缝
注钻除点焊焊缝时,请确保使用的钻头能钻出一个大小合适的孔,以便用紧固件代替点焊焊缝。- 或 原厂点焊焊缝
- 仅适用于区块维修:按 车门安装环外件区块说明 中所述方式,制作衬垫板或加固板。
-
准备安装。
- 或 安装点焊焊缝
- 或 结构型灯笼铆钉,6.5 毫米
- 或 流型铆钉,S28
-
准备安装。
- 或 安装点焊焊缝
- 或 结构型灯笼铆钉,6.5 毫米
- 在车辆接合面以及新部件上涂抹结构型粘合剂。
- 仅适用于区块维修:按 车门安装环外件区块说明 中所述方式,安装衬垫板或加固板。
- 安装新部件。
-
执行电阻点焊。
- 或 安装点焊焊缝
警告未遵守包括使用个人防护装备在内的任何焊接安全注意事项,可能导致严重的人身伤害或财产损失。只有已完成 Tesla 认可的焊接培训课程的维修技师才有权在 Tesla 车辆上焊接结构组件。警告切勿在执行车辆电气绝缘程序前焊接 Tesla 车辆(请参阅车辆专用维修手册,了解有关车辆电气绝缘程序的更多信息)。在具有通电高压或低压系统的 Tesla 车辆上进行焊接可能会损坏车辆部件。 -
安装先前为露出更换组件而拆下的车身侧外件部分。
-
按指示安装紧固件。
- 或 流型铆钉,S38
-
按指示安装紧固件。
- 或 流型铆钉,S38
-
仅限铰链柱区块维修:在指定位置安装红色圆圈标示的紧固件。
- 执行任何必要的维修后操作。