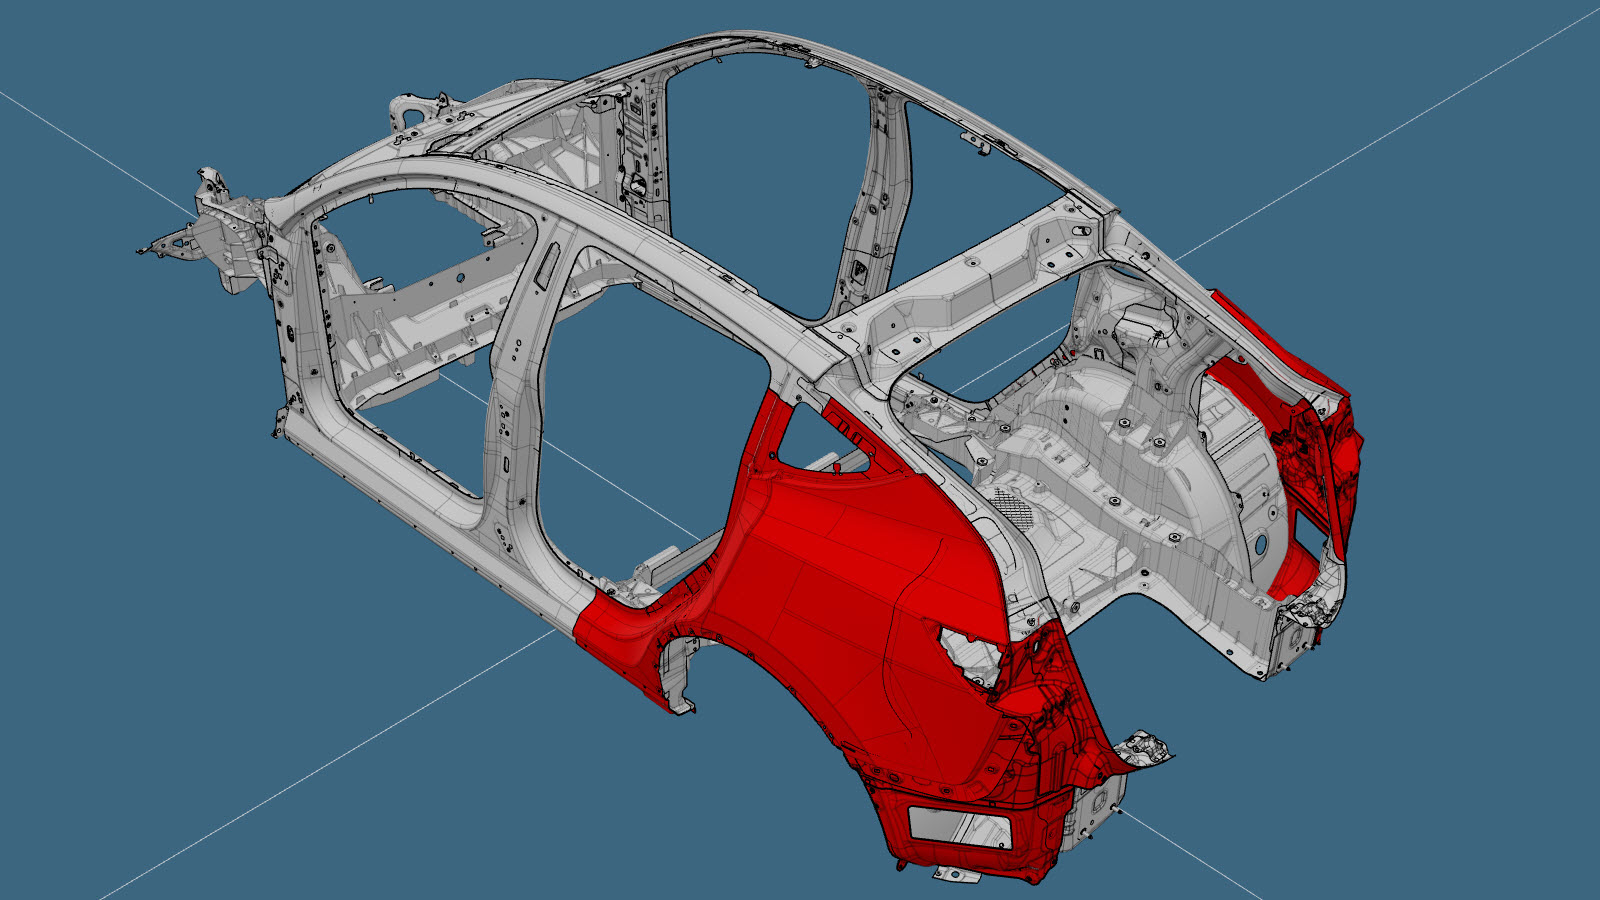
Sidepanelenhet (uten øvre kanal)
 Korrigeringskode:
10100135802,
10100135902
MERK: Med mindre det er uttrykkelig oppgitt i prosedyren, omfatter korrigeringskoden ovenfor all kollisjonsreparasjon og servicereparasjon som kreves for å gjennomføre denne prosedyren, inkludert de tilknyttede prosedyrene for kollisjonsreparasjon og de tilknyttede serviceprosedyrene. Ikke stable korrigeringskoder for kollisjonsreparasjon med mindre du blir uttrykkelig bedt om det. Ytterligere reparasjoner kan være nødvendig, avhengig av skaden på bilen.
Korrigeringskode:
10100135802,
10100135902
MERK: Med mindre det er uttrykkelig oppgitt i prosedyren, omfatter korrigeringskoden ovenfor all kollisjonsreparasjon og servicereparasjon som kreves for å gjennomføre denne prosedyren, inkludert de tilknyttede prosedyrene for kollisjonsreparasjon og de tilknyttede serviceprosedyrene. Ikke stable korrigeringskoder for kollisjonsreparasjon med mindre du blir uttrykkelig bedt om det. Ytterligere reparasjoner kan være nødvendig, avhengig av skaden på bilen.
Reparasjonsinformasjon
- Enhver individuell seksjon eller kombinasjon av seksjoner av ytre karosserisideenhet kan skiftes ut så lenge de henviste skjærelinjene fra delen Beskrivelse av seksjoner av sidepanelenheten i dette dokumentet brukes.
- Gjennomgå all generell praksis og sikkerhetsdokumentasjon for kollisjonsreparasjon, og ta på deg egnet personlig verneutstyr før du starter denne prosedyren.
- Denne prosedyren kan utføres uten å bruke rammeløfter.
Bruke dette dokumentet
- Beskrivelse av seksjoner av sidepanelenheten gir informasjon om hvor og hvordan du deler opp sidepanelenheten (eller underenheter) etter behov for å skifte ut skadde områder på sidepanelenheten eller for å få tilgang til underliggende deler av bilstrukturen. Bruk beskrivelsene av seksjonene til å avgjøre hvor du kan dele opp den utvendige karosserisideenheten etter behov for reparasjonen som utføres.MerkSeksjoner av sidepanelenheten kan skiftes ut enkeltvis eller i hvilken som helst kombinasjon av seksjoner så lenge de henviste skjæreplasseringene som er identifisert i dette dokumentet, brukes.MerkMålinger fra bolthullplasseringer er fra midten av de henviste hullene med mindre noe annet er oppgitt i beskrivelsen av seksjonen.
- Delen Reparasjonsprosedyre i dette dokumentet inneholder informasjonen som er nødvendig for å skifte ut hele sidepanelenheten. Hvis du skifter ut seksjoner av sidepanelet (ikke hele sidepanelenheten), må du bruke de relevante delene av hvert trinn for å avgjøre hvilke deler og festeanordninger som trengs, og trinnene som kreves for å fullføre reparasjonen.
Deleliste
| Antall | Beskrivelse | Bilde/merknader |
|---|---|---|
| 1 | ASSEMBLY - REAR QUARTER COMPLETE (bakre sidepanelenhet) | |
| 5 | Konstruksjonspopnagle, 6,5 mm | |
| 11 | Flow Form-nagle S18 |
Når du bestiller deler, må du se delekatalogen og angi understellsnummeret for bilen som repareres for å finne de riktige delene (og delenumrene) for bilen. Alternativt kan du bruke søkerfunksjonen i delekatalogen for å finne en spesifikk del for bilen.
Beskrivelse av seksjoner av sidepanelenheten
| Oppdeling av sidepanelenheten | ||
|---|---|---|
| Sidepanelenheten er én enkelt enhet og kan skiftes ut som én enkelt reparasjon. Eller, i stedet for å skifte ut hele sidepanelenheten, kan områder av ytre sidepanel skiftes ut ved å bruke deler av hele sidepanelenheten ved å bruke skjærelinjene som er beskrevet i dette dokumentet. | ||
|
|
| Beskrivelse av seksjoner av sidepanel | Beskrivelser av skjøt |
|---|---|
|
Seksjon av ytterste sidepanel Referanselinje/-punkt
Skjærelinje
Merk Se prosedyren Karosseriside utvendig for retningslinjer for oppdeling. GMA-sveising Merk Avstanden mellom de tilstøtende panelene til skjøten uten overlapping for denne seksjonen bør være så liten som mulig for å maksimere skjøtstyrken. |
|
|
Seksjon av dørstokk bak Referanselinje/-punkt
Skjærelinje
Merk Se prosedyren Karosseriside utvendig for retningslinjer for oppdeling. GMA-sveising Merk Avstanden mellom de tilstøtende panelene til skjøten uten overlapping for denne seksjonen bør være så liten som mulig for å maksimere skjøtstyrken. |
|
|
Seksjon av støttestag Referanselinje/-punkt
Skjærelinje
Merk Se prosedyren Karosseriside utvendig for retningslinjer for oppdeling. GMA-sveising Merk Avstanden mellom de tilstøtende panelene til skjøten uten overlapping for denne seksjonen bør være så liten som mulig for å maksimere skjøtstyrken. |
|
|
Seksjon av bakre takramme Merk Hvis reparasjonsområdet inkluderer noen del av takskinnen, må du ikke bruke denne prosedyren, men i stedet se prosedyren Karosseriside utvendig. |
Reparasjonsprosedyre
- Fjern Brightwork - Upper - LH (Remove and Replace).
- Fjern Glass - Body - Rear Quarter - LH (Remove and Replace).
- Fjern Striker - Door - Rear - LH (Remove and Replace).
- Fjern Carrier - Rocker Panel - LH (Remove and Replace).
- Fjern Wheel Arch Liner - Rear - LH (Strukturell pakke) (Remove and Replace).
- Fjern Bracket - Rear Wing - LH (Remove and Replace).
- Fjern Bracket - Taillight - LH (Remove and Replace).
- Fjern Panel Assembly - Rear (Remove and Replace).
- Fjern Air Extractor - LH (Remove and Replace).
- Fjern Reflex Lens - Rear - RH (Remove and Replace).
- Fjern Door Assembly - Charge Port (NA) (Remove and Replace).
- Fjern Charge Port (NACS) (Remove and Replace).
- Bare komponent på høyre side: Fjern Amplifier - Audio - External (Remove and Replace).
- Bare komponent på høyre side: Fjern Subwoofer (Remove and Replace).
- Bare komponent på venstre side: Fjern Insulator - Wheelhouse - LH (Remove and Replace).
- Bare komponent på høyre side: Fjern Wheelhouse Insulator - Rear - RH (Remove and Replace).
-
Fjern øvre kanel fra servicedelen for bakre sidepanelenhet.
- eller Bor gjennom fabrikkpunktsveisinger
MerkNår du borer ut punktsveisinger, bruker du et bor som lager et hull med korrekt størrelse for festeanordningen som skal erstatte punktsveisingen.- eller Fabrikkpunktsveisinger
-
Fjern øvre kanel fra servicedelen for bakre sidepanelenhet.
- eller Fabrikkpunktsveisinger
-
Fjern øvre kanel fra servicedelen for bakre sidepanelenhet.
- eller Fabrikkpunktsveisinger
-
Fjern øvre kanel fra servicedelen for bakre sidepanelenhet.
- eller Fabrikkpunktsveisinger
-
Fjern den opprinnelige komponenten.
- eller Fabrikkpunktsveisinger
- eller SPR-er fra fabrikk
-
Fjern den opprinnelige komponenten.
- eller Bor gjennom fabrikkpunktsveisinger
MerkNår du borer ut punktsveisinger, bruker du et bor som lager et hull med korrekt størrelse for festeanordningen som skal erstatte punktsveisingen.- eller Fabrikkpunktsveisinger
- eller SPR-er fra fabrikk
-
Fjern den opprinnelige komponenten.
- eller Bor gjennom fabrikkpunktsveisinger
MerkNår du borer ut punktsveisinger, bruker du et bor som lager et hull med korrekt størrelse for festeanordningen som skal erstatte punktsveisingen.- eller Fabrikkpunktsveisinger
-
Fjern den opprinnelige komponenten.
- eller Fabrikkpunktsveisinger
-
Fjern den opprinnelige komponenten.
- eller Fabrikkpunktsveisinger
-
Klargjør for montering.
MerkEn rød X indikerer en plassering der en fabrikkmontert festeanordning ikke skiftes ut.
- eller Konstruksjonspopnagler, 6,5 mm
- eller Flow Form-nagler, S18
- GMA-sveising
- eller Monteringspunktsveisinger
-
Klargjør for montering.
MerkEn rød X indikerer en plassering der en fabrikkmontert festeanordning ikke skiftes ut.
- eller Konstruksjonspopnagler, 6,5 mm
- eller Flow Form-nagler, S18
- GMA-sveising
- eller Monteringspunktsveisinger
- eller Stålpluggsveisinger
-
Klargjør for montering.
MerkEn rød X indikerer en plassering der en fabrikkmontert festeanordning ikke skiftes ut.
- eller Flow Form-nagler, S18
- eller Monteringspunktsveisinger
- eller Stålpluggsveisinger
-
Klargjør for montering.
MerkEn rød X indikerer en plassering der en fabrikkmontert festeanordning ikke skiftes ut.
- eller Flow Form-nagler, S18
- eller Monteringspunktsveisinger
- eller Stålpluggsveisinger
- Påfør konstruksjonslim på kontaktflatene på bilen og den nye komponenten eller komponentene.
- Monter den nye komponenten eller komponentene.
-
Gjennomfør motstandspunktsveising.
- eller Monteringspunktsveisinger
ADVARSELHvis ikke alle forholdsregler for sveising, inkludert bruk av personlig verneutstyr, følges, kan dette føre til alvorlig personskade eller skade på eiendom. Bare teknikere som har fullført Teslas godkjente sveiseopplæring, er autorisert til å sveise strukturelle komponenter på Tesla-biler.ADVARSELIkke sveis på en Tesla-bil før du utfører prosedyren for elektrisk isolering av bilen (se bilspesifikk servicehåndbok for mer informasjon om prosedyren for elektrisk isolering av bilen). Hvis du sveiser på en Tesla-bil med et strømførende høyspenningssystem eller lavspenningsystem, kan bilkomponenter bli skadet. -
Utfør GMA-sveising.
- eller Stålpluggsveisinger
- GMA-sveising
ADVARSELHvis ikke alle forholdsregler for sveising, inkludert bruk av personlig verneutstyr, følges, kan dette føre til alvorlig personskade eller skade på eiendom. Bare teknikere som har fullført Teslas godkjente sveiseopplæring, er autorisert til å sveise strukturelle komponenter på Tesla-biler.ADVARSELFor å opprettholde kjøretøysikkerheten må du kun bruke den godkjente sveisetråden og et godkjent GMA-sveiseapparat som er angitt i dette dokumentet når du utfører GMA-sveising på Tesla-biler. Se Godkjente GMA-sveiseapparater (Gas Metal Arc) og -sveisetråd for informasjon om godkjente GMA-sveiseapparater og sveisetråd.ADVARSELIkke sveis på en Tesla-bil før du utfører prosedyren for elektrisk isolering av bilen (se bilspesifikk servicehåndbok for mer informasjon om prosedyren for elektrisk isolering av bilen). Hvis du sveiser på en Tesla-bil med et strømførende høyspenningssystem eller lavspenningsystem, kan bilkomponenter bli skadet.MerkFør GMA-sveising bør det gjennomføres en testsveising med materiale av samme dimensjon og type for å sikre at innstillingene til sveiseutstyret gir en tilfredsstillende skjøt. - Utfør nødvendige operasjoner etter reparasjon.
- Bare komponent på høyre side: Monter Wheelhouse Insulator - Rear - RH (Remove and Replace).
- Bare komponent på venstre side: Monter Insulator - Wheelhouse - LH (Remove and Replace).
- Bare komponent på høyre side: Monter Subwoofer (Remove and Replace).
- Bare komponent på høyre side: Monter Amplifier - Audio - External (Remove and Replace).
- Bare komponent på venstre side: Monter Charge Port (NACS) (Remove and Replace).
- Bare komponent på venstre side: Monter Door Assembly - Charge Port (NA) (Remove and Replace).
- Monter Reflex Lens - Rear - RH (Remove and Replace).
- Monter Air Extractor - LH (Remove and Replace).
- Monter Panel Assembly - Rear (Remove and Replace).
- Monter Bracket - Taillight - LH (Remove and Replace).
- Monter Bracket - Rear Wing - LH (Remove and Replace).
- Monter Wheel Arch Liner - Rear - LH (Strukturell pakke) (Remove and Replace).
- Monter Carrier - Rocker Panel - LH (Remove and Replace).
- Monter Striker - Door - Rear - LH (Remove and Replace).
- Monter Glass - Body - Rear Quarter - LH (Remove and Replace).
- Monter Brightwork - Upper - LH (Remove and Replace).