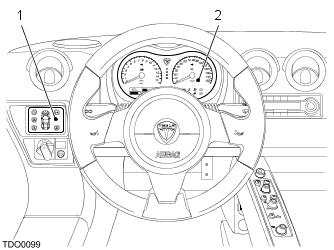
- Touch screen
- Instrument pack
The vehicle utilizes an instrument pack, located above the steering column, and a touch screen, located on the dash to the LH side of the steering column, to relay information to the driver.
Instrumentation

The vehicle utilizes an instrument pack, located above the steering column, and a touch screen, located on the dash to the LH side of the steering column, to relay information to the driver.
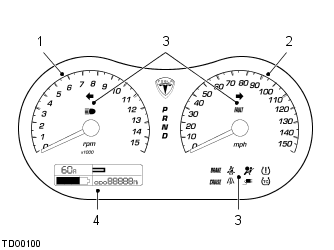
The tachometer displays the speed of the motor when in operation with a range of 0-15,000 RPM in 1,000 rpm increments.
The speedometer displays the speed of the vehicle with a range of 0-150 mph in 10 mph increments.
A number of warning lamps and indicators are located within the instrument pack, these are:
Liquid Crystal Display (LCD) Panel
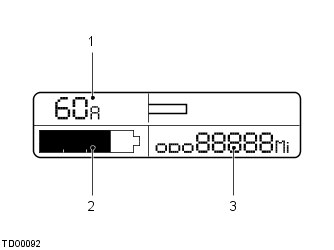
The ammeter displays information about the electrical current either entering or leaving the battery. The numbers at the top LH side of the LCD indicates the current flow in amps. The extending bar on the top right of the LCD indicates the amount of current by the length of the bar and also the direction the current is flowing. The size of the filled region within the battery icon indicates the remaining charge in the battery.
The odometer and trip display has three possible display modes:
To scroll through the three display modes, press the button located on the RH side of the steering column. The ODO mode displays the total miles travelled by the vehicle in its lifetime. The TRIP mode displays the miles travelled since the trip display was last reset. To reset the trip display to zero, press and hold the button on the RH side of the steering column for approximately one second. The RANGE mode displays the current estimated range of the vehicle in miles, based on the remaining charge in the battery.
NOTE: The range is estimated and the actual range may be less, depending on driving style and usage of other electrical systems, such as air conditioning, headlights etc.
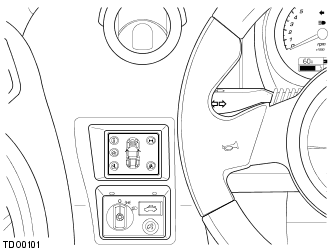
The screen displays information in three modes:
NOTE: The range of information and different screens available to view varies according to the current display mode.
The standard display displays the estimated vehicle range, the remaining vehicle charge, outside air temperature, current compass heading and height above sea level.
The background illumination on the instrument pack and touch screen can be adjusted by rotating the illumination control counter-clockwise or clockwise. The illumination control is located on the dash below the touch screen.
The tachometer receives a motor speed signal from the Power Electronics Module (PEM).
A wheel speed sensor is fitted to each forged steel hub carrier. A toothed reluctor integrated within the hub rotates with the wheel. As each tooth passes the tip of the sensor a voltage is induced, this signal is sent to the Anti-lock Braking System (ABS) ECU.
The signal is sent from the ABS ECU to the Digital Motor Controller (DMC) which is integrated into the PEM. The DMC calculates vehicle speeds from the four ABS reported wheel speeds, it is the frequency of these signals that determines the speed of the vehicle. The exact formula depends on how many wheel speeds are valid and if the vehicle is accelerating or decelerating. A wheel sample is considered to be accelerating if it is faster than the previous sample.
When all 4 ABS wheel speeds are valid the DMC reports the minimum or maximum wheel speed as vehicle speed. The minimum wheel speed is used when the vehicle is accelerating (more than two wheels are accelerating), otherwise the maximum wheel speed is used. When one, two, or three wheel speeds are valid the DMC reports the average of the valid wheel speeds as vehicle speed. When no wheel speeds are valid or the ABS has lost communications the DMC will use the motor speed for vehicle speed.
The high beam indicator illuminates when the headlight high beams are selected.
The turn signal indicators flash to indicate which turn signals are operating. Both turn signal indicators will flash when the hazard warning lights are operating. If the turn signal indicator flashes fast or irregular, one of the turn signal bulbs may be faulty.
The brake warning indicator illuminates when the parking brake is applied. If the indicator illuminates at any other time, a fault with the brake system has been detected:
| WARNING: Driving the vehicle with the warning indicator illuminated could result in serious injury or death. Stop the vehicle as soon as safety permits and rectify the problem immediately. |
When the charge door is opened the charge indicator will illuminate amber. The charge indicator illuminates red when the charge port is open.
Tire Pressure Monitoring System (TPMS) Warning
The TPMS warning illuminates when a low tire pressure is detected. If a fault with the TPMS is detected the warning indicator will flash.
The seat belt warning indicator illuminates whenever the driver’s seat belt is unbuckled and the key is in the ON position.
The air bag warning indicator illuminates during the system check when the key is in the ON position and should extinguish within approximately six seconds. If the indicator fails to illuminate or extinguish after six seconds, the system has detected a fault.
| WARNING: If the air bag indicator is illuminated the air bag system will be deactivated. |
The fault indicator illuminates yellow when a non-critical fault is detected. The fault indicator illuminates red when a critical fault is detected. This can be accompanied by a loss of drive or charge.
The traction control indicator illuminates continuously whenever the traction control has been manually deactivated and flashes during traction control operation.
The cruise control indicator illuminates whenever the cruise control system is operating.
The frost warning indicator illuminates when the temperature outside the vehicle is below 35ºF (2ºC).
When the key is in the ON position, the gear selector indicators will briefly illuminate red and then green in sequence. Once the vehicle start-up sequence has been completed, the indicator corresponding to the currently selected gear will remain illuminated.
Liquid Crystal Display (LCD) Panel
The LCD panel in the instrument pack is operational whenever the key is in the ON position. The ammeter shows the instantaneous current leaving/entering the battery. Current is displayed both numerically and graphically. If a solid bar extends to the left of the vertical line, then the battery is recharging (from regenerative braking). If an open bar extends to the right of the vertical line, then the battery is discharging by powering the vehicle.
NOTE: Occasionally the screen may not respond when you touch an icon. If you experience this it could be that the screen and touch sensor require calibrating. The touch screen can perform a color test to determine if the display is working correctly.
Three types of alerts are displayed on the touch screen:
A hint is a message displayed in box with a blue surround and suggests an operation that the driver should do. A warning is a message displayed in a box with a yellow surround and displayed an instruction that the driver must do. A warning is a message displayed in a box with an orange surround and alerts the driver to a fault with the vehicle.
If more than one alert is present then the number of alerts will be displayed in the top LH of the touch screen.
Whenever the parking brake is applied, the display on the touch screen will change to the Vehicle Parked screen. The Vehicle Parked screen displays information about the current status of the vehicle as well as the remaining charge in the battery and the distance travelled since the battery was last charged.
The following screens are available:
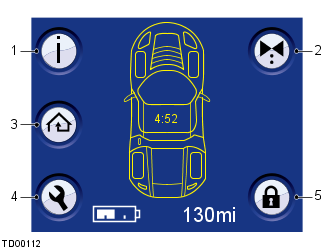
The Information screen provides easy access to information about the vehicle. Touch the respective icon to display the required information:
The Valet mode screen allows the driver to enter a PIN to restrict the vehicle’s acceleration to 50% and the top speed to 50 mph. Valet mode is designed for situations where the vehicle is parked by another person.
The Valet mode screen will display the total distance driven when in Valet mode, the maximum speed reached, the number of unlock attempts made and the number of times that the trunk is opened.
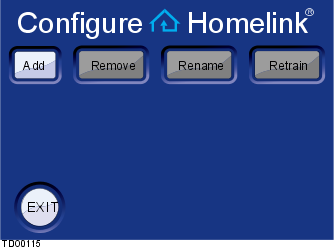
The HomeLink® screen can be used to set up control of up to three HomeLink® devices such as a garage door opener, home lighting or security gates. Once a device has been set up, the HomeLink® button will be displayed on all primary screens and the device(s) can be operated by touching the button.
In addition to adding a HomeLink® device, it is also possible, to remove, rename or retrain the device(s). Retrain is exactly the same as 'Add', except that existing device name is retained.
For further information, refer to www.homelink.com
The Settings screen allows easy access to the user configurable features of the vehicle. The settings are spread over three pages. Within each setting icon, touch the respective icon to access the respective setting screen/or adjust a setting.
Use the Tow Mode screen within the Settings Screen to put the vehicle in tow mode. When the vehicle is in tow mode, operation of the transmission lock is inhibited, allowing the vehicle to free roll when the key is removed from the ignition switch.
NOTE: The vehicle cannot be charged when in tow mode.
On the page 3 of the Setting screen, an icon is displayed to allow the calibration of the touch screen to be performed. To perform touch screen calibration:
The Security PIN screen allows the driver to inhibit starting and driving until the security PIN is entered. Touch the Set Security PIN Code option. If a security PIN code has been previously set, you will be asked to enter the PIN. Enter the PIN by touching the numbers on the screen and then touch OK. Providing that a vehicle PIN code has been previously set, the PIN Code Set screen will be displayed. If no PIN code has been set, the warning Set PIN Code will be displayed on the screen, where the PIN must be entered twice to confirm.
To deactivate the Security lock, enter the PIN and then touch OK. If the correct PIN code was entered, the touch screen will display the main Vehicle Parked screen. If you enter an incorrect PIN code, the message Invalid Entry will be displayed. Either enter the correct PIN code or touch the Exit icon to return to the previous screen.
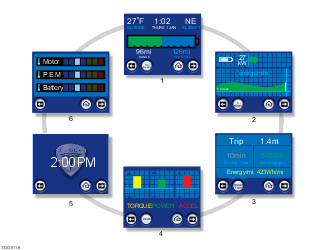
Whenever the parking brake is released, the display on the touch screen will change to the default Drive screen. There are up to six drive screens that can displayed on the touch screen. Touch the left and right arrows to cycle between them.
The following screens are available in Drive mode:
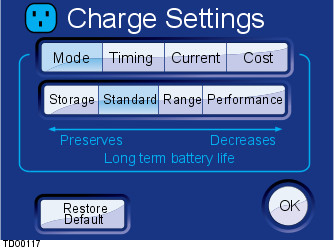
When the charge port is open, or the parking brake is on and the key is in the ACC position, the touch screen will allow the Charge Settings screen to be displayed on page 1 of the Settings screen. The following screens are available:
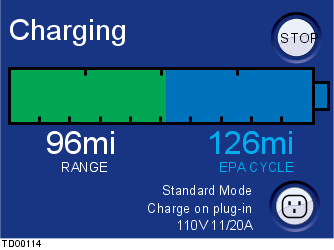
When charging begins, the Charging screen will be displayed. The charge level is displayed numerically and graphically up to a maximum of 100%.